

Introduction
One of the most complex tasks in the Oracle NetSuite workflow is setting up a spend approval process for your company. The most common use cases are for Customers, Vendor Bills, Purchase Orders and Journal Entries - but you can set up approval routing for literally anything in NetSuite.
To help you do this, Oracle has provided a native NetSuite concept called the Workflow, which allows you to set up a flowchart/routing map of your process.
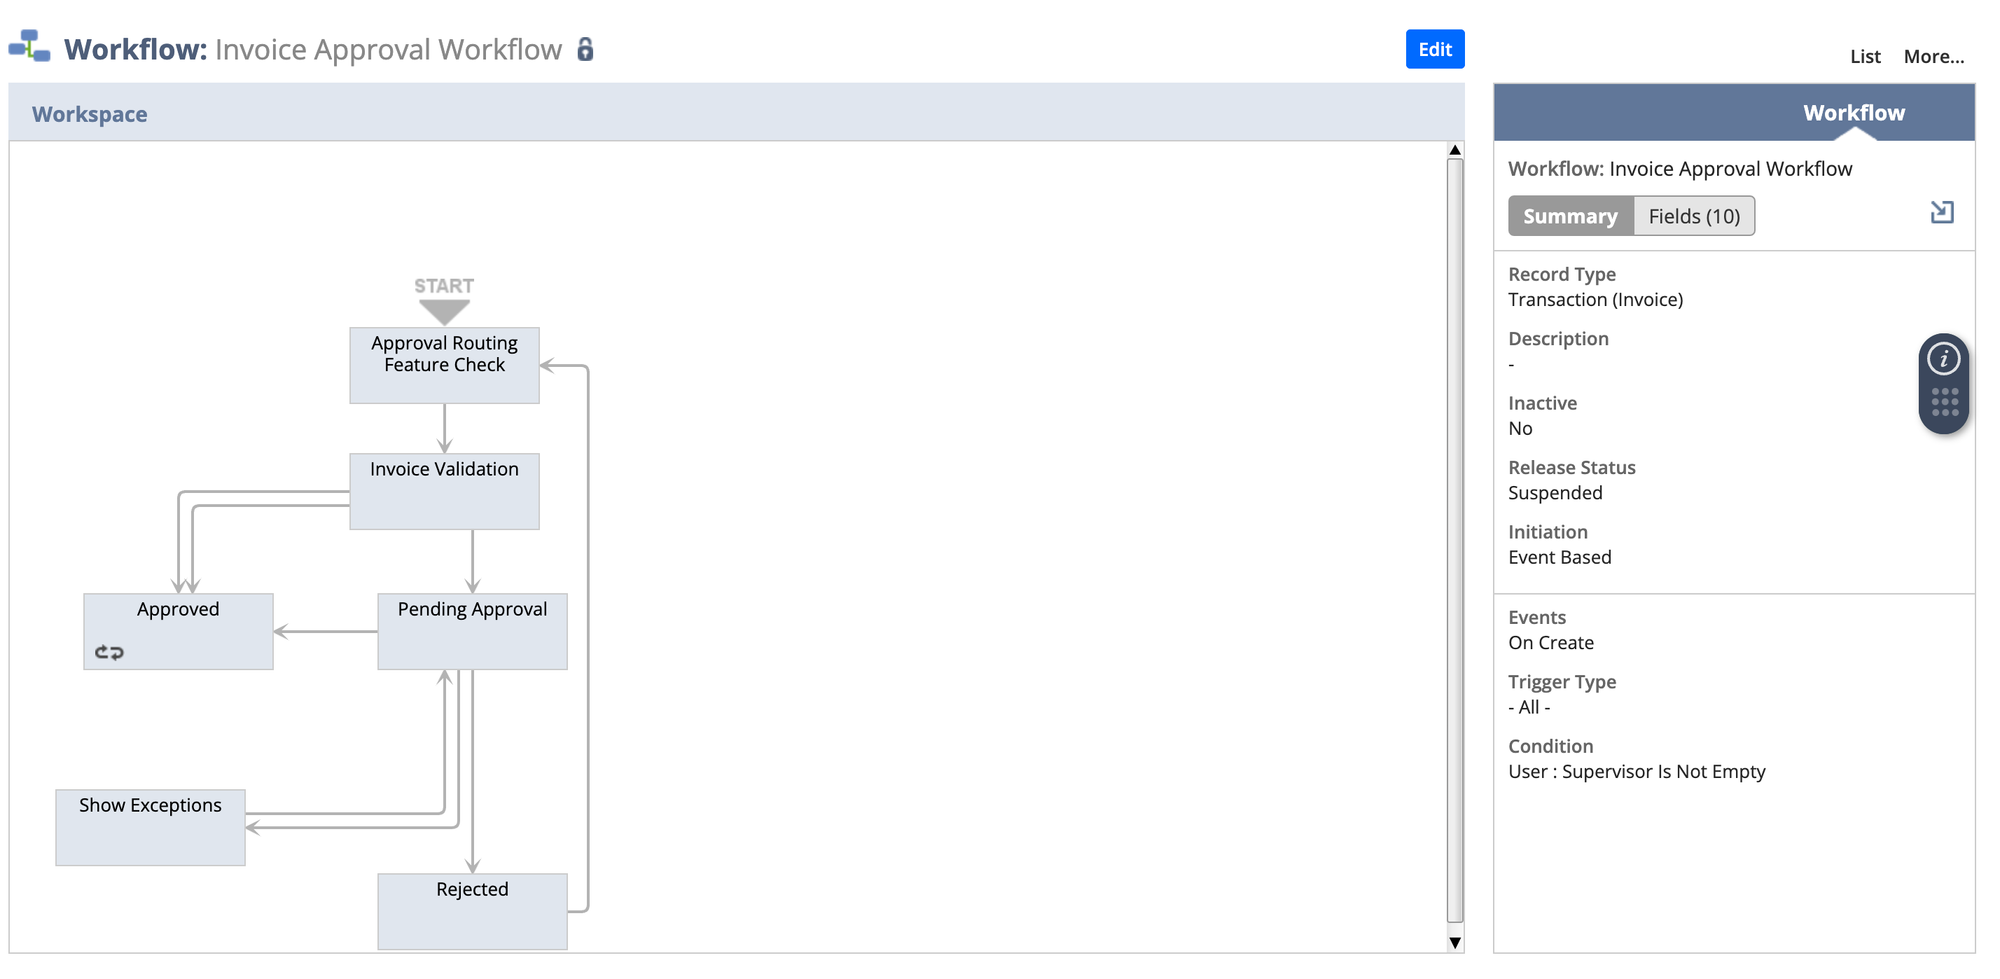
You can basically tell NetSuite to do something like this:
Your custom Workflow process in NetSuite (using either of SuiteApps or SuiteFlow) would look something like this:
Sounds great, right? And once you release this workflow and enable logging, your invoices will start passing through this approval process. You can even refer to the NetSuite documentation that helps you set this up.
So why have we created this guide?
Creating a NetSuite approval workflow is pretty easy. Creating approval workflows that actually work for your business isn't that easy.
Some common problems:
- Full scale approval management in NetSuite is tough to build - it usually needs a dedicated developer/admin
- NetSuite workflows don't support all kinds of approval criteria - like email metadata, or reading supplemental data from an invoice
- You need to purchase extra NetSuite licenses for everyone in your company just so they can approve expenses and see the audit trail, which adds complexity to the expense approval process.
- Complex approvals are difficult to build, maintain and slow down your NetSuite instance - especially when it's trying to do its actual ERP job of great record-keeping
These issues are where true AI workflow automation shines through – and in this article we'll help you get there.
What we'll cover in this article:
- Setting up basic approvals using NetSuite's own features (NetSuite SuiteApps and SuiteFlow)
- The differences between SuiteFlow and SuiteApp
- Handling complex approval scenarios in NetSuite
- Why you (probably) shouldn't keep approval workflows only in NetSuite
- The ideal workflow setup using 3rd party workflow automation tools
How to Set Up Approval Workflows in NetSuite
To start using approval workflows on NetSuite, you'll need to set up SuiteFlow and optionally install SuiteApps (these are pre-defined SuiteFlow workflow templates for specific use cases).
Broadly, these are the steps to create a custom approval workflow:
1. Access SuiteFlow
- Navigate to Customization > Workflow > Workflows > New.
- Ensure SuiteFlow is enabled by going to Setup > Company > Enable Features > SuiteCloud tab.
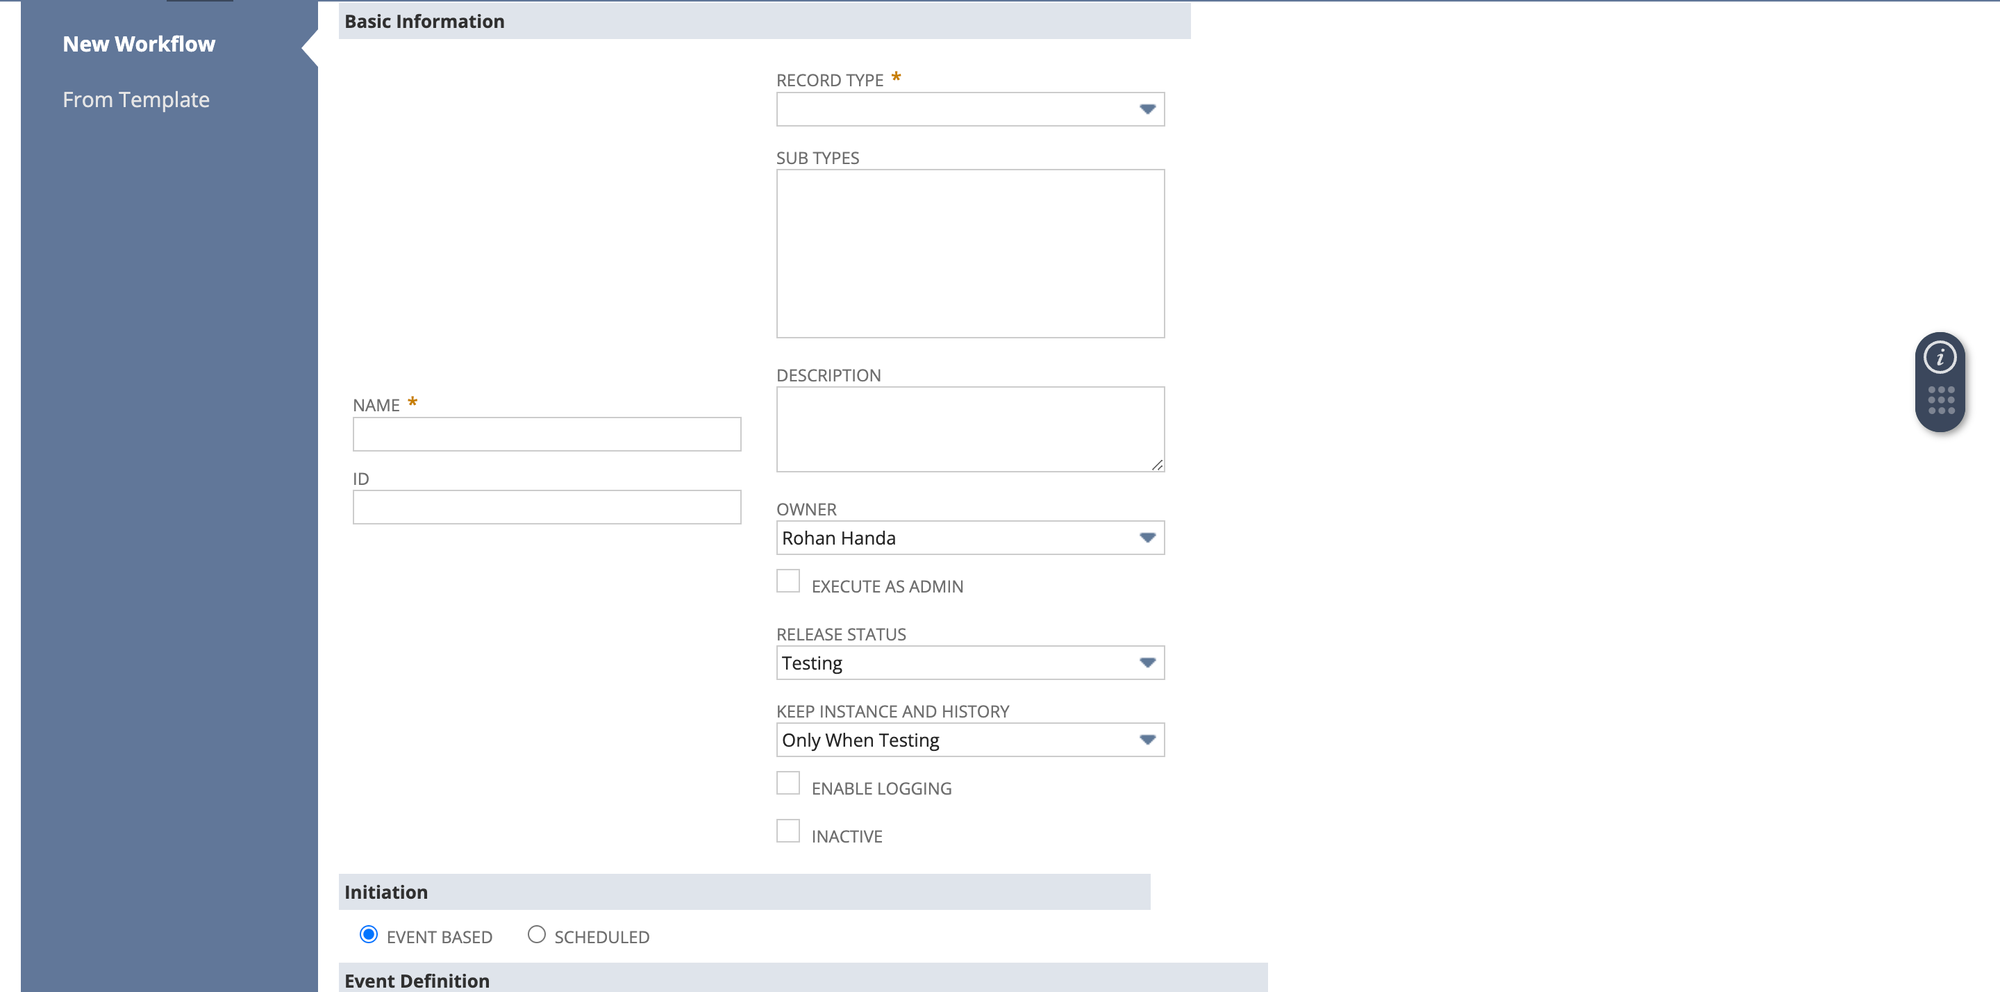
2. Create a New Workflow
- Click New Workflow.
- Name your workflow (e.g., "Purchase Order Approval").
- Set the Record Type to the type of transaction (e.g., Purchase Order, Sales Order, Expense Report).
- Define the Event-Based or Transaction-Based workflow, depending on the business needs.
3. Set Entry Conditions
- Add Entry Criteria to define when the workflow should trigger (e.g., when a purchase order is created or exceeds a certain amount).
4. Define Workflow States
- State 1: Submission
- Create a state for when the record is initially submitted for approval.
- State 2: Pending Approval
- Add another state to indicate when the transaction is awaiting approval.
- State 3: Approved/Rejected
- Set up states for approval and rejection outcomes.
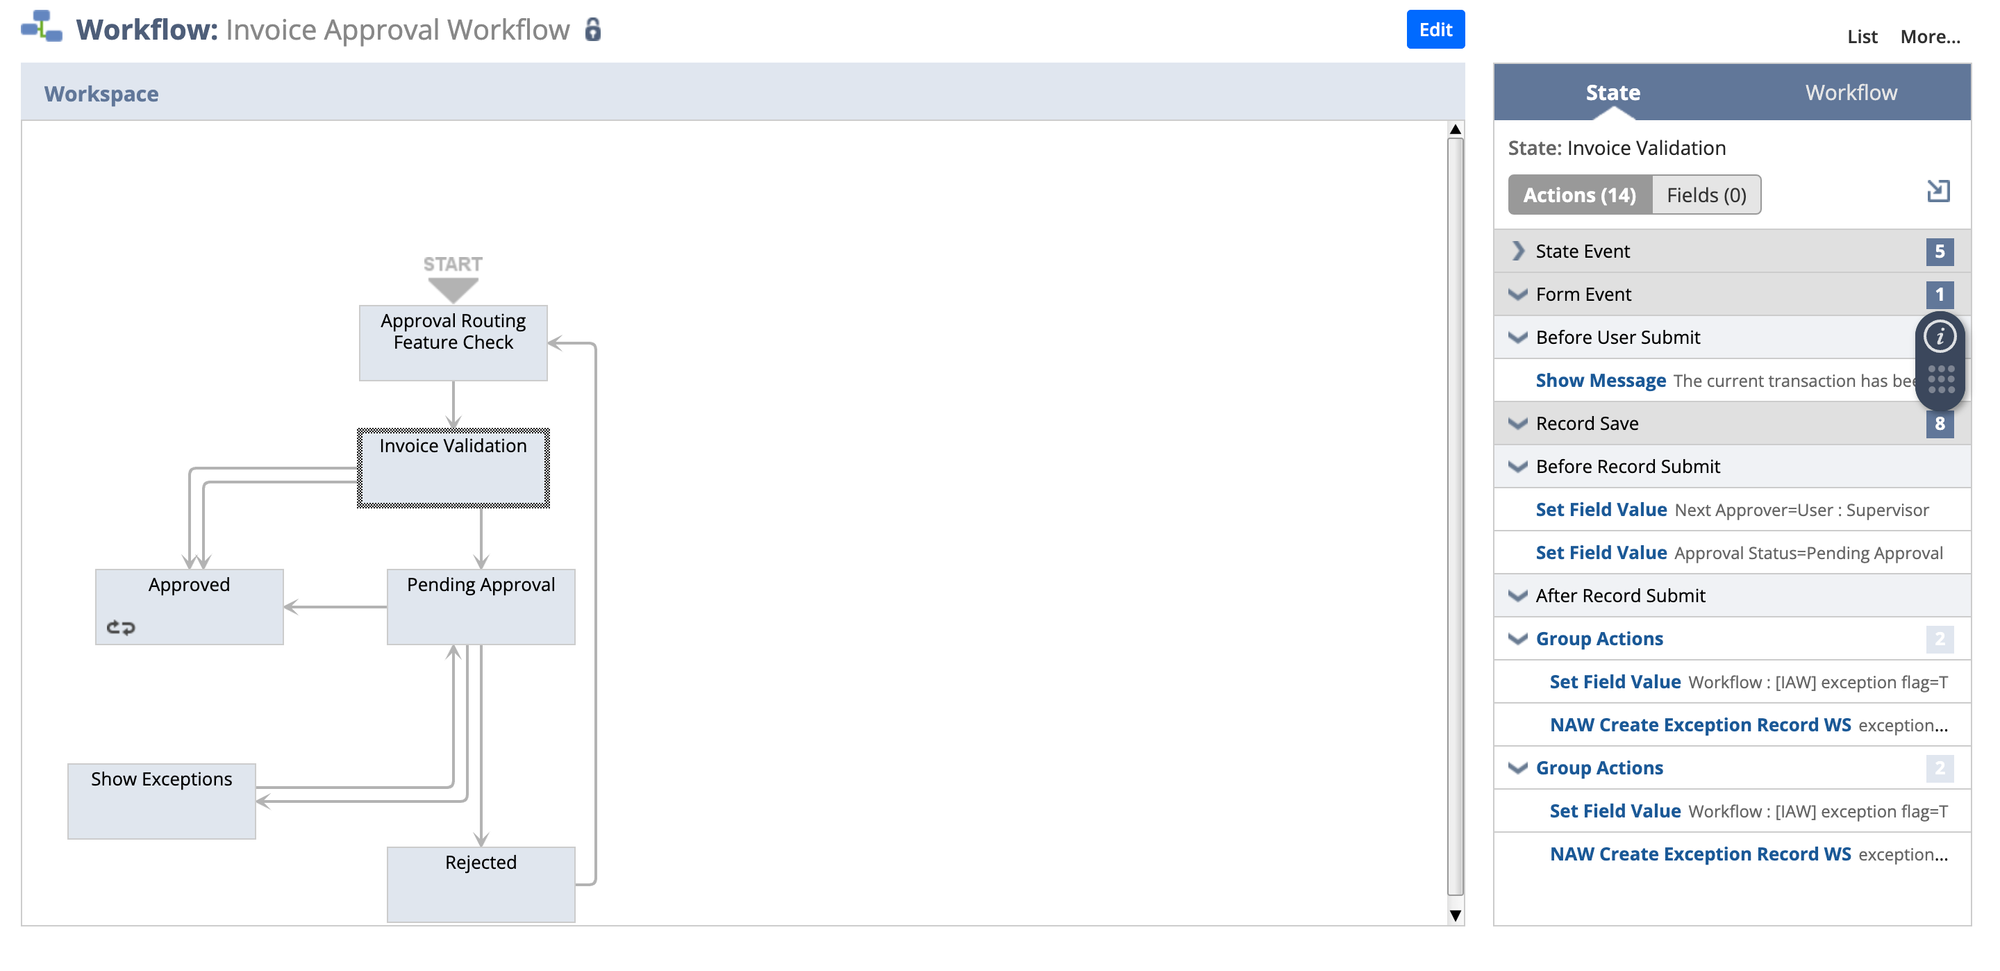
5. Add Workflow Actions
- In each state, define actions like:
- Send Email: Notify approvers that a transaction is awaiting approval.
- Lock Record: Prevent changes while awaiting approval.
- Field Updates: Update the status of the record (e.g., set to “Pending Approval”).
6. Configure Approvals
- Define who the approvers are (e.g., based on roles or custom criteria).
- Add Approval Conditions based on amount thresholds, department, or specific custom fields.
7. Test the Workflow
- Test your workflow by submitting a transaction that fits the criteria.
- Ensure emails are sent, records are locked, and approval actions trigger correctly.
8. Deploy the Workflow
- Once tested, set the workflow to Released to make it active for all users.
SuiteApps vs SuiteFlow
In case you want to use a pre-built approval workflow from NetSuite, you can install the relevant SuiteApp for it. For instance, here is the reference documentation from Oracle on the pre-requisites and setup that you need to do to enable invoice approvals.
The documentation for SuiteApps for approval workflows can be found here. Note that to use SuiteApps, you do not need to enable Approval Routing in the Enable Features section. Essentially, you're not using SuiteFlow here.
If you're interested in going deeper into a specific type of approval workflow, we've covered them in greater detail in a separate series of blogs linked below:
- How to Set Up Invoice Approval Workflows in NetSuite
- When you need to implement a basic, predefined approval process
- When only Supervisor based hierarchy is needed, and no parallel/non-sequential approvals
- When you want the approve/reject buttons on the actual Invoice/PO in NetSuite
SuiteFlow, in contrast, is way more flexible and includes an Approval Status field and a Next Approver field added to your records to make the linking/hierarchy connections much easier.
To use SuiteFlow, you do not need to enabled Approval Routing as above. You will instead need to enable SuiteFlow in the SuiteCloud tab on the Enabled Features screen (detailed instructions here).
To set up a custom workflow based invoice approval, try doing the steps defined by NetSuite here. Bear in mind that you will need to manually add things like
- Hierarchical or custom routing rules
- Approve and Reject action buttons
- Delegation/alternate approvers
- Approval limits
Nanonets automates finance approvals for NetSuite-heavy businesses. Set up seamless approval integrations with Teams/Slack/Email/CRM in less than 30 minutes!
Common Challenges With Approval Workflows in NetSuite
Now that we know how to set up basic and pre-built approval workflows in NetSuite, the next step is to understand what (usually) happens when you scale up your approvals to your entire business.
Here are the most commonly reported challenges when creating complex approval workflows on NetSuite:
- No Advanced Approval Logic: NetSuite will let you set up all the approvals that you want - but only using predefined criteria and events like Add Button, Set Field Value and changing Field Types. Any advanced criteria (like email metadata or semantic understanding) can't be done.
Imagine if you could automatically select which country's Entity to post a vendor bill to - using an AI model that predicts (and learns) the right entity to which each vendor bill belongs.
The new generation of LLM-based AI models can do just this (and more).
- Dynamic Workflow Routing: Many users struggle with workflow logic that needs to bypass/skip approvals when certain conditions occur – by trying to handle all those conditions or steps within a single workflow.
- System Performance Issues: Workflows that trigger too many actions - especially when processing large volumes of records - can negatively impact system performance. This is especially bad when workflows are set to trigger in real-time rather than being scheduled for off-peak hours.
- Context and Record Transitions: Users often face issues with setting the correct context and transitions between approval states. For example, not locking a record before sending an approval notification can lead to errors. At the same time, you still want VPs/CFOs to be able to edit important details.
For eg - post a vendor bill to NetSuite only once it has actually been matched to a PO in your system, and you're sure that the final amount to pay to the vendor is correct.
When to Extend Approval Workflows outside NetSuite
When is this recommended? Is this required for your business?
While setting up approvals entirely within the NetSuite ERP is possible, and you CAN make it work for your business – eventually you might run into a few of these issues:
- You need to buy extra NetSuite licenses for VPs/Functional Heads who just need to approve a few purchases each month
- Managers and busy executives can't approve expenses remotely (who doesn't love one-click approvals via email/Slack?)
- Big ticket purchases have vital context that goes missing (long email threads, Zendesk or JIRA tickets, Slack customer channels) because they don't integrate with NetSuite.
- Your NetSuite instance becomes super slow because it's running real-time approvals and validations all day.
How to Use Workflow Automation Tools to Set Up Approval Workflows
In a live business NetSuite scenario, it can be easier to work with an automation tool that can streamline approvals connected to NetSuite and automate a production environment – without disturbing the data in it. Or without you having to get into the messy details of SuiteFlow setup, or doing API integrations on your own.
And the silver lining - you can connect your approvals to the rest of your business - right where they work!
So what are your options when it comes to these third-party approval tools?
- ZoneApprovals - One of the most popular approval plugins for NetSuite customization, from Zone & Co, this is a fairly common choice because it comes from a trusted vendor. However, it does have its limitations with approval trigger events and options for parallel approval groups in NetSuite.
- ApprovalMax - this is from the Xero stable, and integrates really well with the famous SMB accounting software. While it can integrate with NetSuite as well, the features are a bit limited and not really suited to mid-market companies that have complex matching workflows.
- Nanonets - This is more suited for flexible approval workflows that are supposed to deal with complex approval matrices, permissions, multiple conditions and (often) custom scripting. If you have an approval process that spans more than one document (such as PO matching) then Nanonets is ideal.
- More than 80% time savings on approvals
- Integrations with everything your team uses (Email, Slack, Teams, Hubspot, Zendesk, JIRA)
- High accuracy, trainable AI that learns from decisions on approvals
- Real-time sync with all objects in NetSuite
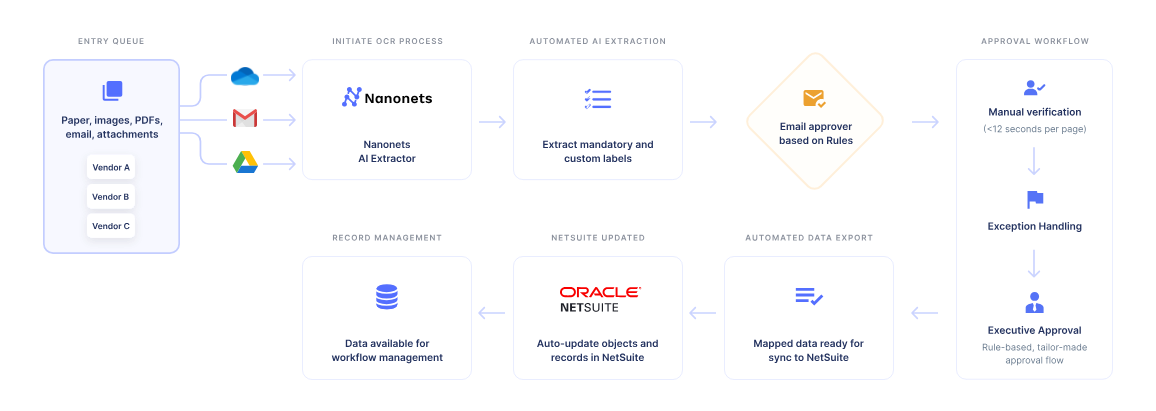
This is what full-scale NetSuite approval automation on Nanonets can look like:
Interested in learning more? A short 15-minute intro call with an automation expert is the best way to get started.
Conclusion
Setting up approval workflows in NetSuite can be handled in several ways, depending on your business setup. You can go for something that is more manual and gives you more control (like SuiteApps or SuiteFlow), or you can fully automate it using a workflow automation tool (with significantly lower effort).
By combining the best of both worlds using a no-code solution like Nanonets, you can confidently manage approval routing, get spends approved in time, and reduce manual errors, saving valuable time for your procurement and finance teams.
References: