

Stuck with complex data in Word documents? Need to analyze information but sick of manually copying and pasting tables into Excel spreadsheets?
Your answer is probably yes, which is why you've landed here.
So how do you convert Word documents into Excel? Thankfully, Excel belongs to the same Microsoft product suite as Word, and hence converting one to the other is fairly straightforward.
In this guide, we'll try to solve two specific problems:
- How to convert a Word document to Excel
- How to convert a Word table to Excel
While there are native features for these conversions, we will also look at a few other methods of achieving this:
- Using Python to convert Word Documents to Excel
- Using an LLM for conversion. Popular examples include GPT, Claude, and Gemini among others.
Most of the above methods present specific challenges and hence, discussing the Intelligent Document Processing tools (IDP) and their benefits becomes important.
Before we get started however, it is important to address why should we convert a word document into an excel file. While Microsoft Word is great for text-based documents, it's not really suited for maintaining records, analysing data, or creating graphs/reports. In contrast, Excel excels in these areas by providing robust tools for data organization, analysis, and visualisation. It also facilitates easy exchange of data.
We'll take an example of a bank statement to better explain the entire process.
In case you are in a hurry, the following table summarises the article for you:
| Title | Summary | Challenges |
|---|---|---|
| How to Convert a Word Document to Excel | Explains how to convert a Word document to Excel by saving it as a plain text file and importing into Excel. | Selecting the correct delimiter is critical for data accuracy and can be error-prone. |
| How to Convert a Word Table to Excel | Describes how to copy and paste tables directly from Word to Excel. | Handling split tables or multiple tables across pages can be time-consuming and error-prone. |
| Using LLMs to Convert Word to Excel | Details the use of Large Language Models (LLMs) like ChatGPT-4o to convert Word documents to Excel. | Requires precise prompts to achieve the desired output; may need multiple attempts to get it right. |
| Using Python to Convert Word Documents to Excel Sheets | Outlines using Python scripts to automate conversion from Word to Excel, especially for documents with tables. | Requires coding knowledge; may need post-processing for formatting and handling various document formats. |
| Benefits of Using Intelligent Document Processing Tools | Highlights the advantages of using Intelligent Document Processing (IDP) tools for automated conversion. |
Let us now take a deeper dive into each section.
Read About: How to Copy Table from PDF to Excel?
How to convert a Word document to Excel
A plain text word document can be anything - a bank statement, a legal contract, an order form, a report, or any other common business document.
Let’s take the example of a bank statement to explain the entire general process you can follow for conversion. Simply save the word document as a plain text file and use Excel’s Import function. Below is a step-by-step guide for doing so:
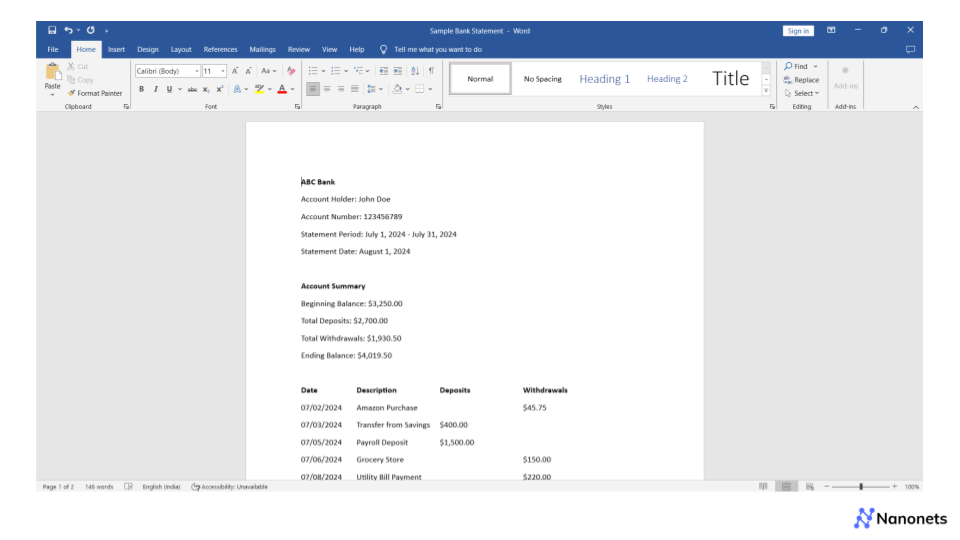
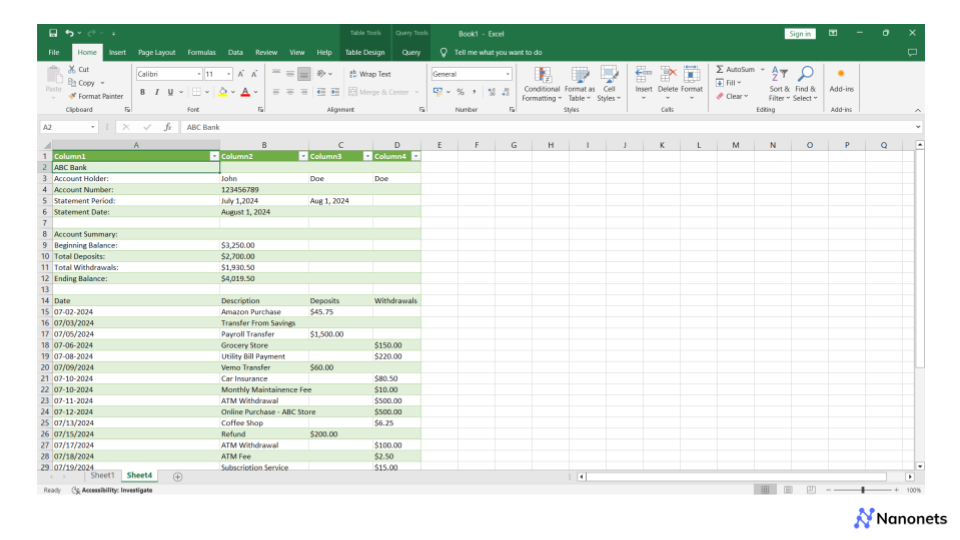
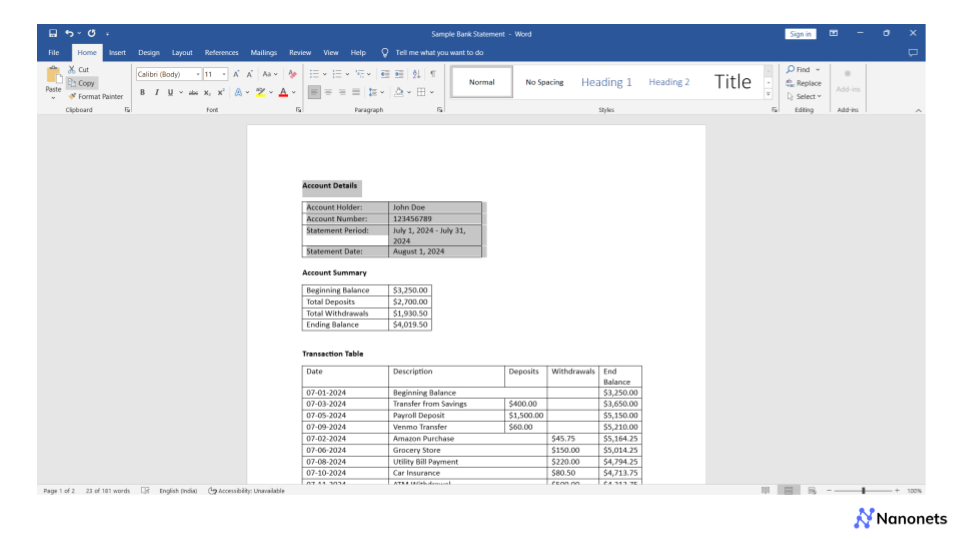
Step 1: Open the word document you wish to be converted to Excel. We'll take a bank statement that is haphazardly arranged on a word document.
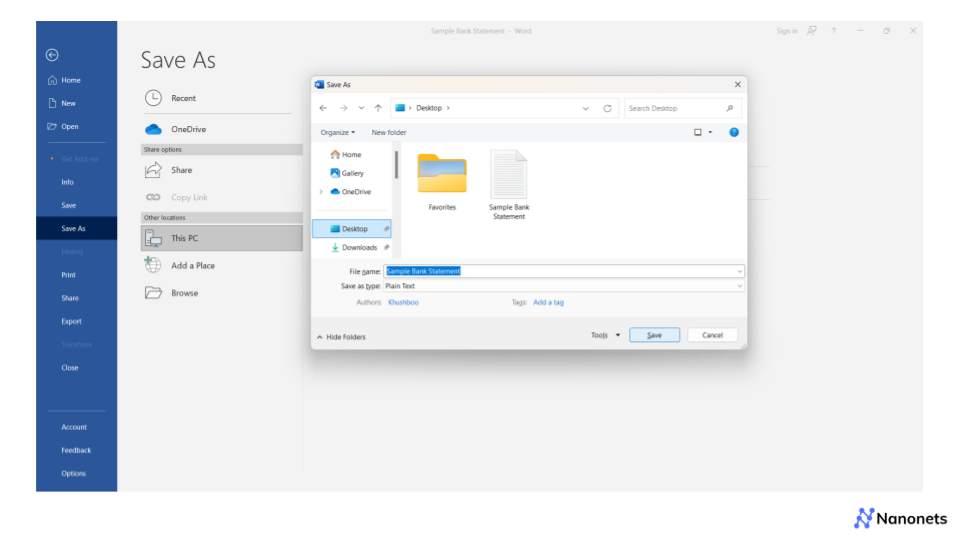
Step 2: Next, we need to ensure that the document is saved as a plain text file. Navigate through the following options in the given order.
Click on “File” > “Save As” > Select the desired location > Adjust the name of the file > “Save As” type needs to be Plain text (*.txt) > Hit “Save".
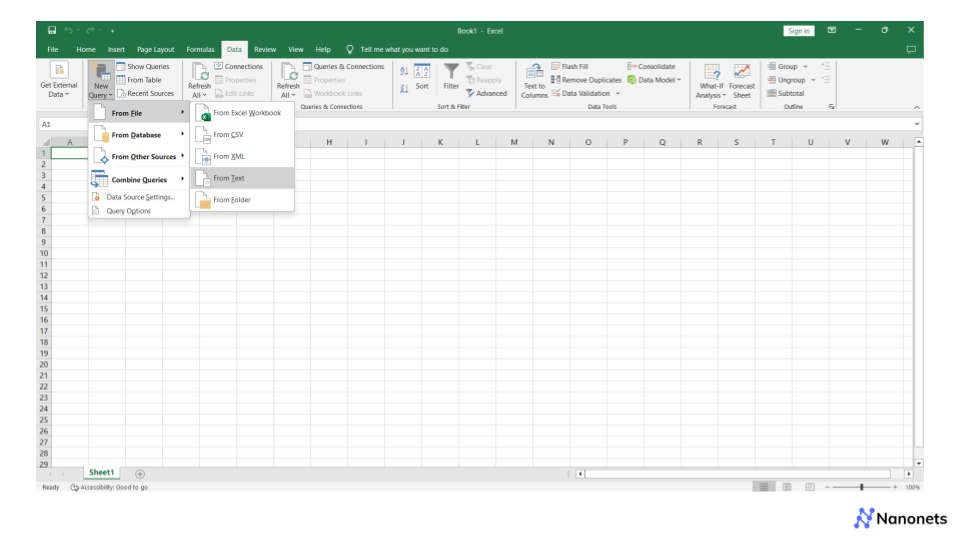
Step 3: Now we are ready to create an Excel spreadsheet. Open a “New” Excel Spreadsheet and click on the “Data” option on the Quick Access toolbar above and then navigate as follows:
“Get and Transform Data” > “From File” > “From Text” > Select the file we saved in the above step > Hit “Import”.
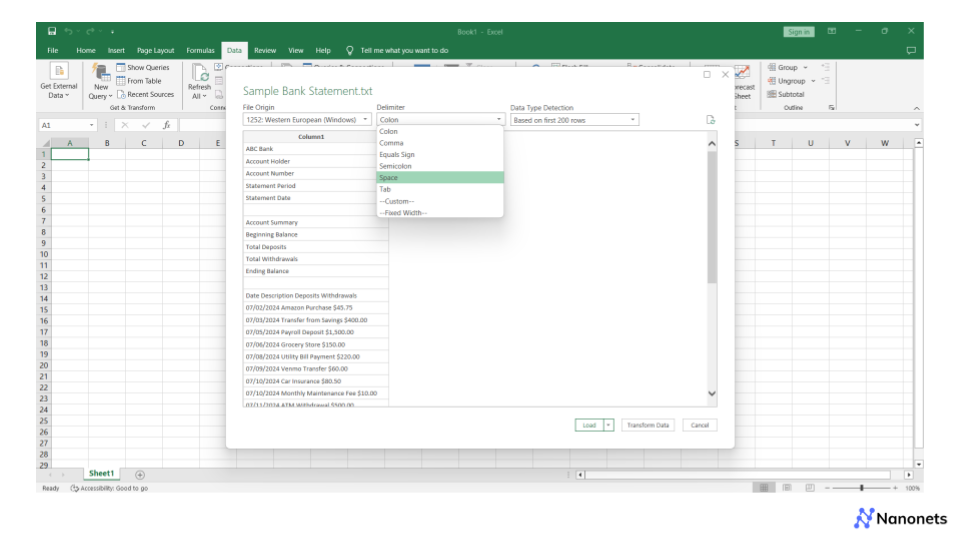
Step 4: You now get the chance to preview and alter the data if you want to. You also need to decide which “Delimiter” works best for your data. You will get a preview of the data as you go through all the options in the list.
A delimiter is any character/symbol that separates individual pieces of data. The most common delimiter is a space (the " " symbol) which separates words. Other common delimiters are Tabs, Colons, Semi-Colons, and so on.
Step 5: If you want to make changes, you can click on “Transform” and then add or delete columns, rows, etc. Once you are satisfied with the preview of the data, click on “Load”. You can adjust the formatting here as well.
So there we have it. The general process one can follow when converting a Word document to Excel. Needless to say, there are unique challenges associated with this process based on the content of the word document and its complexity.
The major challenge is selecting the “Delimiter” option as it can literally make or break your data import. Ensuring the delimiter is present at every word break can be tedious, slow, and error-prone and still may not produce desirable results.
Let’s say, in the above example, we are looking at a new row entry into the transactions table which appears on the word document - such as “07/03/2024 Transfer from Savings $400.00”.
The spaces between the words indicate that “07/03/2024”, “Transfer from Savings” and “$400.00” are all supposed to be in separate cells. The character “space” acts as a delimiter here and lets us know that these are separate words. It acts as an indicator for Excel to transfer the following data into an adjacent cell.
Pre-processing your data can significantly reduce the manual effort needed here. The “space” worked for us in the above example, but, just to suggest an alternative, let’s pick “semicolon”.
The pre-processed data would look something like, “07/03/2024;Transfer from Savings;$400.00”.
Now, Excel will pick this row up and create adjoining entries for “07/03/2024”, “Transfer from Savings” and “$400.00” splitting on the character “;”.
How to convert a Word table to Excel
Now that we have tackled the general process of converting a Word document into an Excel spreadsheet, we can take a look at the relatively simpler process one can follow if the Word document only contains tables.
It is a simple matter of copying and pasting the tables partially or completely. If there are multiple tables, we can repeat the process for each of them. Let’s take a quick look at the process:
Step 1: Open the Word document containing the table.
Step 2: If you want to partially copy the table, drag the mouse while selecting the desired rows and columns and hit, "CTRL + C" or click "Copy" from "Edit" option in the toolbar above.
Step 3: Now, open a new Excel spreadsheet, and place the cursor on the left top cell and hit CTRL + V or alternatively, hit “Edit” in the top bar and click “Paste”.
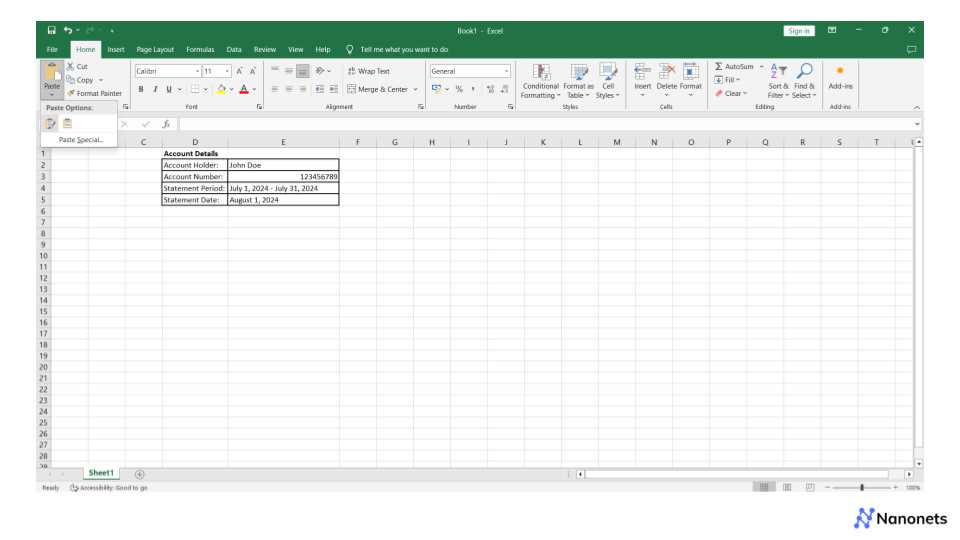
You should now see the table pasted successfully in the spreadsheet. You can now leverage the entire array of tools offered by Excel to modify, analyse and visualise the data.
In case we want to copy multiple tables into one spreadsheet, you can copy the table from the word document, place the cursor on the desired location within the spreadsheet and paste the tables one after another. You can also create a new spreadsheet within the same workbook and paste different tables in different spreadsheets.
If you are dealing with multiple tables in multiple pages of a single word document, or sometimes a single table that is split across pages, each of them has to be selected, copied and pasted separately.
Now imagine doing this for hundreds, if not thousands of documents. The process becomes slow and error-prone.
How to use LLMs to convert Word to Excel?
There is a third way that is noteworthy as well as convenient. Leveraging cutting-edge LLMs. So what are LLMs? LLM stands for Large Language Models. They are sophisticated Machine Learning models that are trained on large data sets and use complex neural network architecture to mimic human problem solving. They are capable of performing a wide range of tasks based on human instructions.
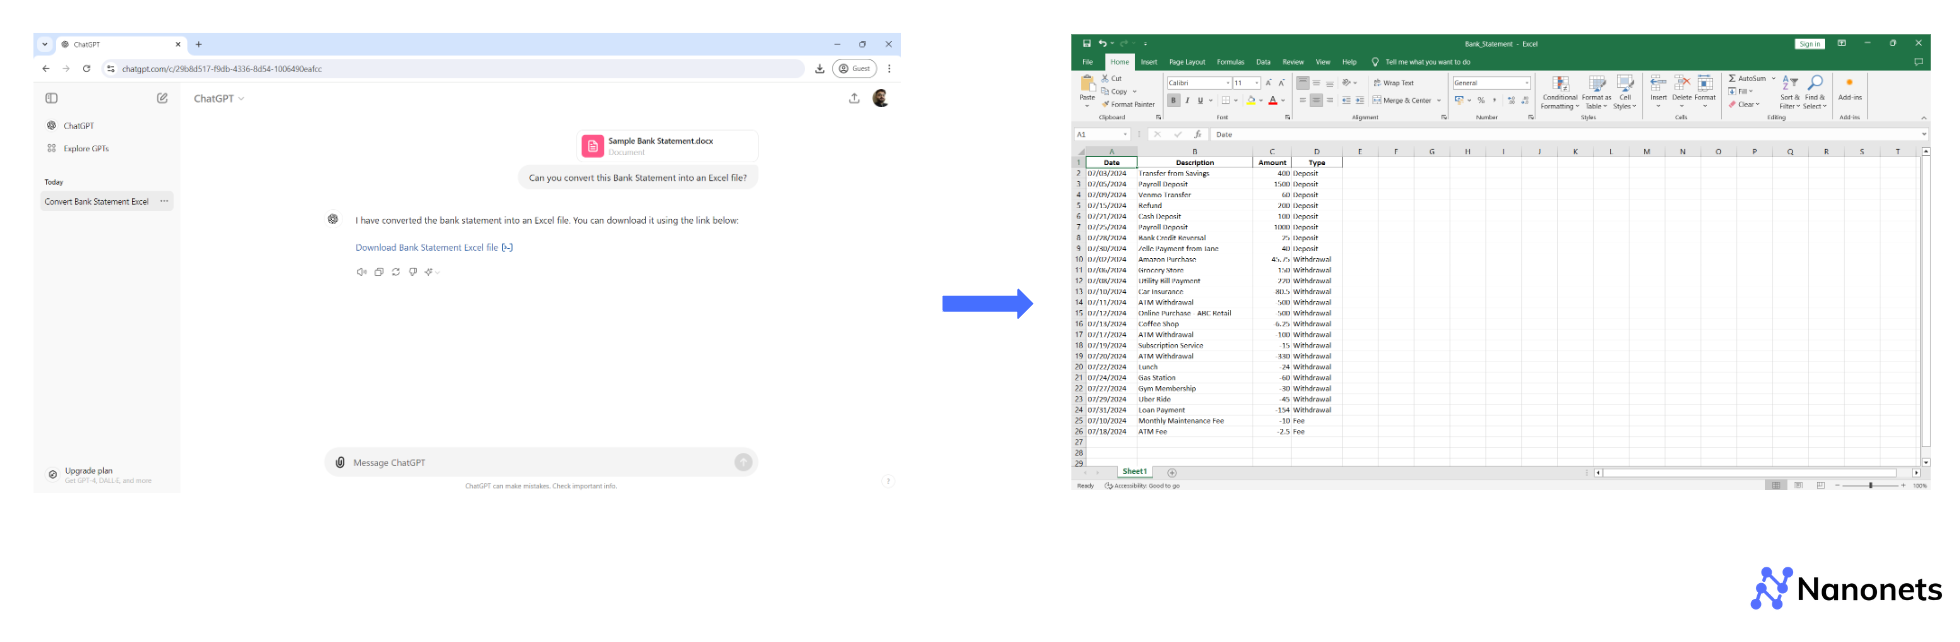
In this example, we have used OpenAI's popular LLM, ChatGPT-4o for converting the bank statement in the above example into an Excel File. We will be using both the UI as well as the API for this conversion. Let us walk you through both methods in a step-by-step manner:
Method 1: Using ChatGPT-4o User Interface:
Step 1: Visit chatgpt.com and log in. Create a new conversation, switch to GPT-4o and have the sample Bank Statement in Word document ready.
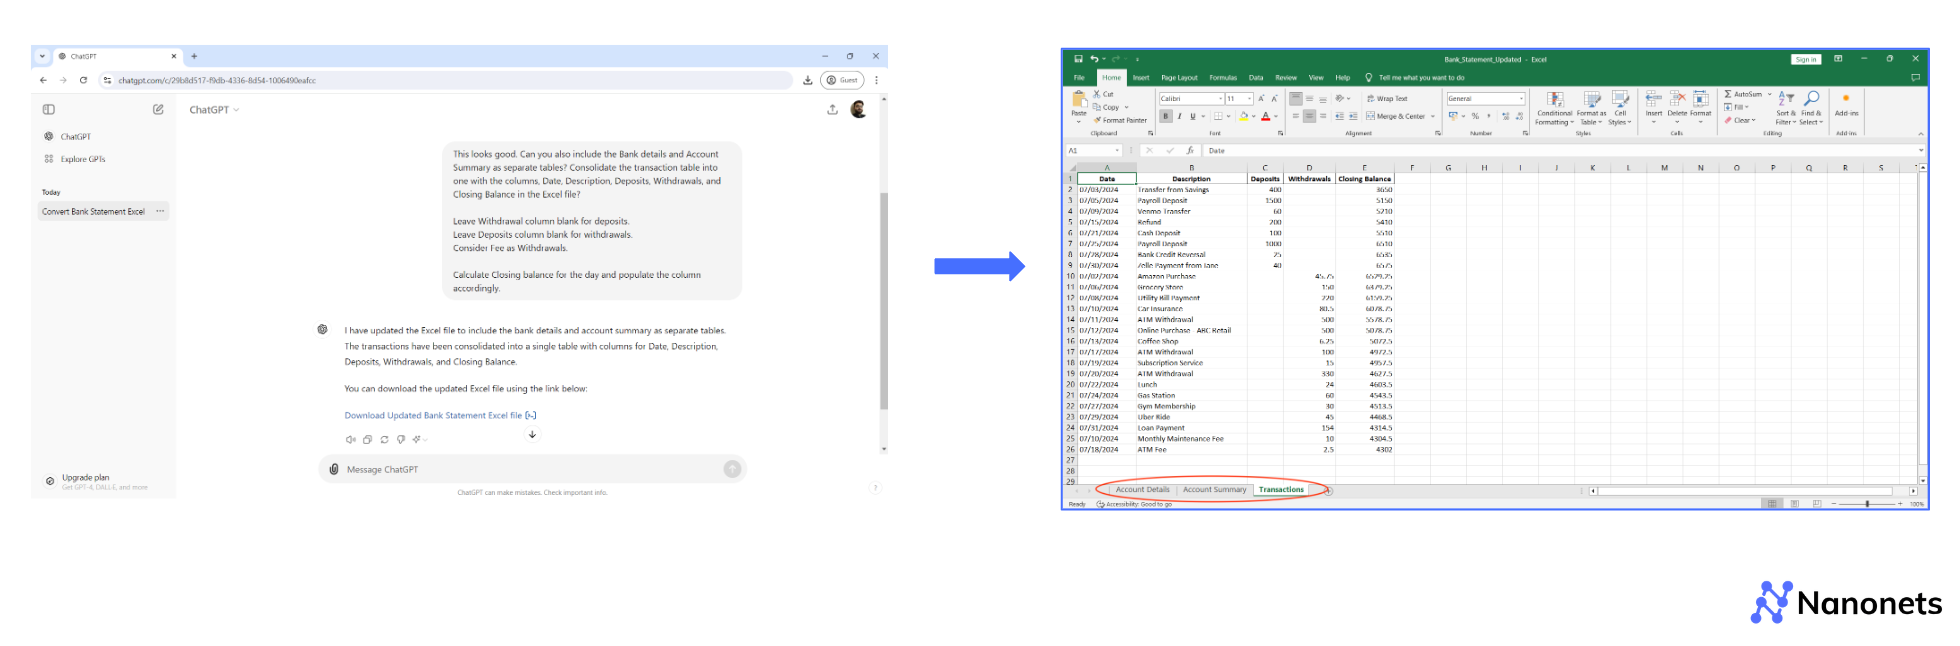
Step 2: The tricky bit is getting the prompt right. We need to be clear in our instructions and state exactly what we want to get better outputs. We tried the following two prompts with drastically different results.
Leave Withdrawal column blank for deposits.
Leave Deposits column blank for withdrawals.
Consider Fee as Withdrawals.
Calculate Closing balance for the day and populate the column accordingly."
You will notice Bank Details, Account Summary and Transaction Table in separate spreadsheets as well as a consolidated transaction table with auto-calculated Closing Balance for the day.
Method 2: Using ChatGPT-4o API
You can also achieve this using the GPT-40 API. Let us take a look at how we can leverage that to convert a word document into an Excel file. Follow this step-by-step process:
Step 1: First, you need to install the OpenAI library and other dependencies.
pip install openai pandasStep 2: Import Necessary Libraries.
import openai  # For interacting with the OpenAI GPT API
import pandas as pd  # For creating Excel files from the extracted data
from io import StringIO  # To handle string data as file-like objects
Step 3: Define a Function to Extract Text Using GPT.
Here's a function that takes a Word document and uses the GPT API to extract the text content. You can customise the prompt in this function.
def extract_text_with_gpt(api_key, file_path, prompt):

    # Set your OpenAI API key
    openai.api_key = api_key

    # Upload the Word file to OpenAI
    with open(file_path, 'rb') as file:

        # Upload the file and specify the purpose ('answers' for example)
        file_response = openai.File.create(file=file, purpose='answers')

    # Extract file ID from the response
    file_id = file_response['id']

    # Customize the prompt for GPT to extract specific content
    response = openai.ChatCompletion.create(
        model="gpt-4o-mini",  # Use the appropriate model
        messages=[
            {
                "role": "user",
                "content": prompt  # The customizable prompt for GPT
            }
        ],
        file=file_id
    )

    # Extract the content returned by GPT
    extracted_text = response.choices[0].message['content']

    return extracted_text
Explanation:
api_key: Your OpenAI API key for authentication.file_path: The path to the Word document you want to process.prompt: Customisable text that instructs GPT on what to do with the document.openai.File.create: Uploads the Word document to OpenAI servers.openai.ChatCompletion.create: Calls the GPT model to process the file with the provided prompt.response.choices[0].message['content']: Extracts the text content returned by GPT.
Step 4: Define a Function to Convert Text to Excel.
This function takes the extracted text and converts it into an Excel file:
def save_text_to_excel(text_content, excel_file_path):

    # Convert the text content to a pandas DataFrame
    # Assuming text content is CSV formatted; adjust based on your actual prompt's output format
    df = pd.read_csv(StringIO(text_content))

    # Save the DataFrame to an Excel file
    df.to_excel(excel_file_path, index=False)
    print(f"Data successfully saved to {excel_file_path}.")
Explanation:
text_content: The extracted text data from GPT.excel_file_path: The output path where the Excel file will be saved.pd.read_csv(StringIO(text_content)): Converts the CSV-formatted text into a pandas DataFrame.df.to_excel(): Writes the DataFrame to an Excel file.
Step 5: Main Function to Integrate Everything.
Combine the functions to perform the full conversion from Word document to Excel file:
def main(api_key, word_file_path, excel_file_path, prompt):

    # Extract text from the Word document using GPT-4o
    extracted_text = extract_text_with_gpt(api_key, word_file_path, prompt)

    # Save the extracted text to an Excel file
    save_text_to_excel(extracted_text, excel_file_path)

# Example usage
api_key = "your_openai_api_key"  # Replace with your actual API key
word_file_path = 'example.docx'  # Path to the Word document
excel_file_path = 'output.xlsx'  # Desired output path for the Excel file
prompt = "Can you convert this Bank Statement into an Excel file?"

main(api_key, word_file_path, excel_file_path, prompt)
Explanation:
main()function: Orchestrates the workflow of extracting text from a Word file and saving it as an Excel file.prompt: You can modify thepromptvariable to instruct GPT to extract different types of content (e.g., specific tables, paragraphs, bullet points, etc.)
- Prompt 1: "Can you convert this Bank Statement into an Excel file?"
- Prompt 2: "Can you also include the Bank details and Account Summary as separate tables? Consolidate the transaction table into one with the columns, Date, Description, Deposits, Withdrawals, and Closing Balance in the Excel file?
Leave Withdrawal column blank for deposits.
Leave Deposits column blank for withdrawals.
Consider Fee as Withdrawals.
Calculate Closing balance for the day and populate the column accordingly."
Download Full Code:
Getting the prompt right.
We need to be brief, clear and specific with what we want, for the LLM to produce a desirable output. It is clear from the above example.
Be as detailed as possible.
Think of the LLM as a dumb human who needs specific and detailed instructions for the simplest of tasks.
How to use Python to convert Word documents to Excel Sheets?
There is another method to convert Word Documents to Excel spreadsheets. One that requires some degree of coding proficiency. In this section, we will understand how we can use Python to convert Word documents into Excel sheets. We will go through a step-by-step explanation of the exact code you can use for conversion as well as give an option to download the unified code snippet at the end.
Step 1: Installation of Libraries
Before running the code, ensure you have the necessary libraries installed:
pip install python-docx openpyxl
python-docx: This library is used to read and manipulate Word documents (.docxfiles).openpyxl: This library is used to create and manipulate Excel files (.xlsxfiles).
Step 2. Importing Libraries
from docx import Document
import openpyxl
Step 3. Define a function to convert Word documents to Excel
def convert_word_tables_to_excel(word_file_path, excel_file_path):
    # Load the Word document
    doc = Document(word_file_path)

    # Create a new Excel workbook
    wb = openpyxl.Workbook()

    # Loop through each table in the Word document
    for idx, table in enumerate(doc.tables):
        # Create a new sheet for each table
        ws = wb.create_sheet(title=f"Table {idx + 1}")

        # Loop through each row in the table
        for row_idx, row in enumerate(table.rows):
            # Loop through each cell in the row
            for col_idx, cell in enumerate(row.cells):
                # Write the cell value to the corresponding Excel cell
                ws.cell(row=row_idx + 1, column=col_idx + 1, value=cell.text)

    # Remove the default sheet created by openpyxl
    if 'Sheet' in wb.sheetnames:
        wb.remove(wb['Sheet'])

    # Save the Excel workbook
    wb.save(excel_file_path)
    print(f"Converted Word tables to Excel: {excel_file_path}")
Explanation:
This function handles the conversion of tables from a Word document into an Excel file.
- Load the Word Document:
doc = Document(word_file_path)reads the Word file specified byword_file_path. - Create a New Excel Workbook:
wb = openpyxl.Workbook()initialises a new Excel workbook. - Iterate Through Word Tables: The loop
for idx, table in enumerate(doc.tables):goes through each table in the Word document.- Create a New Excel Sheet for Each Table:
ws = wb.create_sheet(title=f"Table {idx + 1}")creates a separate sheet for each table in the Word document. - Write Data to Excel: Nested loops
for row_idx, row in enumerate(table.rows):andfor col_idx, cell in enumerate(row.cells):iterate through each row and cell of the table, writing the text from each Word cell into the corresponding Excel cell usingws.cell(row=row_idx + 1, column=col_idx + 1, value=cell.text).
- Create a New Excel Sheet for Each Table:
- Remove Default Sheet:
if 'Sheet' in wb.sheetnames: wb.remove(wb['Sheet'])removes the default sheet created byopenpyxl. - Save Excel Workbook:
wb.save(excel_file_path)saves the created Excel file to the specified path.
Step 4. Main Function to Execute the Conversion
def main():
    # Example usage
    word_file_path = 'your_word_document.docx'
    excel_file_path = 'output_excel_file.xlsx'

    convert_word_tables_to_excel(word_file_path, excel_file_path)
Explanation:
main() function acts as the entry point of the script and demonstrates how to use the convert_word_tables_to_excel function.
- Set File Paths: Defines example paths for the input Word document (
word_file_path) and the output Excel file (excel_file_path). - Call Conversion Function: Executes
convert_word_tables_to_excelwith the specified file paths to perform the conversion.
Step 5. Run the Main Function
if __name__ == "__main__":
    main()
By structuring the code this way, it becomes easy to reuse and customise for different files or use cases.
Download Full Code:
1. This method requires some degree of coding proficiency.
2. The final results obtained would require some post-processing in terms of formatting, alignment, etc.
3. This method is generally not scaleable for large volumes of documents.
4. It will not be able to handle documents with differing formats, like, vendor invoices, customer bank statements, rent agreements, etc.
Benefits of using Intelligent Document Processing (IDP) tools to convert Word to Excel?
Through this article, we have seen multiple ways of converting Word to Excel, each presenting with it's own challenges. So what is the solution?
One word. Intelligent Document Processing.
Intelligent Document Processing solutions can help solve most, if not all, challenges we have encountered in this article. Let's take a look.
Tedious and inefficient pre-processing methods to convert Word to Excel using Microsoft's native features.
Solution:
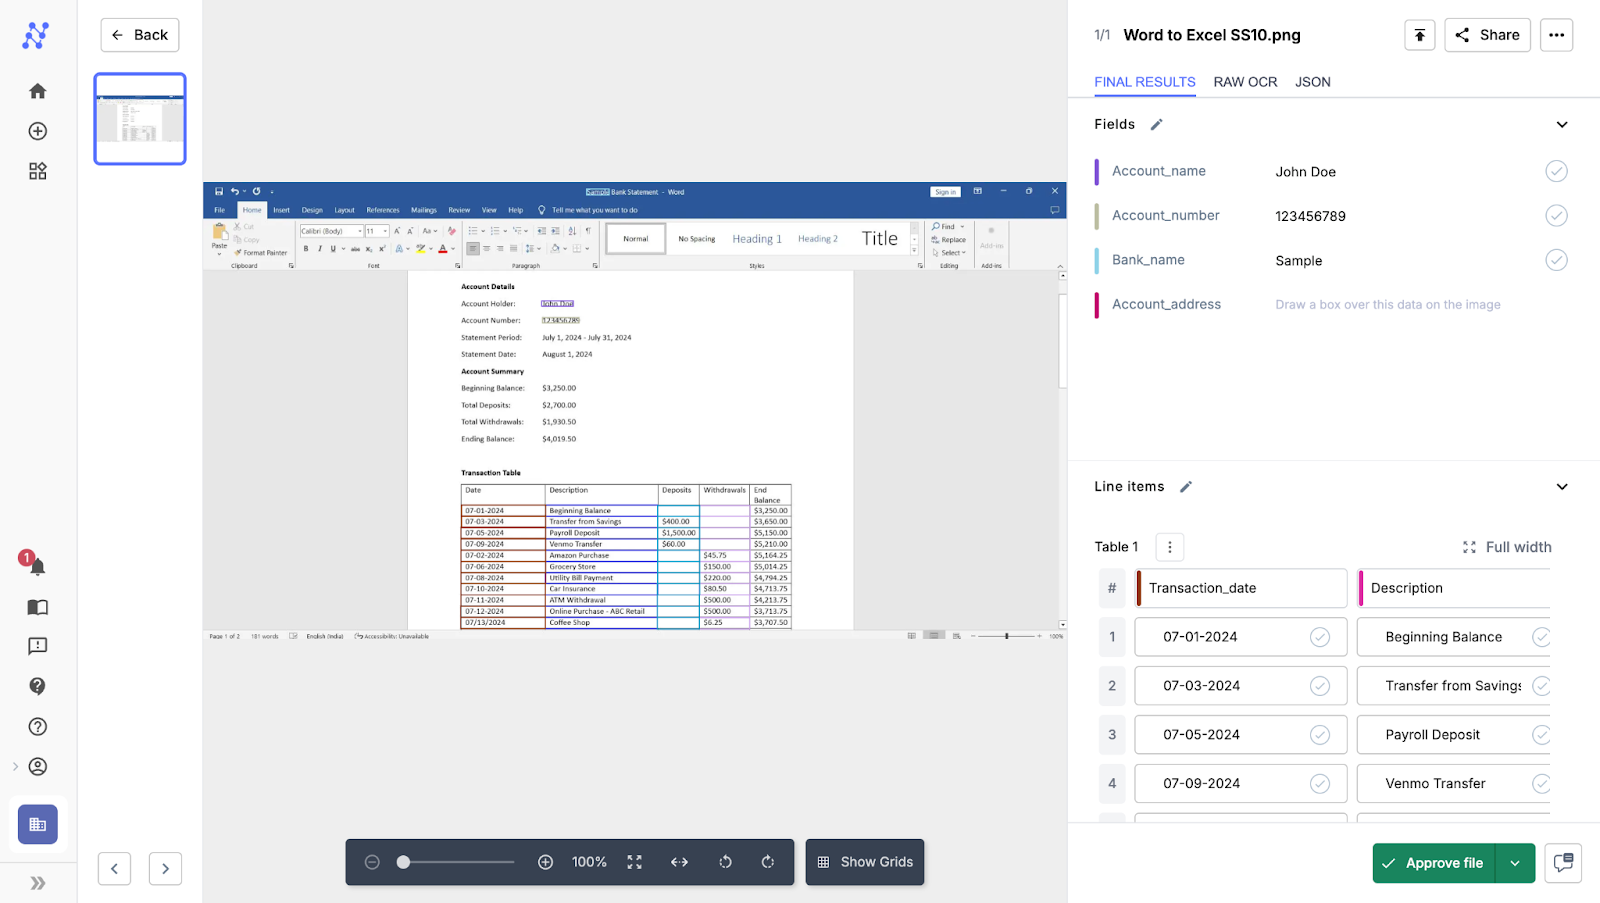
Pre-processing becomes tedious, error-prone and resource intensive when the volume of documents is large. Leveraging Intelligent Document Processing tools (such as Nanonets) can help detect and extract specific data points from your documents as well as auto-detect tables to extract them separately.
Check out the example below!
Dealing with multiple tables or split tables.
Solution:
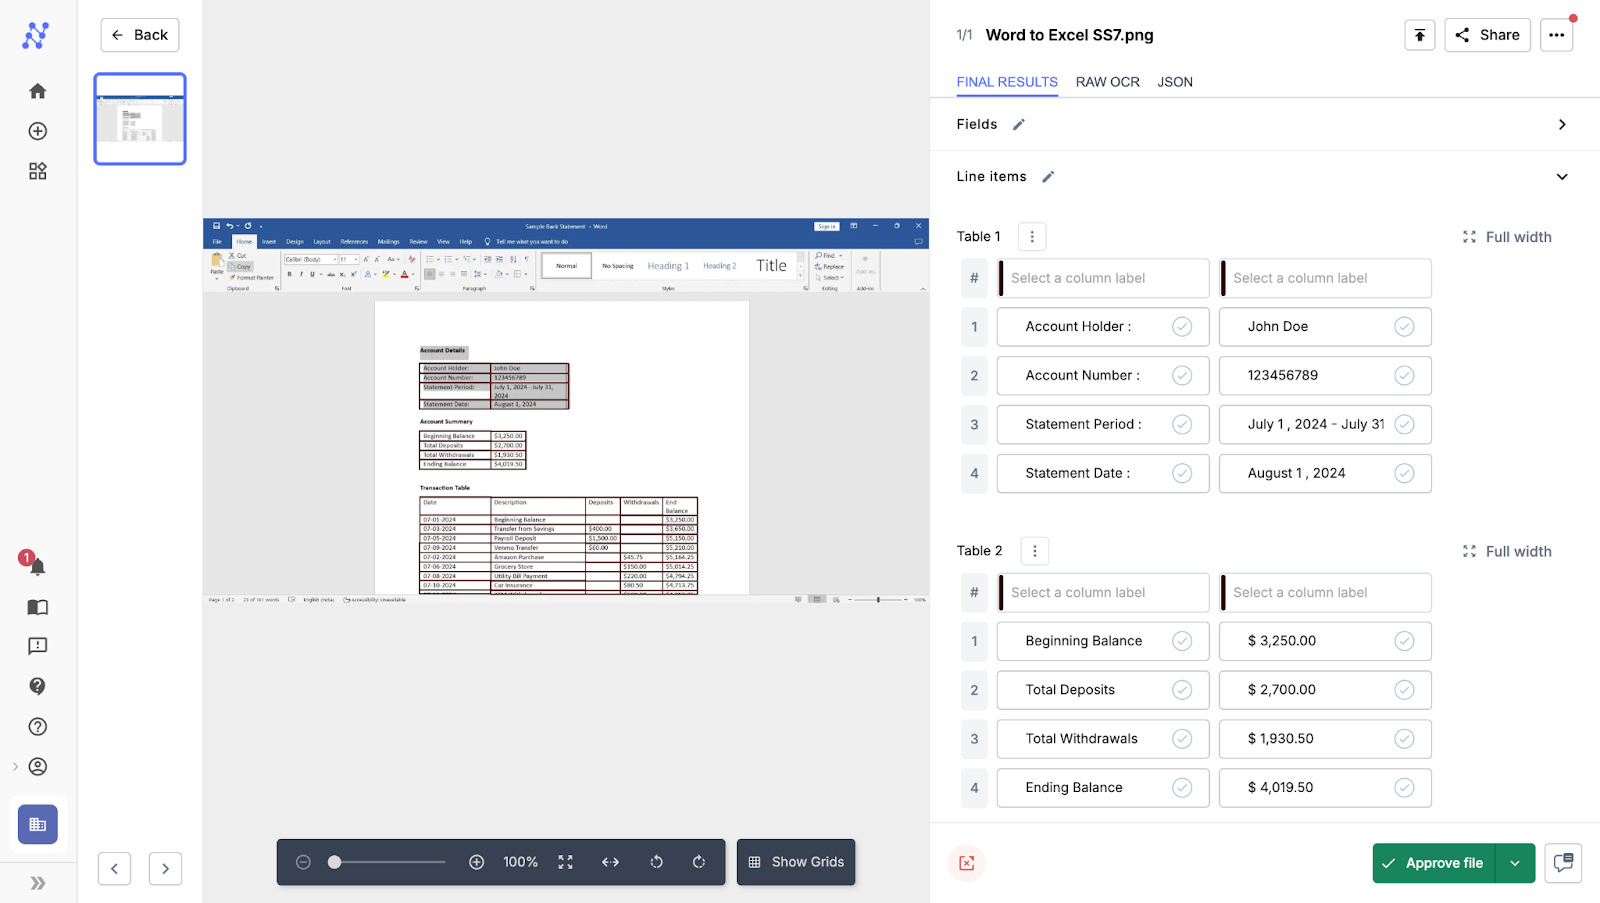
Intelligent document processing tools like Nanonets can automatically detect the tables, partial or whole, singular or multiple and extract them separately. They can also merge the same table across different pages into one. Check out the same example, using Nanonets below:
Significant post-processing effort even after successful Word to Excel conversion.
Solution:
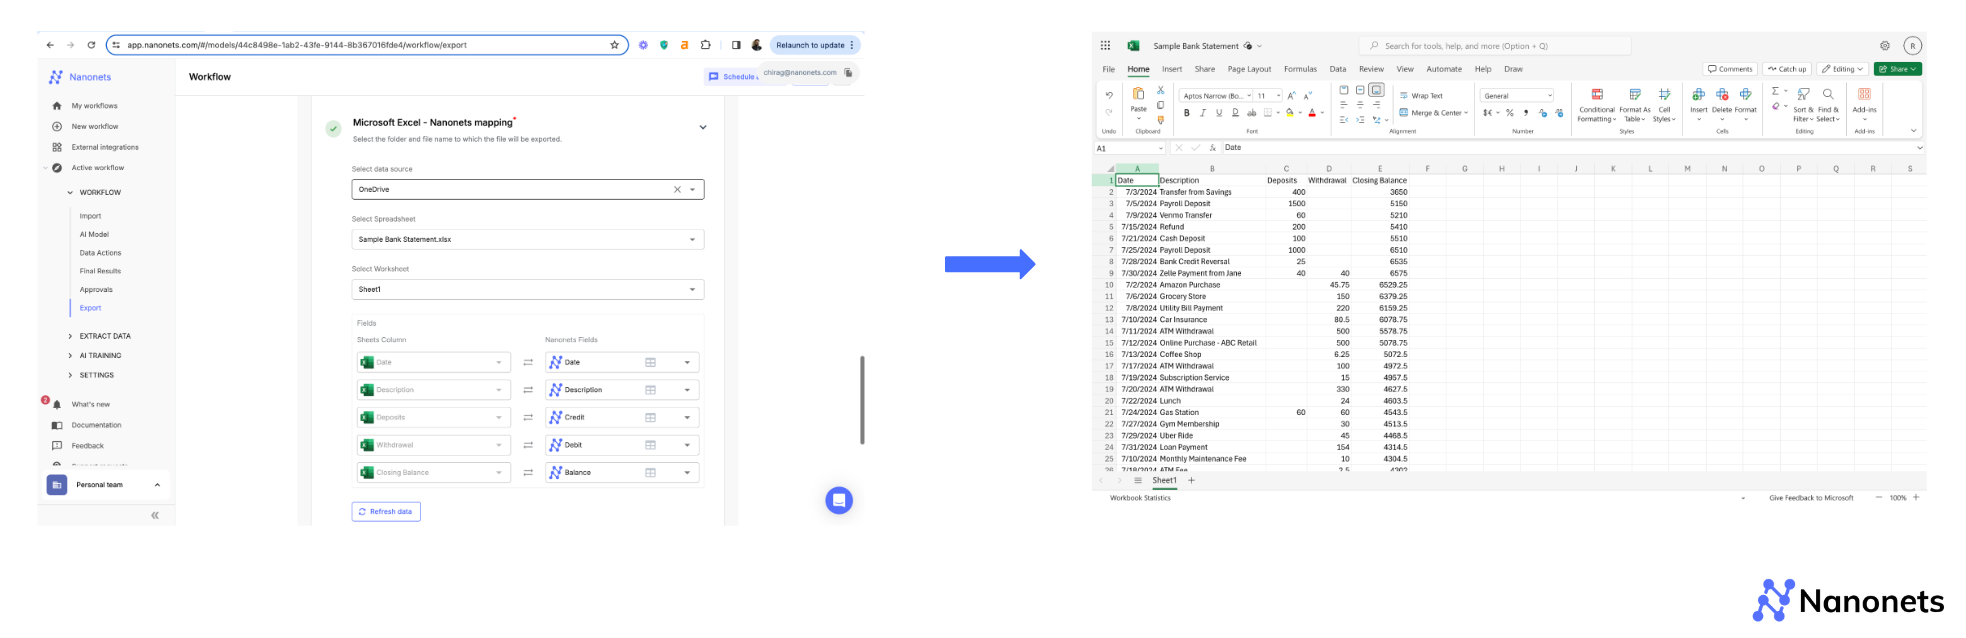
You can create a pre-configured Excel spreadsheet and extract specific data points using Nanonets native Excel export and mapping feature. This allows you to have more control over your output.
Check out the example below!
The following example shows the data extraction process for a bank statement. You can see how we can only have pre-determined column headers in an Excel file, namely, Date, Transaction detail, Credit, Debit and Closing Balance. We are mapping the data extracted from Word documents (from the transaction table only) into the Excel file and leaving out the rest.
The native Excel export and field mapping feature comes in handy for a number of use cases. We have taken an example of a bank statement above but that is just the tip of the iceberg. Other popular use cases in organisations include:
- Data extraction from financial statements, like, P&L statements, balance sheets, Invoices, receipts, purchase orders, tax forms, etc. Organisations benefit from having pre-configured excel files where only specific data points are extracted in a structured manner for reconciliation. This saves significant post-processing effort.
- Extracting data from travel and insurance documents such as passports, visas, claim forms, and insurance certificates into Excel becomes seamless. Nanonets can automate data extraction and structure it into Excel, making it easier for companies to manage customer information, process claims quickly, and ensure compliance.
- Converting medical documents like birth and death certificates, lab reports, and prescriptions into structured Excel sheets. This helps healthcare providers keep patient records organised, ensures quick access to critical information, and improves the overall coordination of care by maintaining a single source of truth for patient data.
- Streamlining HR processes by converting workplace documents such as resumes, appraisal forms, retirement applications among others into Excel. This allows HR teams to efficiently manage employee data, track applications, and perform data analysis for decision-making, all while reducing manual entry and processing time.
- Transforming legal documents like contracts, lease agreements, authorisation letters, claim forms into Excel files extracting only relevant information. This capability speeds up legal workflows by allowing easy extraction and organization of key data points, such as dates and financial terms, helping legal teams manage contracts and compliance more effectively.
Summary
There we have it. A step-by-step guide on how to convert Word documents into Excel spreadsheets.
While this is usually straightforward, sometimes there are significant challenges that cannot be overcome. These challenges arise given the complexity of documents being converted and the user’s exact needs.
For instance, let’s say you have a legal contract stored as a word document - you may not necessarily need all the data to be dumped into an Excel file. The ideal solution here would be a mix of two things - intelligent document understanding to pick the relevant data, and then copying it over to Excel.
For businesses - whether SMEs or enterprises - the volume of these documents also makes simple methods slow and inefficient. You may need to identify, classify and extract data at scale while also integrating with other software like your CRM, ERP or database.
To carry out these processes efficiently at scale, consider turning to more powerful tools like Nanonets that can not only extract text and tables from word documents directly into excel sheets - but also automate end-to-end business workflows for you!
Looking to accurately convert Word documents to Excel? Sick of manually copying and pasting tables from Word to Excel? Try Nanonets for free or set up a live, custom demo below!