

Oracle NetSuite offers a powerful API for integrating and extending your business workflows, but working effectively with these APIs requires a solid understanding of how they function.
In this guide we dive deep into the evolution of NetSuite's API offerings, the differences between NetSuite REST API and SOAP setting up API-based applications, and scaling your API deployments - all while leveraging NetSuite SuiteQL and NetSuite SuiteScript for more complex scenarios. We’ll also explore how tools like Nanonets can help automate your workflows across data layers.
Introduction to the NetSuite APIs
NetSuite started with the SuiteTalk SOAP API two decades ago, and it became the go-to solution for any business looking to integrate their systems with NetSuite's deep feature set. For many years, this was the standard API for NetSuite development.
To address the eventual limitations in the SOAP API, NetSuite released its REST API in 2019, offering a simpler, more scalable way to access data. The REST API embraced modern web standards like JSON, providing easier integration with cloud-native applications and APIs. However, not all is great with the REST API, as we will see later in this guide.
NetSuite also launched SuiteQL, introduced alongside the REST API - to further improve data querying with SQL-like syntax. As it turns out, SuiteQL one of the most useful features of the REST API.
Understanding the NetSuite APIs: SOAP vs REST
The NetSuite SOAP API
The NetSuite SOAP API has remained the standard for many years for any NetSuite integrations, and even today a lot of integrations will utilise the SOAP API simply because it is reliable and has good support.
The API uses complex XML payloads and has strict formatting, so while it might initially seem nice to have a high level of detail in every API call, it can quickly become cumbersome for cases where you need to integrate the APIs at some level of scale.
<soapenv:Envelope xmlns:soapenv="http://schemas.xmlsoap.org/soap/envelope/" xmlns:platform="urn:platform_2013_2.webservices.netsuite.com">
  <soapenv:Header>
    <platform:tokenPassport>
      <platform:account>123456</platform:account>
      <platform:consumerKey>abc123</platform:consumerKey>
      <platform:token>def456</platform:token>
      <platform:nonce>random123</platform:nonce>
      <platform:timestamp>1627891230</platform:timestamp>
    </platform:tokenPassport>
  </soapenv:Header>
  <soapenv:Body>
    <platform:recordRef internalId="12345" type="purchaseOrder"/>
  </soapenv:Body>
</soapenv:Envelope>
NetSuite SOAP API payloads are not always developer-friendly.
Further, all of the metadata (basically the data about the NetSuite objects) is stored in a format called WSDL (Web Services Description Language). And the only metadata you get is that of the standard NetSuite modules, objects and fields.
So if you created any custom fields (or, god forbid, entire custom objects) - you won't see them here. There's a nice way around this - using RESTlets - but that can quickly get messy.
What are RESTlets? Before we go further, let's understand a few NetSuite API concepts (feel free to skip ahead if you are already well versed).
SuiteScript and RESTlets
To define a RESTlet, we'll first have to define what SuiteScript is.
Here's a sample SuiteScript that updates the email address of a customer record in NetSuite:
/**
 * @NApiVersion 2.x
 * @NScriptType UserEventScript
 */
define(['N/record'], function(record) {
    function beforeSubmit(context) {
        var customerRecord = context.newRecord;

        // Set a new email address
        customerRecord.setValue({
            fieldId: 'email',
            value: 'newemail@example.com'
        });
    }

    return {
        beforeSubmit: beforeSubmit
    };
});
As an example - you can create a RESTlet to return data from NetSuite on the current inventory held. You can then use this data in another application (like running an approval process for Purchasing Managers to approve a purchase requisition based on current inventory levels).
However, creating and scaling RESTlet usage is cumbersome. It can be done, but needs a dedicated place to host your code and business logic + keep track of all custom entities (more on this later).
The NetSuite REST API
Designed to be lightweight and more suited for cloud-based apps, the REST API uses JSON payloads, reducing overhead in data transmission. The transition from SOAP to REST mirrored the growing demand for simpler, faster, and more accessible integrations, particularly for mobile apps and cloud ecosystems.
As is the case with most REST APIs, it can be tempting to completely sideline NetSuite's SOAP API - simply because developing with a REST API is generally much easier. But in NetSuite's case, this isn't always true.
The object structure in the REST API is difficult to deal with (owing in part to poor implementation of an object structure called HATEOAS) which basically means that the data of an object is not returned entirely in one go, but in nested links.
Here's an example - if you call a REST API endpoint like /vendors you would normally expect something like this in the response:
{
    {
      "vendorId": "123abc",
      "vendorName": "Test Vendor"
    },
    {
      "vendorId": "123abcd",
      "vendorName": "Test Vendor 2"
    },
    {
      "vendorId": "123abcde",
      "vendorName": "Test Vendor 3"
    }
}
Instead, what you get is a set of IDs of each vendor, and API links to the individual vendor entities themselves. So now you need to know the ID of the vendor you really want to get data for.
If you don't already know this ID, you're going to have to iterate over 500+ vendors for any basic operation. Every. Single. Time.
There is a way out, though, and that is to use SuiteQL.
SuiteQL
In fact, there is an entire separate endpoint in the REST API to call SuiteQL. Let's take the example above - here's how you can use SuiteQL to find data for the Vendor that you want:
HTTP Method - POST

https://<account_id>.suitetalk.api.netsuite.com/services/rest/query/v1/suiteql

//Send the actual SuiteQL query below in the request body
{
    "q": "SELECT * FROM Vendor where vendorName = 'Test Vendor 2'"
}
What about custom entities and fields in REST?
This is slightly easier in the REST API as well, as NetSuite gives a separate metadata catalog as a REST endpoint, and you can query (and persist if needed) the entire schema of all objects.
Here's a sample REST API payload (you can see how simple this looks compared to the SOAP-y mess we saw earlier).
import requests
from requests_oauthlib import OAuth1

url = 'https://<account_id>.suitetalk.api.netsuite.com/services/rest/record/v1/vendorBill'
auth = OAuth1('<consumer_key>', '<consumer_secret>', '<token>', '<token_secret>')

payload = {
    "entity": {"id": "12345"},
    "lineItems": [
        {"item": {"id": "5678"}, "quantity": 5},
        {"item": {"id": "9012"}, "quantity": 3}
    ]
}

response = requests.post(url, json=payload, auth=auth)
print(response.json())
Pros and Cons of the NetSuite API
The cliched (but unfortunately, correct) answer is that it really depends on your use case. While SOAP excels in environments requiring limited transactions on standard objects and high security, REST is preferred for its simplicity, flexibility and speed.
Advantages of the REST API
- JSON Payloads: Easy to read and debug, lightweight, and reduces bandwidth overhead.
- Faster Development: You don’t need to predefine strict structures like SOAP’s WSDL.
- Easier to use SuiteQL: SuiteQL is probably the most powerful aspect of NetSuite's API, and is a breeze to use with REST. With SOAP, you need to create a RESTlet to use SuiteQL.
Use Cases for the REST API
- Lightweight deployments like mobile apps or 3rd party applications where basic CRUD operations (create, read, update and delete) need to be done at speed.
- Complex Workflows with Custom Data - If you're working with customised NetSuite data structures, SuiteQL is by far the best way to query and combine data. For example, processes like the below:
- NetSuite Approval workflows based on custom fields, or
- Customised 2-way/3-way PO matching
Advantages of the SOAP API
- Reliable: Strong documentation and support since it is much older.
- Supports Saved Searches: One of the favourite ways of NetSuite users to get filtered, customized data, this extends the Saved Search functionality directly to the API.
Use Cases for the SOAP API
- Legacy deployments (like linking NetSuite to banking data) where reliability and thoroughness of information is more important than speed.
- Utilising Saved Searches - The SOAP API natively supports NetSuite Saved Searches, which are a very useful way of searching for data on the NetSuite UI. If you are replicating Saved Searches and pushing that data into another application, SOAP might be useful.
You'll find a lot more detail on the pros/cons of each API in this blog by Eric Popivker.
How to Set Up NetSuite API Calls
For the rest of this article, we will use the REST API as the basis for discussion (however many of the same processes will work with the SOAP API too).
Let's go through a step-by-step guide to set up the REST API and make an API call.
- Create an Integration Record:
- In NetSuite, navigate to
Setup > Integration > Manage Integrations > New. - Name your integration (e.g., “My REST API Integration”).
- Check "Token-Based Authentication (TBA)" to enable it for the integration.
- Save the record to generate the
Consumer KeyandConsumer Secret. You'll need these for OAuth authentication.
- In NetSuite, navigate to
- Assign Roles and Permissions:
- Go to
Setup > Users/Roles > Access Tokens > New. - Select the integration you just created.
- Choose the user and role (typically an admin or a role with the necessary permissions to access records via the API).
- Generate the
Token IDandToken Secret.
- Go to
- OAuth Setup:
- Create an access token via
Setup > Users/Roles > Access Tokens > New. - You’ll get a
TokenandToken Secretfor your application. - NetSuite uses OAuth 1.0a for authentication. This requires the above four key parameters:
Consumer KeyConsumer SecretToken IDToken Secret
- Create an access token via
API Call Example
Your REST API calls will need both headers and body (depending on the type of request).
- Headers:
- Authentication: The primary authentication is handled via OAuth 1.0a. You will pass OAuth tokens in the header.
- Content-Type: For POST or PUT requests, set this to
application/jsonsince NetSuite REST API works with JSON data.
Authorization: OAuth oauth_consumer_key="<consumer_key>",
                    oauth_token="<token>",
                    oauth_signature_method="HMAC-SHA1",
                    oauth_timestamp="<timestamp>",
                    oauth_nonce="<random_string>",
                    oauth_signature="<signature>"
Content-Type: application/json- Body: The body of the request is required when making POST or PUT requests, typically in JSON format. For example, when creating a customer record, your body might look like this:
{
  "companyName": "ABC Corp",
  "email": "contact@abccorp.com",
  "phone": "555-555-5555"
}
Here's a full API call for example:
import requests
from requests_oauthlib import OAuth1

url = 'https://<account_id>.suitetalk.api.netsuite.com/services/rest/record/v1/customer'
auth = OAuth1('<consumer_key>', '<consumer_secret>', '<token>', '<token_secret>')
headers = {
    'Content-Type': 'application/json'
}
data = {
    "companyName": "ABC Corp",
    "email": "contact@abccorp.com",
    "phone": "555-555-5555"
}
response = requests.post(url, json=data, auth=auth, headers=headers)
print(response.json())
Common Issues
- OAuth Setup: "Invalid signature" errors are common with OAuth 1.0a, often caused by incorrect parameter ordering or key misconfiguration.
- Incorrect API URL: Ensure that you’re using the correct NetSuite account ID in the API endpoint URL, e.g.,
https://<account_id>.suitetalk.api.netsuite.com. - 403 Forbidden: This could be due to incorrect permissions or access levels for the user or role tied to the token.
Use an API testing tool like Postman or Insomnia for easier debugging and help with API issues.
Common Use Cases for the NetSuite API
If you're looking to integrate NetSuite with other applications, you may already know that NetSuite typically has pre-configured NetSuite SuiteApp integrations and workflow tools that can interface with various business applications, including:
- CRM Tools: Integrate with Salesforce, HubSpot, or Zoho to sync customer and sales data.
- Workplace Apps: Tools like Slack and Microsoft Teams can be integrated for real-time notifications or workflows.
- E-commerce Platforms: Connect NetSuite to platforms like Shopify or Magento for inventory syncs and order management.
Here's a list of the top integrations that exist for NetSuite today.
There are also multiple software platforms that typically help you set up drag-and-drop workflows with these integrations:
- Celigo
- Workato
- MuleSoft
- Boomi
When are these pre-built workflow integrations useful?
You can solve a lot of business problems with good integrations. Think of cases like:
- Having to cross-check a customer invoice in NetSuite against customer data that's present in Salesforce/Hubspot
- Having to manually enter data into NetSuite when scanning complex bills/invoices because the OCR template is brand new and not recognised
But they may not solve all your problems. Consider the below situation:
Another common scenario - your business might rely on strong real-time inventory tracking. So you set up SuiteScripts to continuously monitor stock levels – but now it's impacting your NetSuite system performance.
Pre-built integrations go only so far, as we'll find out next.
When to Use the NetSuite API
(instead of pre-built integrations)
Pre-built workflow tools and integrations simplify the setup for common use cases but fall short in handling complex, customized workflows. For instance, when it comes to doing complex processes at scale, you will probably need to turn to the API.
Let's take an example - say you have a Purchase Order matching process where you need to match a PO to multiple vendor bills.
The standard NetSuite API has a function called PO Transform, that will be present on many pre-built integrations and will be integrated on the back-end code of most AP SaaS solutions.
This REST method has the below endpoint:
https://<account_id>.suitetalk.api.netsuite.com/services/rest/record/v1/purchaseOrder/<purchase_order_internal_id>/!transform/vendorBill
You can call this API in the manner below:
import requests
from requests_oauthlib import OAuth1

# NetSuite account information
account_id = '<account_id>'
purchase_order_id = '<purchase_order_internal_id>'
url = f'https://{account_id}.suitetalk.api.netsuite.com/services/rest/record/v1/purchaseOrder/{purchase_order_id}/!transform/vendorBill'

# OAuth1 Authentication
auth = OAuth1('<consumer_key>', '<consumer_secret>', '<token>', '<token_secret>')

payload = {
    "entity": {
        "id": "<vendor_id>"
    },
    "memo": "Converted from PO",
    "location": {
        "id": "2"
    },
    "lineItems": [
        {
            "item": {"id": "1234"},
            "quantity": 10,
            "amount": 100.00
        }
    ]
}

response = requests.post(url, json=payload, auth=auth)

print(response.json())
The issue with the predefined method is that it will end up billing the ENTIRE Purchase Order. There is no way for you to restrict it by selecting only part of the quantity as per the Vendor Bill.
So what is the solution?
How To Build a Complex Workflow
Let’s now demonstrate a better way to handle the above situation where the pre-built integration fails. To achieve our objective in this PO matching scenario, we will need to use a SuiteQL query and then run a SuiteScript as below:
SuiteQL Query
SELECT id, item, quantity, amount
FROM transactionLine
WHERE transactionType = 'PurchaseOrder'
AND transaction.id = '12345';
This SQL-like query fetches data for a particular Purchase Order, which you can use as input for further API calls or workflow automation. Note that we don't need to iterate through EVERY purchase order to get this done.
The REST API call for this SuiteQL query is:
curl -X POST https://<account_id>.suitetalk.api.netsuite.com/services/rest/query/v1/suiteql \
-H "Authorization: OAuth oauth_consumer_key='<consumer_key>', oauth_token='<token>', oauth_signature='<signature>'" \
-H "Content-Type: application/json" \
-d '{
    "q": "SELECT id, item, quantity, amount FROM transactionLine WHERE transactionType = 'PurchaseOrder' AND transaction.id = '12345';"
}'
SuiteScript for Creating Vendor Bill
function createVendorBill(poId) {
    var poRecord = record.load({
        type: record.Type.PURCHASE_ORDER,
        id: poId
    });

    var billRecord = record.create({
        type: record.Type.VENDOR_BILL
    });

    for (var i = 0; i < poRecord.getLineCount('item'); i++) {
        var quantity = poRecord.getSublistValue({ sublistId: 'item', fieldId: 'quantity', line: i });
        if (quantity > 0) {
            billRecord.selectNewLine({ sublistId: 'item' });
            billRecord.setCurrentSublistValue({ sublistId: 'item', fieldId: 'item', value: poRecord.getSublistValue({ sublistId: 'item', fieldId: 'item', line: i }) });
            billRecord.setCurrentSublistValue({ sublistId: 'item', fieldId: 'quantity', value: quantity });
            billRecord.commitLine({ sublistId: 'item' });
        }
    }
    billRecord.save();
}
This SuiteScript is customizable - you can choose to update quantities on the PO partially, or you can choose to never update the PO until it is fully matched across multiple invoices. The choice is completely yours.
You can trigger this SuiteScript via the REST API as well. Below is the sample API call:
curl -X POST https://<account_id>.suitetalk.api.netsuite.com/services/rest/script/v1/scriptexecution \
-H "Authorization: OAuth oauth_consumer_key='<consumer_key>', oauth_token='<token>', oauth_signature='<signature>'" \
-H "Content-Type: application/json" \
-d '{
    "scriptId": "customscript_create_vendor_bill",
    "deploymentId": "customdeploy_create_vendor_bill",
    "params": {
        "poId": "12345"
    }
}'
In this way you can leverage the flexibility of the NetSuite API, SuiteQL, and SuiteScript to automate complex business processes.
How to Use the NetSuite API in your Application
While you can test API calls in Postman, you will need a more organized way to interact with the NetSuite API and actually store and use the data you fetch.
To start with, you can set up a small application in Python. Here’s the basic setup for doing this:
Create a Python File:
import requests
from requests_oauthlib import OAuth1

def netsuite_api_call():
    url = 'https://<account_id>.suitetalk.api.netsuite.com/services/rest/record/v1/customer'
    auth = OAuth1('<consumer_key>', '<consumer_secret>', '<token>', '<token_secret>')
    response = requests.get(url, auth=auth)
    return response.json()

if __name__ == "__main__":
    print(netsuite_api_call())
Install Required Libraries:
pip install requests requests_oauthlib
Storing Data:
For one-off use cases, you can get by with storing data locally in a JSON.
with open('netsuite_data.json', 'w') as file:
json.dump(data, file, indent=4)
For cases with more data and regular API calls to be done, you can set up a SQL database like SQLite3 using the below sample code.
import sqlite3

conn = sqlite3.connect('netsuite_data.db')
cursor = conn.cursor()

cursor.execute('''
    CREATE TABLE IF NOT EXISTS customers (
        id INTEGER PRIMARY KEY,
        name TEXT,
        email TEXT
    )
''')

# Insert data into the database
for customer in data['items']:
    cursor.execute('''
        INSERT INTO customers (id, name, email)
        VALUES (?, ?, ?)
    ''', (customer['id'], customer['companyName'], customer['email']))

conn.commit()
conn.close()
However beyond a certain point, you'll need a production DB and a way to properly administer and manage all this NetSuite data.
How to Deploy NetSuite APIs at Scale
Deploying NetSuite APIs at scale requires careful consideration of performance, automation, and the layers of data you’re working with. End-to-end workflow automation tools are generally the best fit for this - they can greatly simplify this process by providing an environment that allows you to manage automation across different layers.
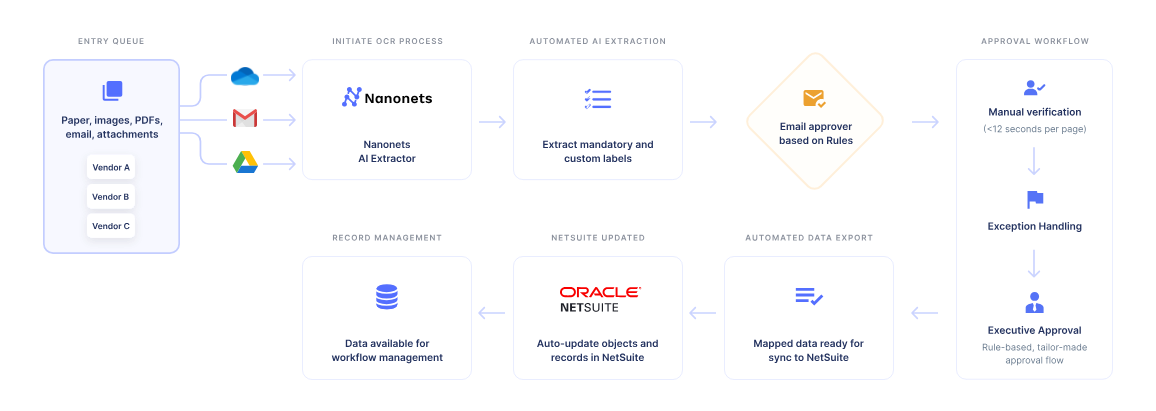
Automating Across 3 Data Layers
- Document Layer:
- This includes processing documents like POs, invoices, bank statements, and vendor bills. Tools typically use AI-enabled OCR and machine learning to extract data from these documents.
- AP Process Layer:
- The AP automation layer involves business logic, such as approval routing and matching documents like POs to invoices. Workflow tools can automate the logic here to automate these processes.
- ERP Layer:
- The ERP layer refers to the data and operations within NetSuite itself. Using NetSuite’s API, these workflow tools can sync bi-directionally with NetSuite to push or pull data from the system, without compromising the master data.
Nanonets is an AI workflow automation tool that allows businesses to orchestrate these layers in harmony, enabling document understanding, a smooth AP process, and maintaining a single source of truth within NetSuite.
Why Nanonets is Ideal for Scaling NetSuite API Usage
- Best-in-class AI enabled OCR: Data extraction that doesn't depend on OCR templates and continuously learns from user inputs.
- Business Logic Automation: By allowing custom code deployment, Nanonets automates processes like invoice matching, approval routing, and PO creation.
- Deep ERP Sync: Interface in real-time with every single data point in NetSuite, including custom objects and fields.
Using NetSuite’s SOAP and REST APIs, our platform helps you access important information and create solutions that fit your accounting needs. For example, SuiteQL lets you quickly pull data in a format that’s easy to use, saving you time on complex tasks. For example, our platform allows you to create vendor bills or match purchase orders using API calls, reducing manual work and errors. We also help you control who can access sensitive accounting information, keeping your data safe while making it easy to use. Whether you’re working on small integrations or handling large workflows, we help you build a system that grows with your business.
Interested in learning more? A short 15-minute intro call with an automation expert is the best way to get started.
References: