

We live in times when any organization or company to scale and to stay relevant has to change how they look at technology and adapt to the changing landscapes swiftly.
We already know how Google has digitized books. Or how Google earth is using NLP (or NER) to identify addresses. Or how it is possible to read text in digital documents like invoices, legal paperwork, etc.
But how does it work exactly?
This post is about Optical character recognition(OCR) for text recognition in natural scene images. We will learn about why it is a tough problem, approaches used to solve this and the code that goes along with it. We will also see how OCR can leverage machine learning and deep learning to overcome limitations.
Have an OCR problem in mind? Want to extract data from documents? Head over to Nanonets and build OCR models for free!
But Why Really?
In this era of digitization, storing, editing, document indexing and finding information in a digital document is much easier than spending hours scrolling through the printed/handwritten/typed documents.
And moreover searching something in a large non-digital document is not just time-consuming but also, it is likely for us to miss the information while scrolling the document manually. Lucky for us, computers are getting better everyday at doing the tasks humans thought only they could do, often performing better than us as well.
Extracting text from images has found numerous applications.
Some of the applications are Passport recognition, automatic number plate recognition, converting handwriting to text, converting handwritten texts to digital text, and converting typed text to digital text, among others.
Challenges

Before going through how we need to understand the challenges we face in OCR problem.
Many OCR implementations were available even before the boom of deep learning in 2012. While it was popularly believed that OCR was a solved problem, OCR is still a challenging problem especially when text images are taken in an unconstrained environment.
I am talking about complex backgrounds, noise, lightning, different font, and geometrical distortions in the image.
It is in such situations that the machine learning OCR (or machine learning for image processing) tools shine.
Challenges in the OCR problem arises mostly due to the attribute of the OCR tasks at hand. We can generally divide these tasks into two categories:
Structured Text- Text in a typed document. In a standard background, proper row, standard font and mostly dense.
Unstructured Text- Text at random places in a natural scene. Sparse text, no proper row structure, complex background , at random place in the image and no standard font.
A lot of earlier techniques solved the OCR problem for structured text.
But these techniques didn't properly work for a natural scene, which is sparse and has different attributes than structured data.
In this blog, we will be focusing more on unstructured text which is a more complex problem to solve.
As we know in the deep learning world, there is no one solution which works for all. We will be seeing multiple approaches to solve the task at hand and will work through one approach among them.
Nanonets OCR API has many interesting use cases. Talk to a Nanonets AI expert to learn more.
Datasets for unstructured OCR tasks
There are lots of datasets available in English but it's harder to find datasets for other languages. Different datasets present different tasks to be solved. Here are a few examples of datasets commonly used for machine learning OCR problems.
SVHN dataset
The Street View House Numbers dataset contains 73257 digits for training, 26032 digits for testing, and 531131 additional as extra training data. The dataset includes 10 labels which are the digits 0-9. The dataset differs from MNIST since SVHN has images of house numbers with the house numbers against varying backgrounds. The dataset has bounding boxes around each digit instead of having several images of digits like in MNIST.
Scene Text dataset
This dataset consists of 3000 images in different settings (indoor and outdoor) and lighting conditions (shadow, light and night), with text in Korean and English. Some images also contain digits.
Devanagri Character dataset
This dataset provides us with 1800 samples from 36 character classes obtained by 25 different native writers in the devanagri script.
And there are many others like this one for chinese characters, this one for CAPTCHA or this one for handwritten words.
Reading text in the wild
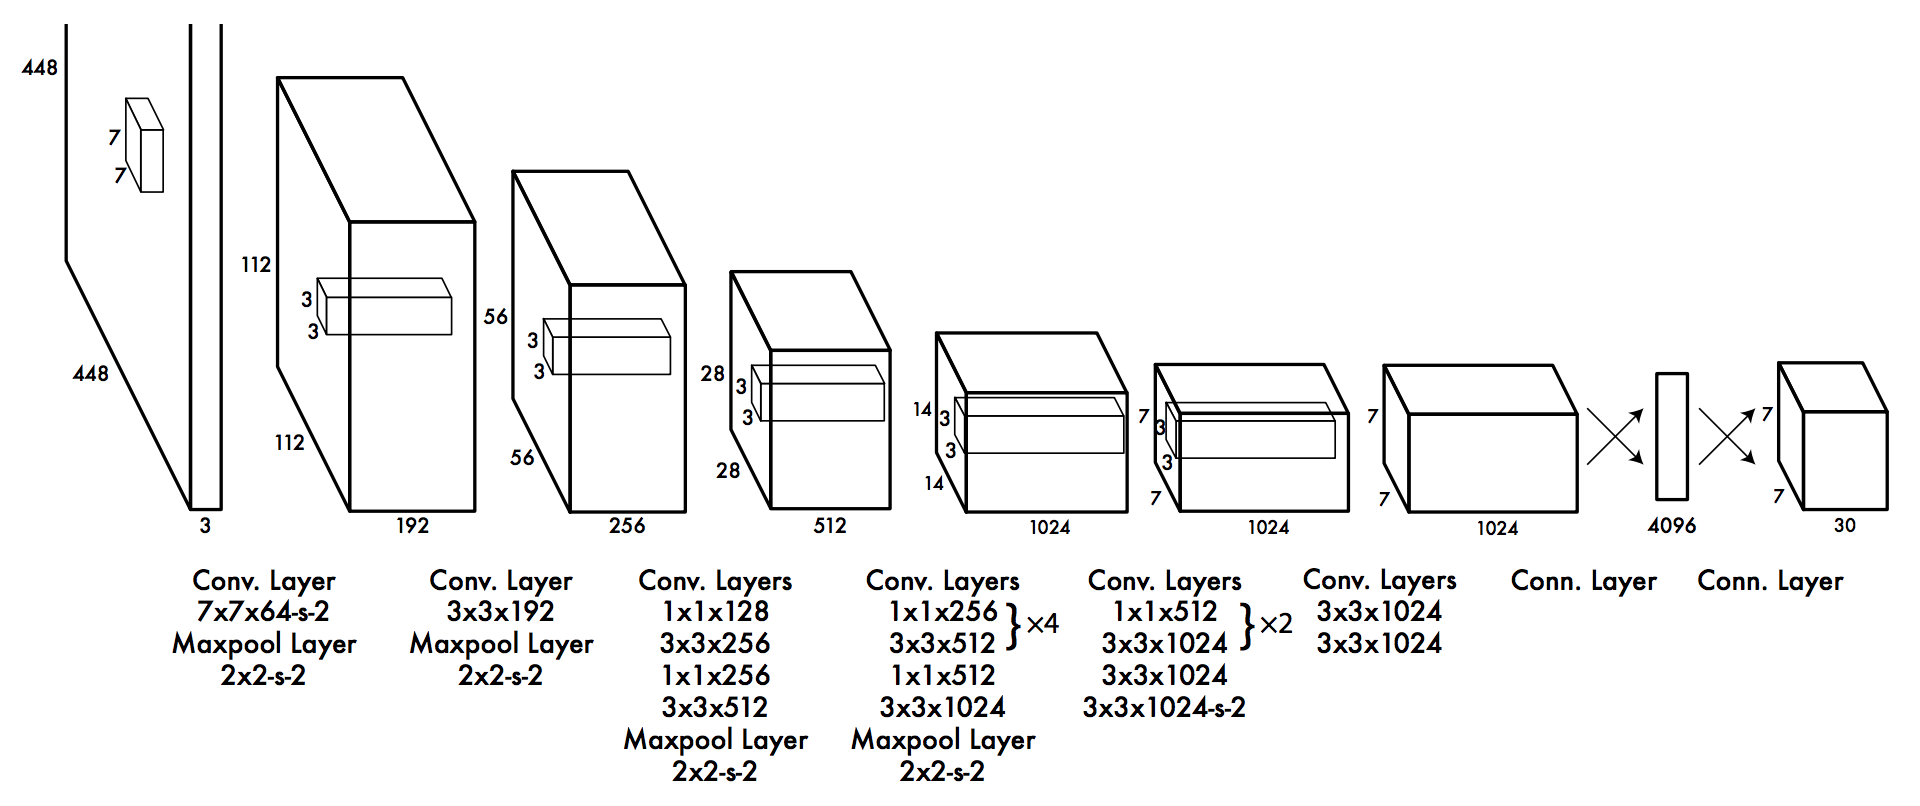
Any Typical machine learning OCR pipeline follows the following steps :

Preprocessing
- Remove the noise from the image
- Remove the complex background from the image
- Handle the different lightning condition in the image
These are the standard ways to preprocess image in a computer vision task. We will not be focusing on preprocessing step in this blog.
Text Detection

Text detection techniques required to detect the text in the image and create and bounding box around the portion of the image having text. Standard objection detection techniques will also work here.
Sliding window technique
The bounding box can be created around the text through the sliding window technique. However, this is a computationally expensive task. In this technique, a sliding window passes through the image to detect the text in that window, like a convolutional neural network. We try with different window size to not miss the text portion with different size. There is a convolutional implementation of the sliding window which can reduce the computational time.
Single Shot and Region based detectors
There are single-shot detection techniques like YOLO(you only look once) and region-based text detection techniques for text detection in the image.
YOLO is single-shot techniques as you pass the image only once to detect the text in that region, unlike the sliding window.
Region-based approach work in two steps.
First, the network proposes the region which would possibly have the test and then classify the region if it has the text or not. You can refer one of my previous article to understand techniques for object detection, in our case text detection.
EAST (Efficient accurate scene text detector)
This is a very robust deep learning method for text detection based on this paper. It is worth mentioning as it is only a text detection method. It can find horizontal and rotated bounding boxes. It can be used in combination with any text recognition method.
The text detection pipeline in this paper has excluded redundant and intermediate steps and only has two stages.
One utilizes the fully convolutional network to directly produce word or text-line level prediction. The produced predictions which could be rotated rectangles or quadrangles are further processed through the non-maximum-suppression step to yield the final output.
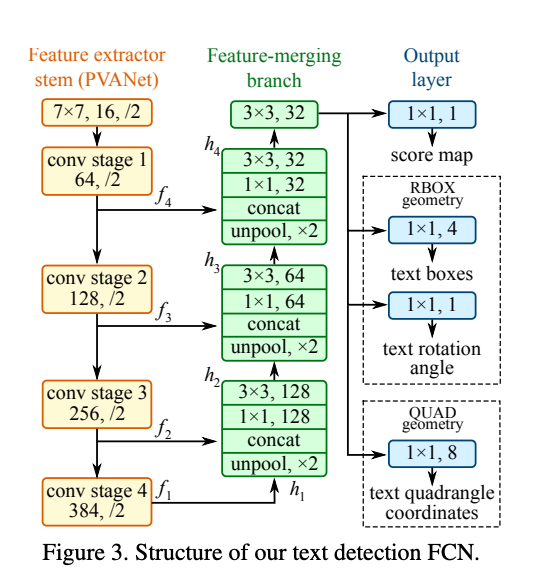
EAST can detect text both in images and in the video. As mentioned in the paper, it runs near real-time at 13FPS on 720p images with high text detection accuracy. Another benefit of this technique is that its implementation is available in OpenCV 3.4.2 and OpenCV 4. We will be seeing this EAST model in action along with text recognition.
Text Recognition
Once we have detected the bounding boxes having the text, the next step is to recognize text. There are several techniques for recognizing the text. We will be discussing some of the best techniques in the following section.
CRNN
Convolutional Recurrent Neural Network (CRNN) is a combination of CNN, RNN, and CTC(Connectionist Temporal Classification) loss for image-based sequence recognition tasks, such as scene text recognition and OCR. The network architecture has been taken from this paper published in 2015.
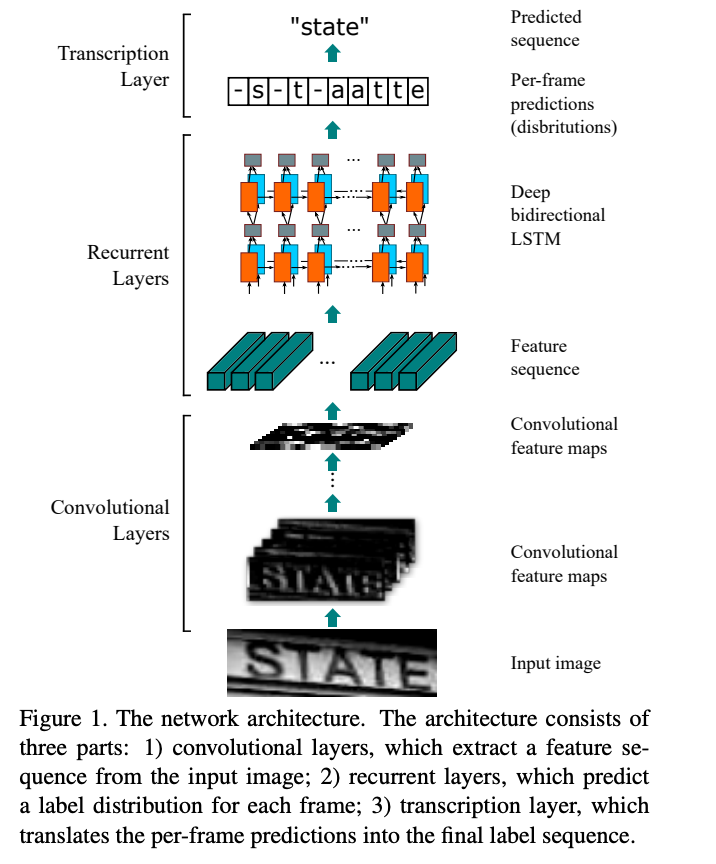
This neural network architecture integrates feature extraction, sequence modeling, and transcription into a unified framework. This model does not need character segmentation. The convolution neural network extracts features from the input image(text detected region). The deep bidirectional recurrent neural network predicts label sequence with some relation between the characters. The transcription layer converts the per-frame made by RNN into a label sequence. There are two modes of transcription, namely the lexicon-free and lexicon-based transcription. In the lexicon-based approach, the highest probable label sequence will be predicted.
Machine Learning OCR with Tesseract
Tesseract was originally developed at Hewlett-Packard Laboratories between 1985 and 1994. In 2005, it was open-sourced by HP. As per wikipedia-
In 2006, Tesseract was considered one of the most accurate open-source OCR engines then available.
The capability of the Tesseract OCR was mostly limited to structured text data. It would perform quite poorly in unstructured text with significant noise. Further development in Tesseract has been sponsored by Google since 2006.
Deep-learning based method performs better for the unstructured data. Tesseract 4 added deep-learning based capability with LSTM network(a kind of Recurrent Neural Network) based OCR engine which is focused on the line recognition but also supports the legacy Tesseract OCR engine of Tesseract 3 which works by recognizing character patterns. The latest stable version 4.1.0 is released on July 7, 2019. This version is significantly more accurate on the unstructured text as well.
We will use some of the images to show both text detection with the EAST method and text recognition with Tesseract 4. Let's see text detection and recognition in action in the following code. The article here proved to be a helpful resource in writing the code for this project.
##Loading the necessary packages
import numpy as np
import cv2
from imutils.object_detection import non_max_suppression
import pytesseract
from matplotlib import pyplot as plt
Loading the packages
#Creating argument dictionary for the default arguments needed in the code.
args = {"image":"../input/text-detection/example-images/Example-images/ex24.jpg", "east":"../input/text-detection/east_text_detection.pb", "min_confidence":0.5, "width":320, "height":320}
Creating argument dictionary with some default values
Here, I am working with essential packages. OpenCV package uses the EAST model for text detection. The tesseract package is for recognizing text in the bounding box detected for the text. Make sure you have tesseract version >= 4. There are several sources available online to guide installation of the tesseract.
Created a dictionary for the default arguments needed in the code. Let's see what these arguments mean.
- image: The location of the input image for text detection & recognition.
- east: The location of the file having the pre-trained EAST detector model.
- min-confidence: Min probability score for the confidence of the geometry shape predicted at the location.
- width: Image width should be multiple of 32 for the EAST model to work well.
- height: Image height should be multiple of 32 for the EAST model to work well.
#Give location of the image to be read.
#"Example-images/ex24.jpg" image is being loaded here.

args['image']="../input/text-detection/example-images/Example-images/ex24.jpg"
image = cv2.imread(args['image'])

#Saving a original image and shape
orig = image.copy()
(origH, origW) = image.shape[:2]

# set the new height and width to default 320 by using args #dictionary.
(newW, newH) = (args["width"], args["height"])

#Calculate the ratio between original and new image for both height and weight.
#This ratio will be used to translate bounding box location on the original image.
rW = origW / float(newW)
rH = origH / float(newH)

# resize the original image to new dimensions
image = cv2.resize(image, (newW, newH))
(H, W) = image.shape[:2]

# construct a blob from the image to forward pass it to EAST model
blob = cv2.dnn.blobFromImage(image, 1.0, (W, H),
	(123.68, 116.78, 103.94), swapRB=True, crop=False)
Image processing
# load the pre-trained EAST model for text detection
net = cv2.dnn.readNet(args["east"])

# We would like to get two outputs from the EAST model.
#1. Probabilty scores for the region whether that contains text or not.
#2. Geometry of the text -- Coordinates of the bounding box detecting a text
# The following two layer need to pulled from EAST model for achieving this.
layerNames = [
	"feature_fusion/Conv_7/Sigmoid",
	"feature_fusion/concat_3"]
Loading Pre-trained EAST model and defining output layers
#Forward pass the blob from the image to get the desired output layers
net.setInput(blob)
(scores, geometry) = net.forward(layerNames)
Forward pass the image through EAST model
## Returns a bounding box and probability score if it is more than minimum confidence
def predictions(prob_score, geo):
	(numR, numC) = prob_score.shape[2:4]
	boxes = []
	confidence_val = []

	# loop over rows
	for y in range(0, numR):
		scoresData = prob_score[0, 0, y]
		x0 = geo[0, 0, y]
		x1 = geo[0, 1, y]
		x2 = geo[0, 2, y]
		x3 = geo[0, 3, y]
		anglesData = geo[0, 4, y]

		# loop over the number of columns
		for i in range(0, numC):
			if scoresData[i] < args["min_confidence"]:
				continue

			(offX, offY) = (i * 4.0, y * 4.0)

			# extracting the rotation angle for the prediction and computing the sine and cosine
			angle = anglesData[i]
			cos = np.cos(angle)
			sin = np.sin(angle)

			# using the geo volume to get the dimensions of the bounding box
			h = x0[i] + x2[i]
			w = x1[i] + x3[i]

			# compute start and end for the text pred bbox
			endX = int(offX + (cos * x1[i]) + (sin * x2[i]))
			endY = int(offY - (sin * x1[i]) + (cos * x2[i]))
			startX = int(endX - w)
			startY = int(endY - h)

			boxes.append((startX, startY, endX, endY))
			confidence_val.append(scoresData[i])

	# return bounding boxes and associated confidence_val
	return (boxes, confidence_val)
Function to decode bounding box from EAST model prediction
In this exercise, we are only decoding horizontal bounding boxes. Decoding rotating bounding boxes from the scores and geometry is more complex.
# Find predictions and  apply non-maxima suppression
(boxes, confidence_val) = predictions(scores, geometry)
boxes = non_max_suppression(np.array(boxes), probs=confidence_val)
Getting final bounding boxes after non max suppression
Now that we have derived the bounding boxes after applying non-max-suppression. We would want to see the bounding boxes on the image and how we can extract the text from the detected bounding boxes. We do this using tesseract.
##Text Detection and Recognition

# initialize the list of results
results = []

# loop over the bounding boxes to find the coordinate of bounding boxes
for (startX, startY, endX, endY) in boxes:
	# scale the coordinates based on the respective ratios in order to reflect bounding box on the original image
	startX = int(startX * rW)
	startY = int(startY * rH)
	endX = int(endX * rW)
	endY = int(endY * rH)

	#extract the region of interest
	r = orig[startY:endY, startX:endX]

	#configuration setting to convert image to string.
	configuration = ("-l eng --oem 1 --psm 8")
    ##This will recognize the text from the image of bounding box
	text = pytesseract.image_to_string(r, config=configuration)

	# append bbox coordinate and associated text to the list of results
	results.append(((startX, startY, endX, endY), text))
Generating list with bounding box coordinates and recognized text in the boxes
Above portion of the code has stored bounding box coordinates and associated text in a list. We will see how does it look on the image.
In our case, we have used a specific configuration of the tesseract. There are multiple options available for tesseract configuration.
l: language, chosen English in the above code.
oem(OCR Engine modes):
0 Legacy engine only.
1 Neural nets LSTM engine only.
2 Legacy + LSTM engines.
3 Default, based on what is available.
psm(Page segmentation modes):
0 Orientation and script detection (OSD) only.
1 Automatic page segmentation with OSD.
2 Automatic page segmentation, but no OSD, or OCR. (not implemented)
3 Fully automatic page segmentation, but no OSD. (Default)
4 Assume a single column of text of variable sizes.
5 Assume a single uniform block of vertically aligned text.
6 Assume a single uniform block of text.
7 Treat the image as a single text line.
8 Treat the image as a single word.
9 Treat the image as a single word in a circle.
10 Treat the image as a single character.
11 Sparse text. Find as much text as possible in no particular order.
12 Sparse text with OSD.
13 Raw line. Treat the image as a single text line, bypassing hacks that are Tesseract-specific.
We can choose the specific Tesseract configuration on the basis of our image data.
#Display the image with bounding box and recognized text
orig_image = orig.copy()

# Moving over the results and display on the image
for ((start_X, start_Y, end_X, end_Y), text) in results:
	# display the text detected by Tesseract
	print("{}\n".format(text))

	# Displaying text
	text = "".join([x if ord(x) < 128 else "" for x in text]).strip()
	cv2.rectangle(orig_image, (start_X, start_Y), (end_X, end_Y),
		(0, 0, 255), 2)
	cv2.putText(orig_image, text, (start_X, start_Y - 30),
		cv2.FONT_HERSHEY_SIMPLEX, 0.7,(0,0, 255), 2)

plt.imshow(orig_image)
plt.title('Output')
plt.show()
Display image with bounding box and recognized text
Results
Above code uses OpenCV EAST model for text detection and tesseract for text recognition. PSM for the Tesseract has been set accordingly to the image. It is important to note that Tesseract normally requires a clear image for working well.
In our current implementation, we did not consider rotating bounding boxes due to its complexity to implement. But in the real scenario where the text is rotated, the above code will not work well. Also, whenever the image is not very clear, tesseract will have difficulty to recognize the text properly.
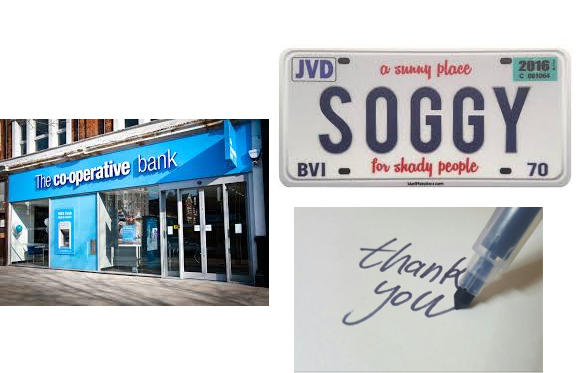
Some of the output generated through the above code are:

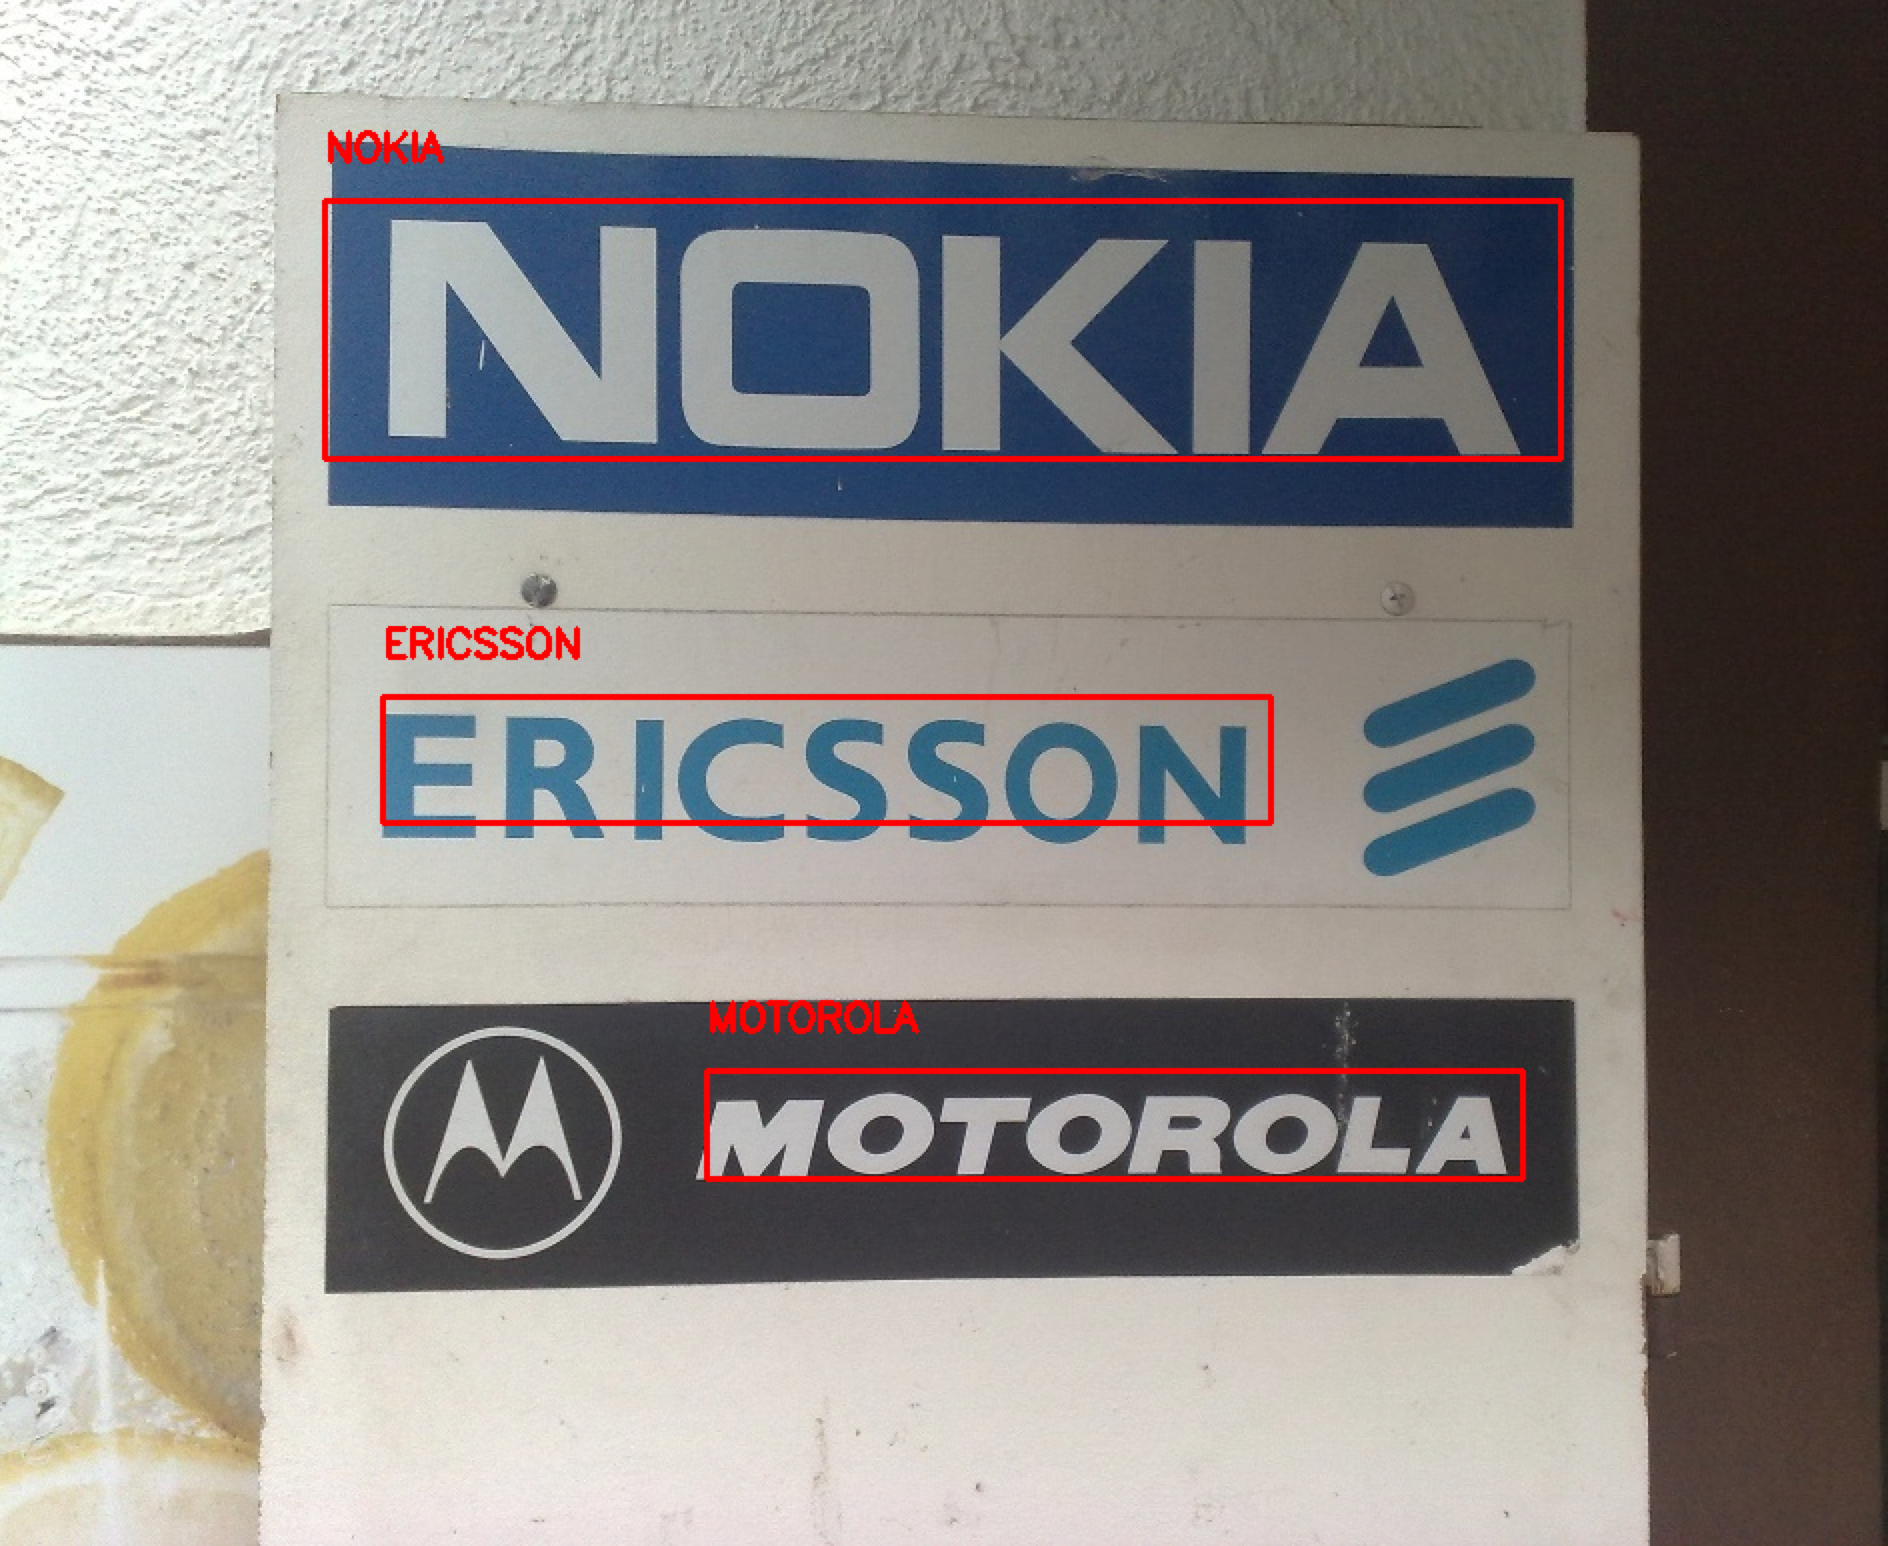
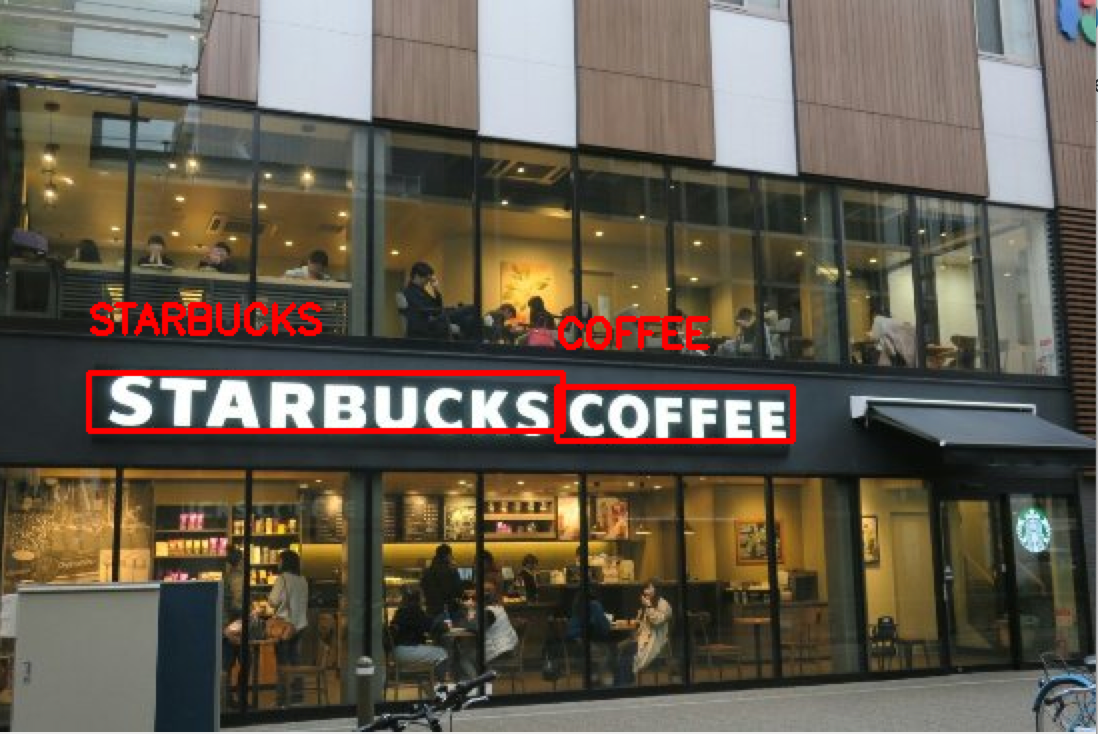
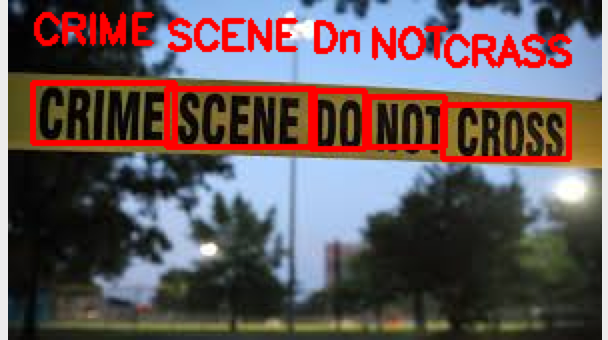
The code could deliver excellent results for all the above three images. The text is clear and background behind the text is also uniform in these images.
The model performed pretty well here. But some of the alphabets are not recognized correctly. You can see that bounding boxes are mostly correct as they should be. May be slight rotation would help. But our current implementation does not provide rotating bounding boxes. It seems due to image clarity, tesseract could not recognize it perfectly.
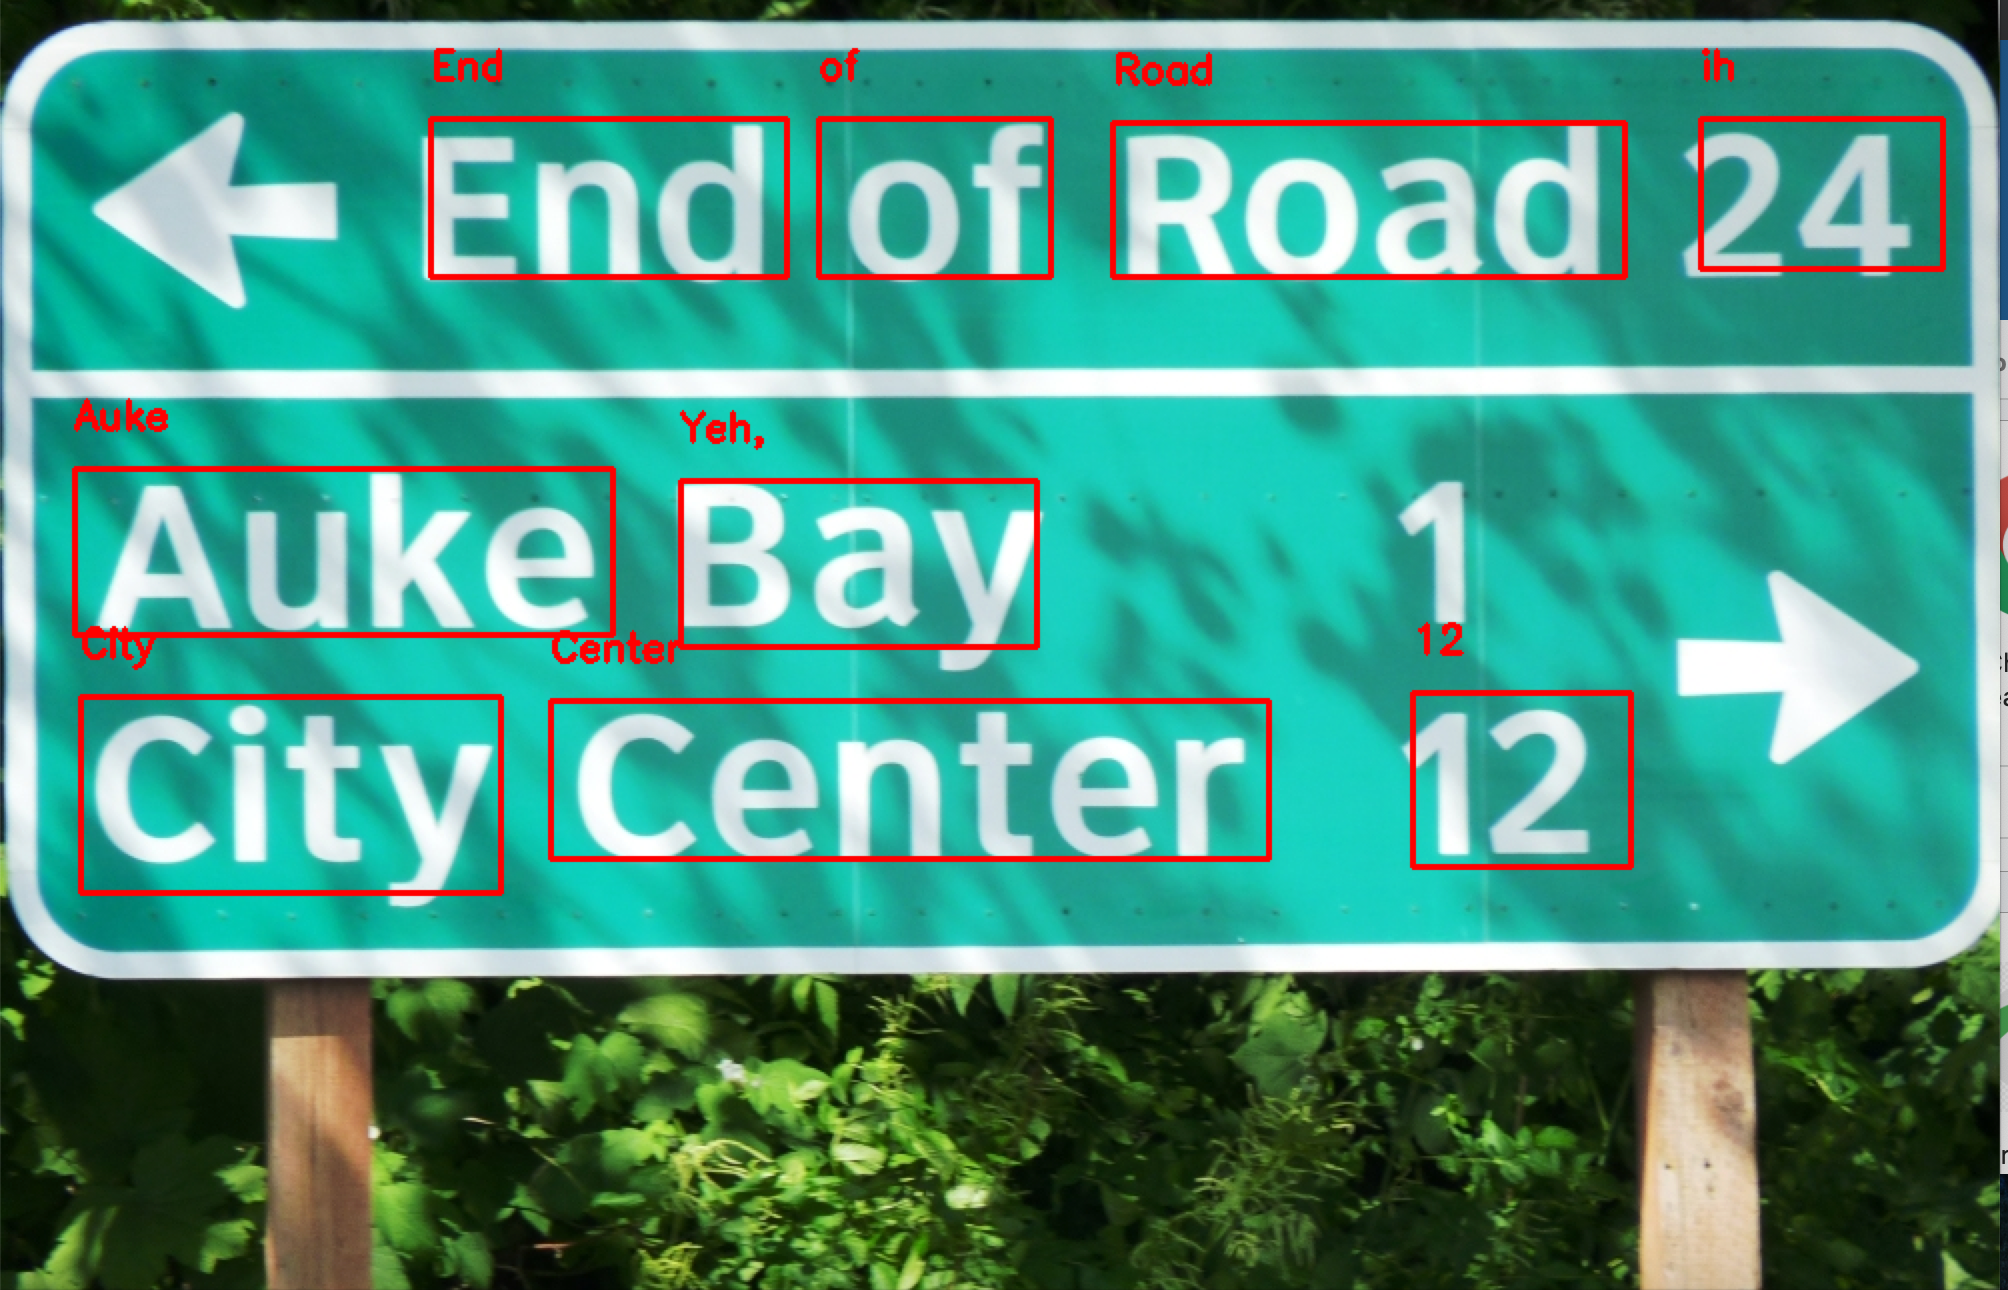
The model performed pretty decently here. But some of the texts in bounding boxes are not recognized correctly. Numeric 1 could not be detected at all. There is a non-uniform background here, maybe generating a uniform background would have helped this case. Also, 24 is not properly bounded in the box. In such a case, padding the bounding box could help.
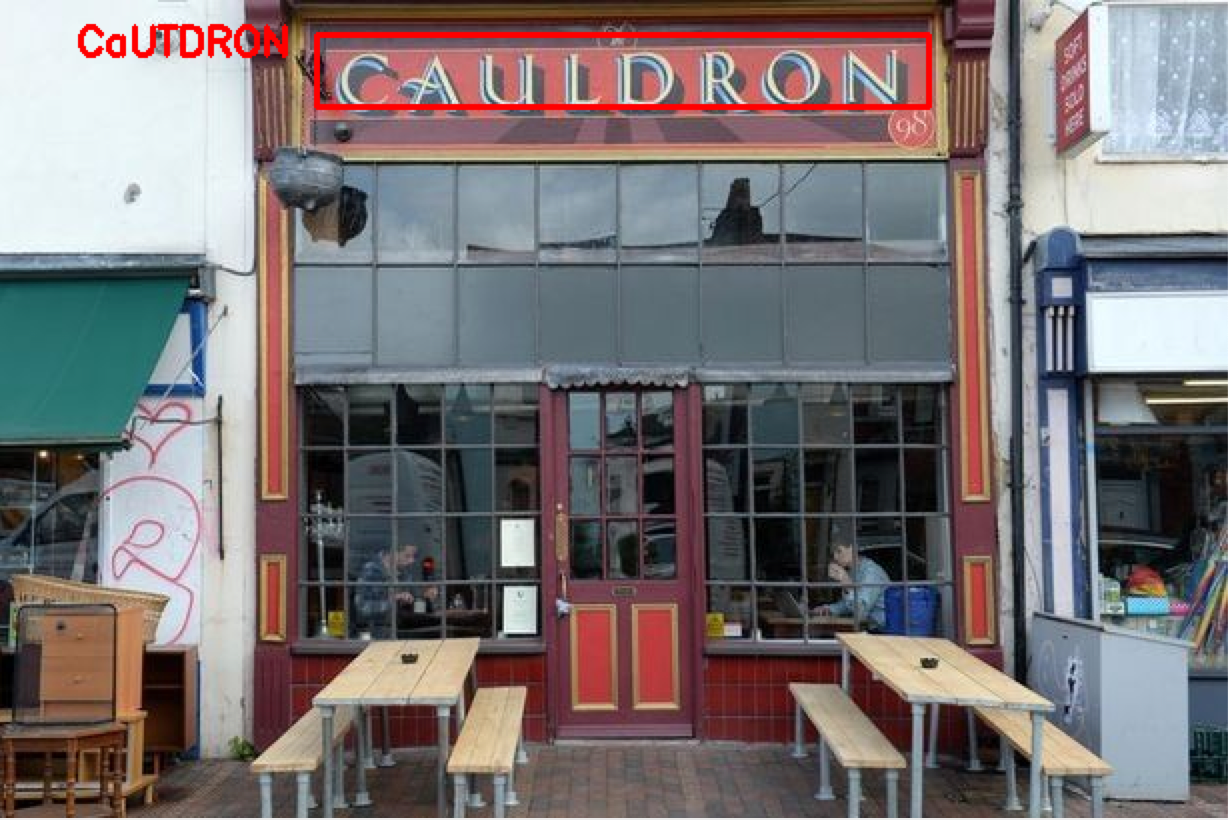
It seems that stylized font with shadow in the background has affected the result in the above case.
We can not expect the OCR model to be 100 % accurate. Still, we have achieved good results with the EAST model and Tesseract. Adding more filters for processing the image would help in improving the performance of the model.
You can also find this code for this project on a Kaggle kernel to try it out on your own.
Nanonets OCR API has many interesting use cases. Talk to a Nanonets AI expert to learn more.
OCR with Nanonets
The Nanonets OCR API allows you to build OCR models with ease. You can upload your data, annotate it, set the model to train and wait for getting predictions through a browser based UI.
1. Using a GUI: https://app.nanonets.com/
You can also use the Nanonets-OCR- API by following the steps below:
2. Using NanoNets API: https://github.com/NanoNets/nanonets-ocr-sample-python
Below, we will give you a step-by-step guide to training your own model using the Nanonets API, in 9 simple steps.
Step 1: Clone the Repo
git clone https://github.com/NanoNets/nanonets-ocr-sample-python
cd nanonets-ocr-sample-python
sudo pip install requests
sudo pip install tqdm
Step 2: Get your free API Key
Get your free API Key from https://app.nanonets.com/#/keys
Step 3: Set the API key as an Environment Variable
export NANONETS_API_KEY=YOUR_API_KEY_GOES_HERE
Step 4: Create a New Model
python ./code/create-model.py
Note: This generates a MODEL_ID that you need for the next step
Step 5: Add Model Id as Environment Variable
export NANONETS_MODEL_ID=YOUR_MODEL_ID
Step 6: Upload the Training Data
Collect the images of object you want to detect. Once you have dataset ready in folder images (image files), start uploading the dataset.
python ./code/upload-training.py
Step 7: Train Model
Once the Images have been uploaded, begin training the Model
python ./code/train-model.py
Step 8: Get Model State
The model takes ~30 minutes to train. You will get an email once the model is trained. In the meanwhile you check the state of the model
watch -n 100 python ./code/model-state.py
Step 9: Make Prediction
Once the model is trained. You can make predictions using the model
python ./code/prediction.py PATH_TO_YOUR_IMAGE.jpg
Head over to Nanonets and build computer vision models for free!
Further Reading
Update #1:
https://nanonets.com/ocr-api is live now where you can using the Nanonets GUI train a custom OCR model including an automated invoice processing workflow.
Update #2:
Added more reading material about different approaches using Deep Learning based OCR to extract text.