OCR provides us with different ways to see an image, find and recognize the text in it. When we think about OCR, we inevitably think of lots of paperwork - bank cheques and legal documents, ID cards and street signs.
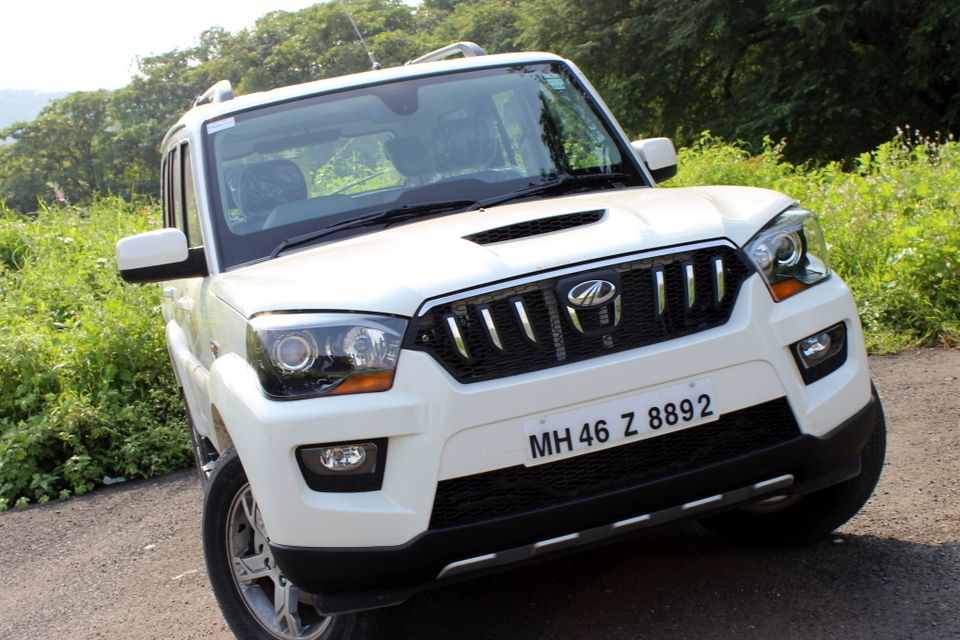
In this blog post, we will try to predict the text present in number plate images.
What we are dealing with is an optical character recognition library that leverages machine learning, deep learning and attention mechanism to make predictions about what a particular character or word in an image is - if there is one at all.
Machine learning OCR or deep learning OCR is a group of computer vision problems in which written text from digital images is processed into machine readable text.
Lots of big words thrown there, so we'll take it step by step and explore the state of OCR technology and different approaches used for these tasks.
You can always directly skip to the code section of the article or check the github repository if you are familiar with the big words above.
Have a data extraction problem in mind? Head over to Nanonets and start building OCR models for free!
OCR - Optical Character Recognition
Optical character recognition or OCR refers to a set of computer vision problems that require us to convert images of digital or hand-written text images to machine readable text in a form your computer can process, store and edit as a text file or as a part of a data entry and manipulation software.
The images can include documents, invoices, legal forms, ID cards or OCR in the wild like reading street signs, shipping container numbers or vehicle number plates.
People have tried solving the OCR problem with several conventional computer vision techniques like image filters, contour detection and image classification which performed well on narrow, template based datasets which did not vary much in their orientation, image quality, etc but to make our models robust to these variations so that a business can deploy their machine learning applications at scale, new methods have to be explored.
There are a lot of services and ocr softwares that perform differently on different kinds of OCR tasks. If you are interested, here's a blog post about where these OCR APIs might fail and how can they improve.
Read About: Best Practices for Deep Learning
Deep Learning and OCR
Deep learning approaches have improved over the last few years, reviving an interest in the OCR problem, where neural networks can be used to combine the tasks of localizing text in an image along with understanding what the text is. Using deep convolutional neural architectures and attention mechanisms and recurrent networks have gone a long way in this regard.
One of these deep learning approaches is the basis of Attention - OCR, the library we are going to be using to predict the text in number plate images.
Think of it like this. The overall pipeline for many architectures for OCR tasks follow this template - a convolutional network to extract image features as encoded vectors followed by a recurrent network that uses these encoded features to predict where each of the letters in the image text might be and what they are.
Let's try to understand what's going on under the hood.
Nanonets OCR API has many interesting use cases. Talk to a Nanonets AI expert to learn more.
Attention Mechanisms
You might be aware of RNNs or LSTMs, neural network architectures that predict output at each time step, providing us with sequence generation as we need for language. This breed of neural networks intended to learn patterns in sequential data by modifying their current state based on current input and previous states iteratively. But due to limitations on memory and issues like vanishing gradients, we found RNNs and LSTMs not able to really capture the influence of words farther away.
Attention mechanism tries to fix this. It is a way to get your model learn long range dependencies in a sequence and has found several applications in natural language processing and machine translation.
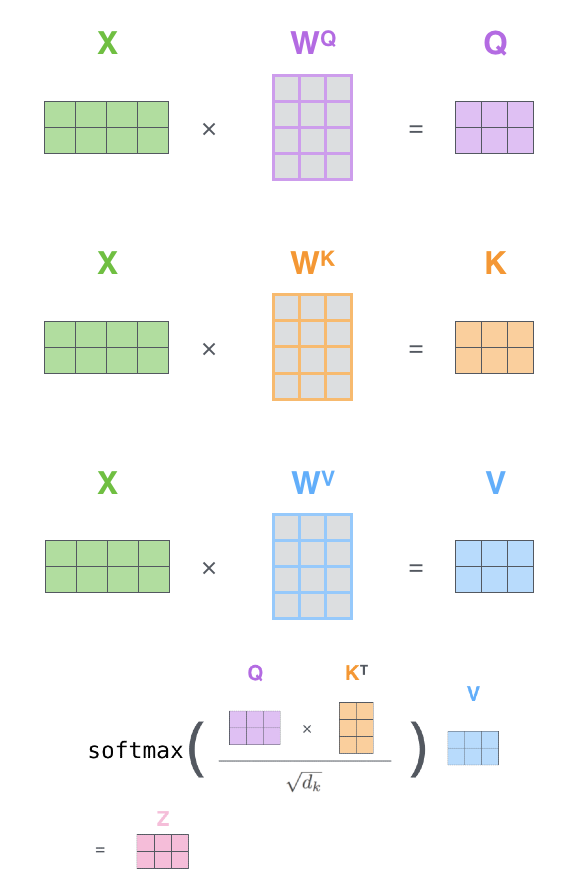
In a nutshell, attention is a feed-forward layer with trainable weights that help us capture the relationships between different elements of sequences. It works by using query, key and value matrices, passing the input embeddings through a series of operations and getting an encoded representation of our original input sequence.
There are flavors to attention mechanisms. They can be hard or soft attention depending on whether the entire image is available to the attention or only a patch. Having soft attention by laying each patch smoothly over the sequence makes it differentiable, but hurts the time taken to run computations. A better explanation can be found here.
Transformers
You might have heard of BERT, GPT2 or more recently XLNet performing a little too well on language modelling and generation tasks. The secret sauce is the different ways of applying transformers.
If you understand how attention works, it shouldn't take much effort to grasp how transformers work. In essence, the paper uses multi-headed attention, which is nothing but using several query, key and value matrices and training them independently, concatenating them and then extracting a useable matrix for our following network by using an additional set of weights.
Another important addition is a positional embedding that encodes the time at which an element in a sequence appears. These positional embeddings are added to our input embeddings for the network to learn time dependencies better. This article is an amazing resource to learn about the mathematics behind self-attention and transformers.
Visual Attention
Though attention and transformer networks evolved for applications in the NLP domain, they have been adapted for convolutional networks to replicate attention mechanisms of the human brain and how it processes vision. To learn more, check this link or this study. The fundamental behind this is to replicate how the human eye works.
When you open your eyes to a new scene, some parts of the picture directly catch your 'attention'. You focus on those parts of the picture first, extract information from it and comprehend it. This information also guides your search for the next point of attention.
This method of watering down an image into it's most important components is the basis of visual attention models. The process of finding the next attention point is seen as a sequential task on convolutional features extracted from the image.
RAM - Recurrent Attention Model
This paper approaches the problem of attention by using reinforcement learning to model how the human eye works. It defines a glimpse vector that extracts features of an image around a certain location.
Several such glimpse vectors extracting features from a different sized crop of the image around a common centre are then resized and converted to a constant resolution. These glimpse vectors are flattened and passed through the glimpse network to obtain a vector representation based on visual attention.
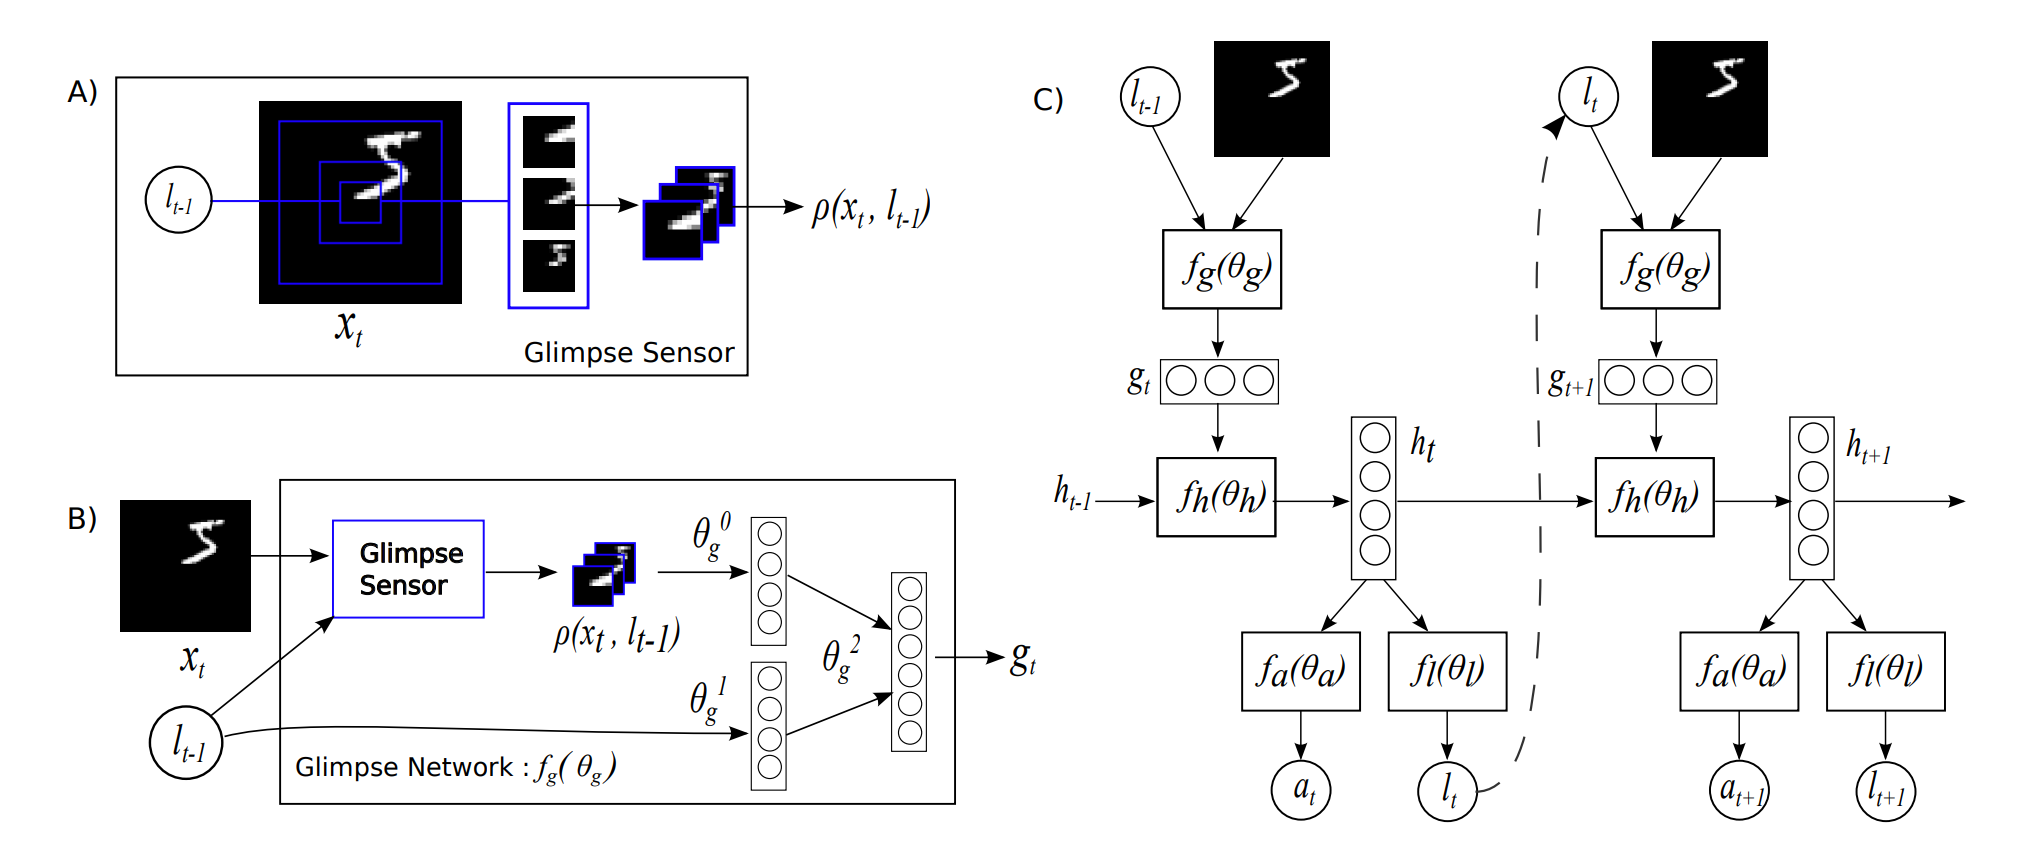
Following this, there is a Location Network which utilises an RNN to predict which part of the image our algorithm should pay attention to next. This predicted location becomes the next input for your glimpse network. This is a stochastic process which helps us balance exploration and exploitation while we are back-propagating our network to maximize our rewards. The back-propagation is done using the REINFORCE policy gradient on the log-likelihood of the attention score.
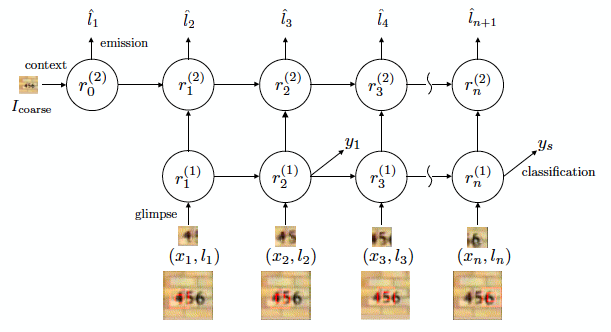
DRAM - Deep Recurrent Attention Model
Instead of using a single RNN, DRAM uses two RNNs - a location RNN to predict the next glimpse location and another Classification RNN dedicated to predicting the class labels or guess which character is it we are looking at in the text. A context network is used to downsample image inputs for more generalisable RNN states. It also chooses to refer to the location network in RAM as Emission Network. The training is done using an accumulated reward and optimizing the sequence log-likelihood loss function using the REINFORCE policy gradient.
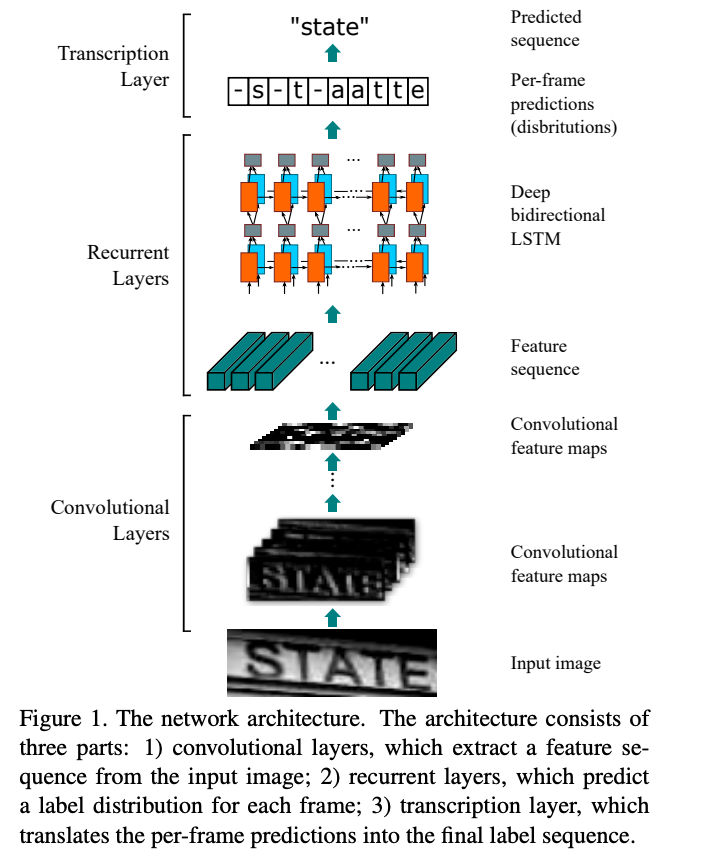
CRNN - Convolutional Recurrent Neural Networks
CRNNs don't treat our OCR task as a reinforcement learning problem but as a machine learning problem with a custom loss. The loss used is called CTC loss - Connectionist Temporal Classification. The convolutional layers are used as feature extractors that pass these features to the recurrent layers - bi-directional LSTMs . These are followed by a transcription layer that uses a probabilistic approach to decode our LSTM outputs. Each frame generated by the LSTM is decoded into a character and these characters are fed into a final decoder/transcription layer which will output the final predicted sequence.
Spatial Transformer Networks
Spatial Transformer Networks, introduced in this paper, augment input images by applying affine transformations so that the trained model is robust to variations in data.
The network consists of a localisation net, a grid generator and a sampler. The localisation net takes an input image and gives us the parameters for the transformation we want to apply on it. The grid generator uses a desired output template, multiplies it with the parameters obtained from the localisation net and brings us the location of the point we want to apply the transformation at to get the desired result. A bilinear sampling kernel is finally used to generate our transformed feature maps.
Attention OCR
Attention-OCR is an OCR project available on tensorflow as an implementation of this paper and came into being as a way to solve the image captioning problem. It can be thought of as a CRNN followed by an attention decoder.
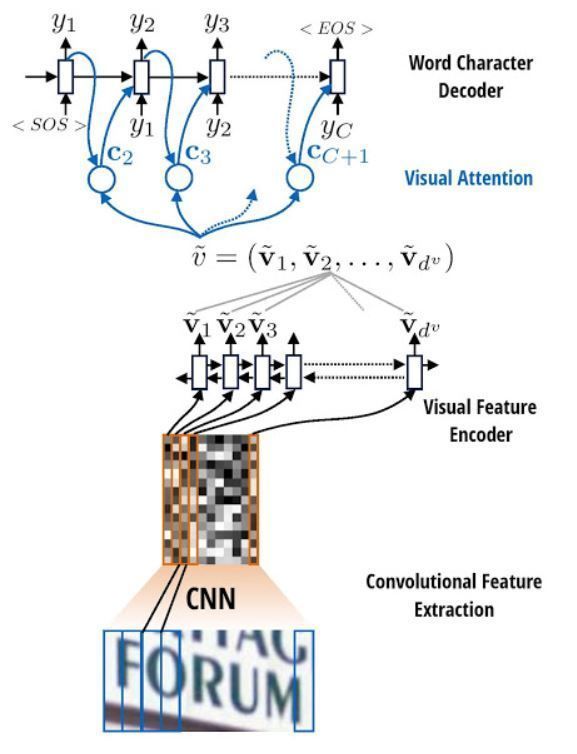
First we use layers of convolutional networks to extract encoded image features. These extracted features are then encoded to strings and passed through a recurrent network for the attention mechanism to process. The attention mechanism used in the implementation is borrowed from the Seq2Seq machine translation model. We use this attention based decoder to finally predict the text in our image.
Building your own Attention OCR model
We will use attention-ocr to train a model on a set of images of number plates along with their labels - the text present in the number plates and the bounding box coordinates of those number plates. The dataset was acquired from here.
The steps followed are summarized here:
- Gather annotated training data
- Get crops for each frame of each video where the number plates are.
- Generate tfrecords for all the cropped files.
- Place them in models/research/attention_ocr/python/datasets as required (in the FSNS dataset format). Follow this link or the following sections of this blog.
- Train the model using Attention OCR.
- Make prediction on your own cropped images.
Or you can explore the Nanonets API where all you have to do is upload annotated images and let the platform handle the rest for you. More about this in the final section.
This blog will run you through everything you need to train and make predictions using tensorflow attention-ocr. Full code available here.
Getting training data
We have images of number plates but we do not have the text in them or the bounding box numbers of the number plates in these images. Use an annotation tool to get your annotations and save them in a .csv file.
Get crops
We have stored our bounding box data as a .csv file. The .csv file has the following fields:
- files
- text
- xmin
- xmax
- ymin
- ymax
To crop the images and get only the cropped window we have to deal with different sized images. To do this we read the csv data in as a pandas dataframe and get our coordinates in such a way that we don't miss any information about the number plates while also maintaining a constant size of the crops. This will prove helpful when we are training our OCR model.
Generate tfrecords
Having stored our cropped images of equal sizes in a different directory, we can begin using those images to generate tfrecords that we will use to train our dataset. The script to generate tfrecords can be found in the repository shared above. These tfrecords along with the label mapping have to be stored in the tensorflow object detection API inside the following directory -
DATA_PATH = 'models/research/attention_ocr/python/datasets/data/number_plates'
The dataset has to be in the FSNS dataset format.
For this, your test and train tfrecords along with the charset labels text file are placed inside a folder named 'fsns' inside the 'datasets' directory. you can change this to another folder and upload your tfrecord files and charset-labels.txt here. You'll have to change the path in multiple places accordingly. I have used a directory called 'number_plates' inside the datasets/data directory.
Generate tf records by running the following script.
Setting our Attention-OCR up
Once we have our tfrecords and charset labels stored in the required directory, we need to write a dataset config script that will help us split our data into train and test for the attention OCR training script to process.
Make a python file and name it 'number_plates.py' and place it inside the following directory:
'models/research/attention_ocr/python/datasets'
The contents of the number-plates.py can be found in the README.md file here.
Also change the __init__.py file in the datasets directory to include the number_plates.py script.
Train the model
Move into the following directory:
models/research/attention_ocr
Open the file named 'common_flags.py' and specify where you'd want to log your training.
and run the following command on your terminal:
# change this if you changed the dataset name in the
# number_plates.py script or if you want to change the
# number of epochs

python train.py --dataset_name=number_plates --max_number_of_steps=3000
Evaluate the model
Run the following command from terminal.
python eval.py --dataset_name='number_plates'
Get predictions
Now from the same directory run the following command on your shell.
python demo_inference.py --dataset_name=number_plates --batch_size=8, \
--checkpoint='models/research/attention_ocr/number_plates_model_logs/model.ckpt-6000', \
--image_path_pattern=/home/anuj/crops/%d.png
We learned about attention mechanism, transformers, different ways visual attention is applied - RAM, DRAM and CRNNs. We learned about STNs. Finally we learned about the deep learning approach we used - Attention OCR.
From a programming perspective, we learnt how to use attention OCR to train it on your own dataset and run inference using a trained model. The code can be found here and in my attention-ocr fork.
There's of course a better, much simpler and more intuitive way to do this.
OCR with Nanonets
The Nanonets OCR API allows you to build OCR models with ease. You can upload your data, annotate it, set the model to train and wait for getting predictions through a browser based UI without writing a single line of code, worrying about GPUs or finding the right architectures for your deep learning models. You can also acquire the json responses of each prediction to integrate it with your own systems and build machine learning powered apps built on state of the art algorithms and a strong infrastructure.
Using the GUI: https://app.nanonets.com/
You can also use the Nanonets-OCR API by following the steps below:
Using NanoNets API
Below, we will give you a step-by-step guide to training your own model using the Nanonets API, in 9 simple steps.
Step 1: Clone the Repo
git clone https://github.com/NanoNets/nanonets-ocr-sample-python
cd nanonets-ocr-sample-python
sudo pip install requests
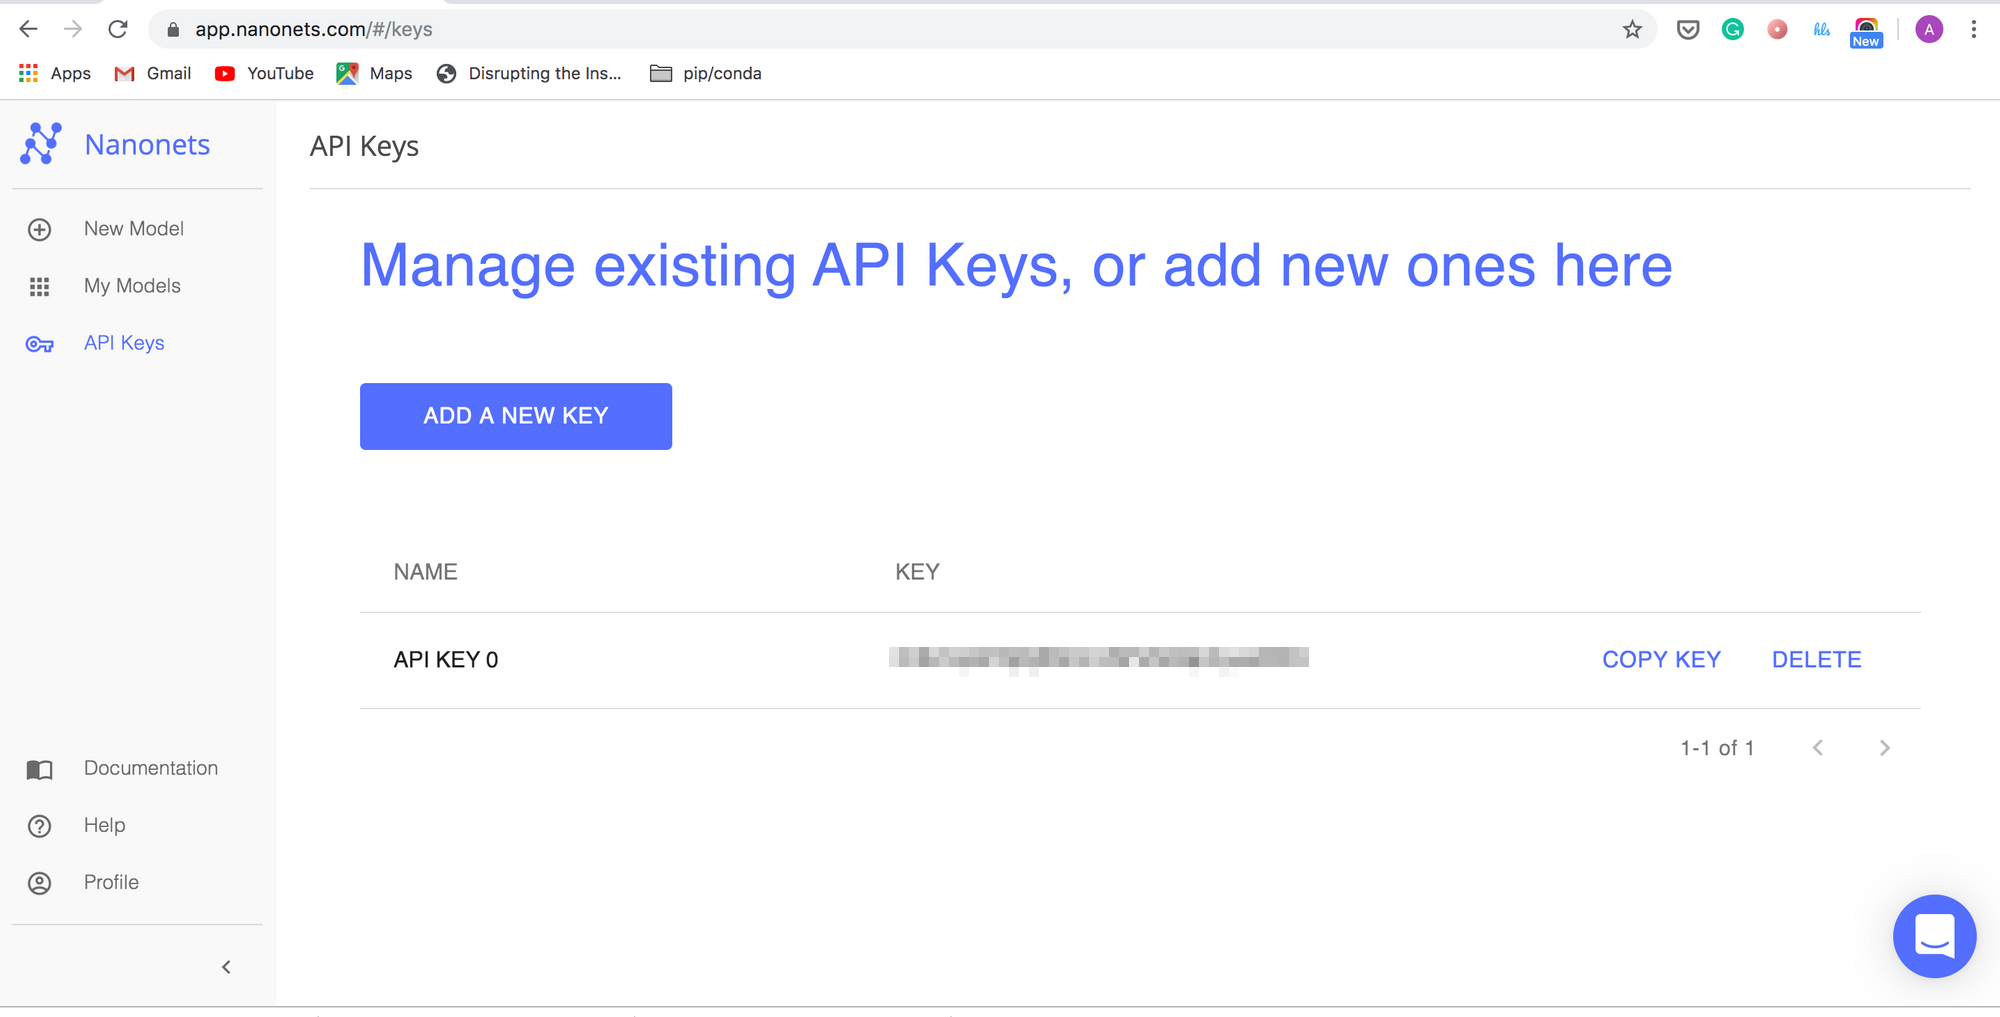
sudo pip install tqdmStep 2: Get your free API Key
Get your free API Key from https://app.nanonets.com/#/keys
Step 3: Set the API key as an Environment Variable
export NANONETS_API_KEY=YOUR_API_KEY_GOES_HERE
Step 4: Create a New Model
python ./code/create-model.py
Note: This generates a MODEL_ID that you need for the next step
Step 5: Add Model Id as Environment Variable
export NANONETS_MODEL_ID=YOUR_MODEL_ID
Step 6: Upload the Training Data
Collect the images of object you want to detect. Once you have dataset ready in folder images (image files), start uploading the dataset.
python ./code/upload-training.py
Step 7: Train Model
Once the Images have been uploaded, begin training the Model
python ./code/train-model.py
Step 8: Get Model State
The model takes ~30 minutes to train. You will get an email once the model is trained. In the meanwhile you check the state of the model
watch -n 100 python ./code/model-state.py
Step 9: Make Prediction
Once the model is trained. You can make predictions using the model
python ./code/prediction.py PATH_TO_YOUR_IMAGE.jpg

Have a data extraction problem in mind? Head over to Nanonets and start building OCR models for free!
Further Reading
- OCR with Keras, TensorFlow, and Deep Learning
- Tutorial : Building a custom OCR using YOLO and Tesseract
Update #1: A lot of people while implementing the code were facing issues. Here's the most common one: Before you begin training, change the default checkpoint flag toNone. Once you have trained the model, you can change the checkpoint path to your latest checkpoint in thecommon_flags.pyfile or run the inference script through command line and specify the checkpoint path explicitly.
Update #2: The annotation tool used here is a custom tool built by us available at https://app.nanonets.com
Update #3:
Added more reading material about different approaches on using custom deep learning based OCR