

Microsoft Power Automate is a very simple drag-and-drop workflow-based automation software created by Microsoft to automate manual and repetitive tasks. It is part of the Business Central suite. The main aim of creating Microsoft Power Automate (earlier known as Microsoft Flow) was to allow coders and non-coders to automate repetitive tasks following a sequential rule-based flow.
In simple words, suppose you have a process that you’d want to automate. Before starting, you can try to visualize the process flow by creating a flowchart. This flowchart contains different steps, variables, loops, and even conditions. Once done, you can replicate the same flowchart on Microsoft Power Automate.
Sounds interesting? A lot of tasks can be automated using the Power Automate platform.
This blog post will dive deep into Microsoft Power Automate (formerly known as Microsoft Flow). We will understand the components of the software, try to build business process flows, and go through various aspects of automating business processes.
What is Microsoft Power Automate?
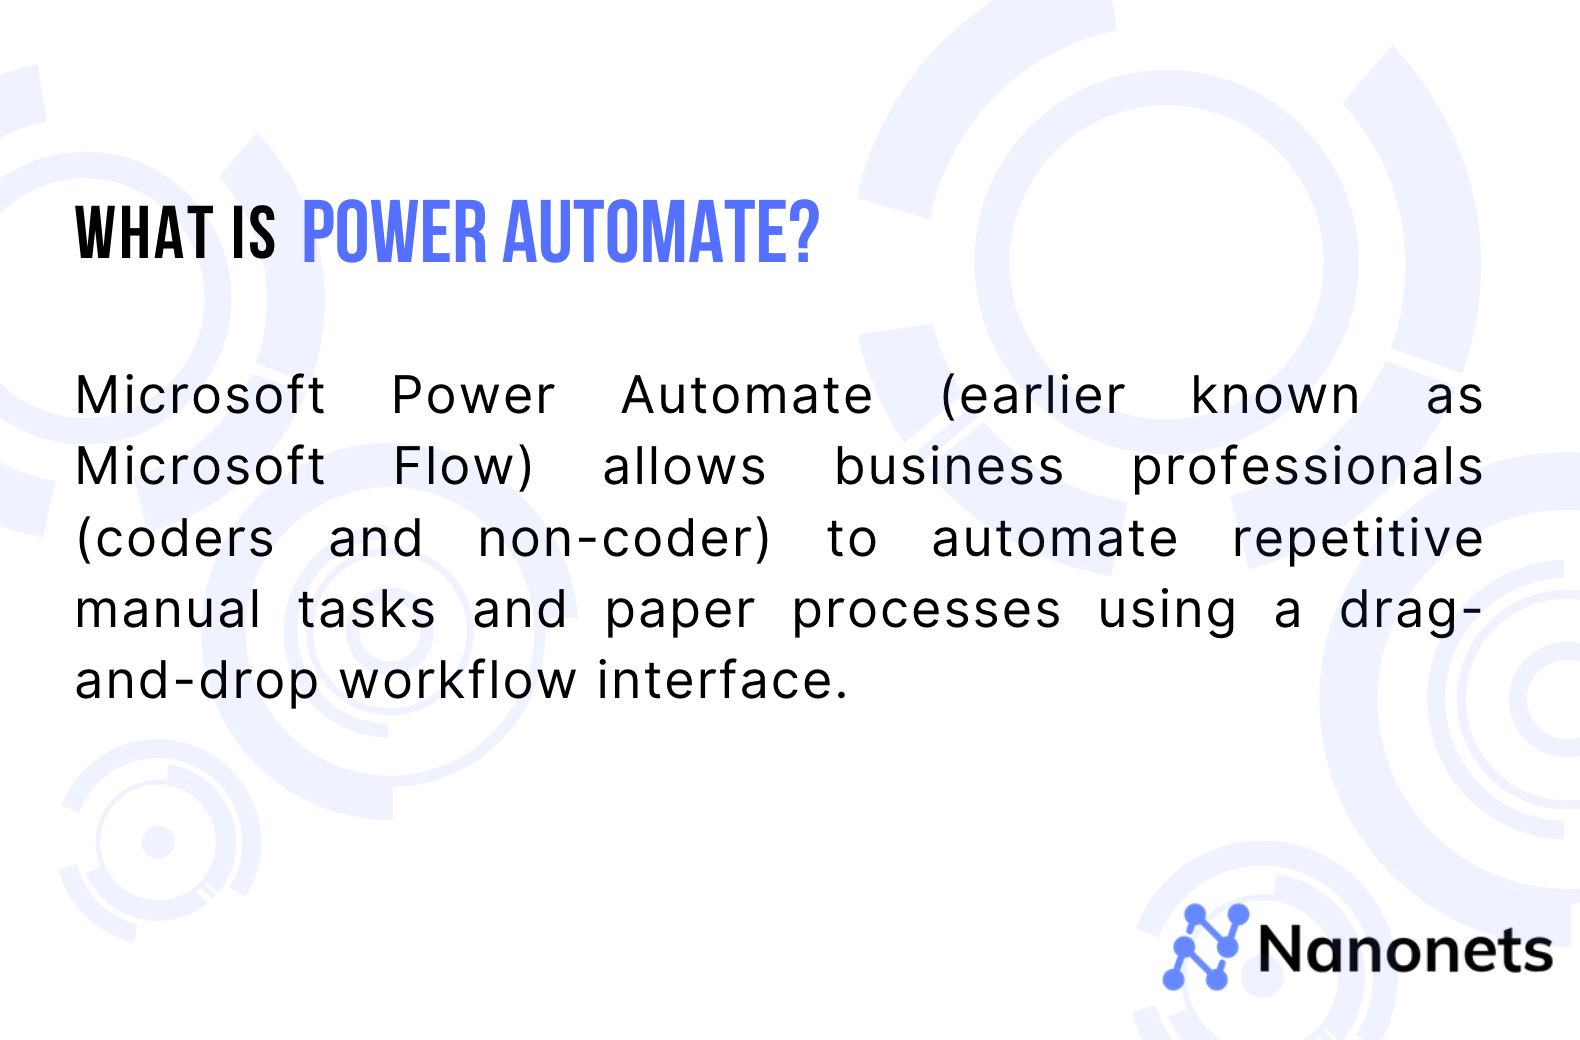
Microsoft Power Automate (earlier known as Microsoft Flow) allows business professionals (coders and non-coder) to automate repetitive manual tasks and paper processes using a drag-and-drop workflow interface.
Microsoft Power Automate can create workflows to sync data across apps and software, generate real-time notifications to alert stakeholders, update databases with new information and collect data from Power Apps or other data sources.
The intelligent automation platform allows users to set triggers to take a particular set of sequential actions by using workflows. All Office 365 license users can use Power Automate. The users can automate tasks between 500+ applications, including Microsoft applications like Sharepoint, Azure, Excel, Online Office, etc, and third-party applications like Twitter, Youtube, Gmail, and more.
Power Automate use cases
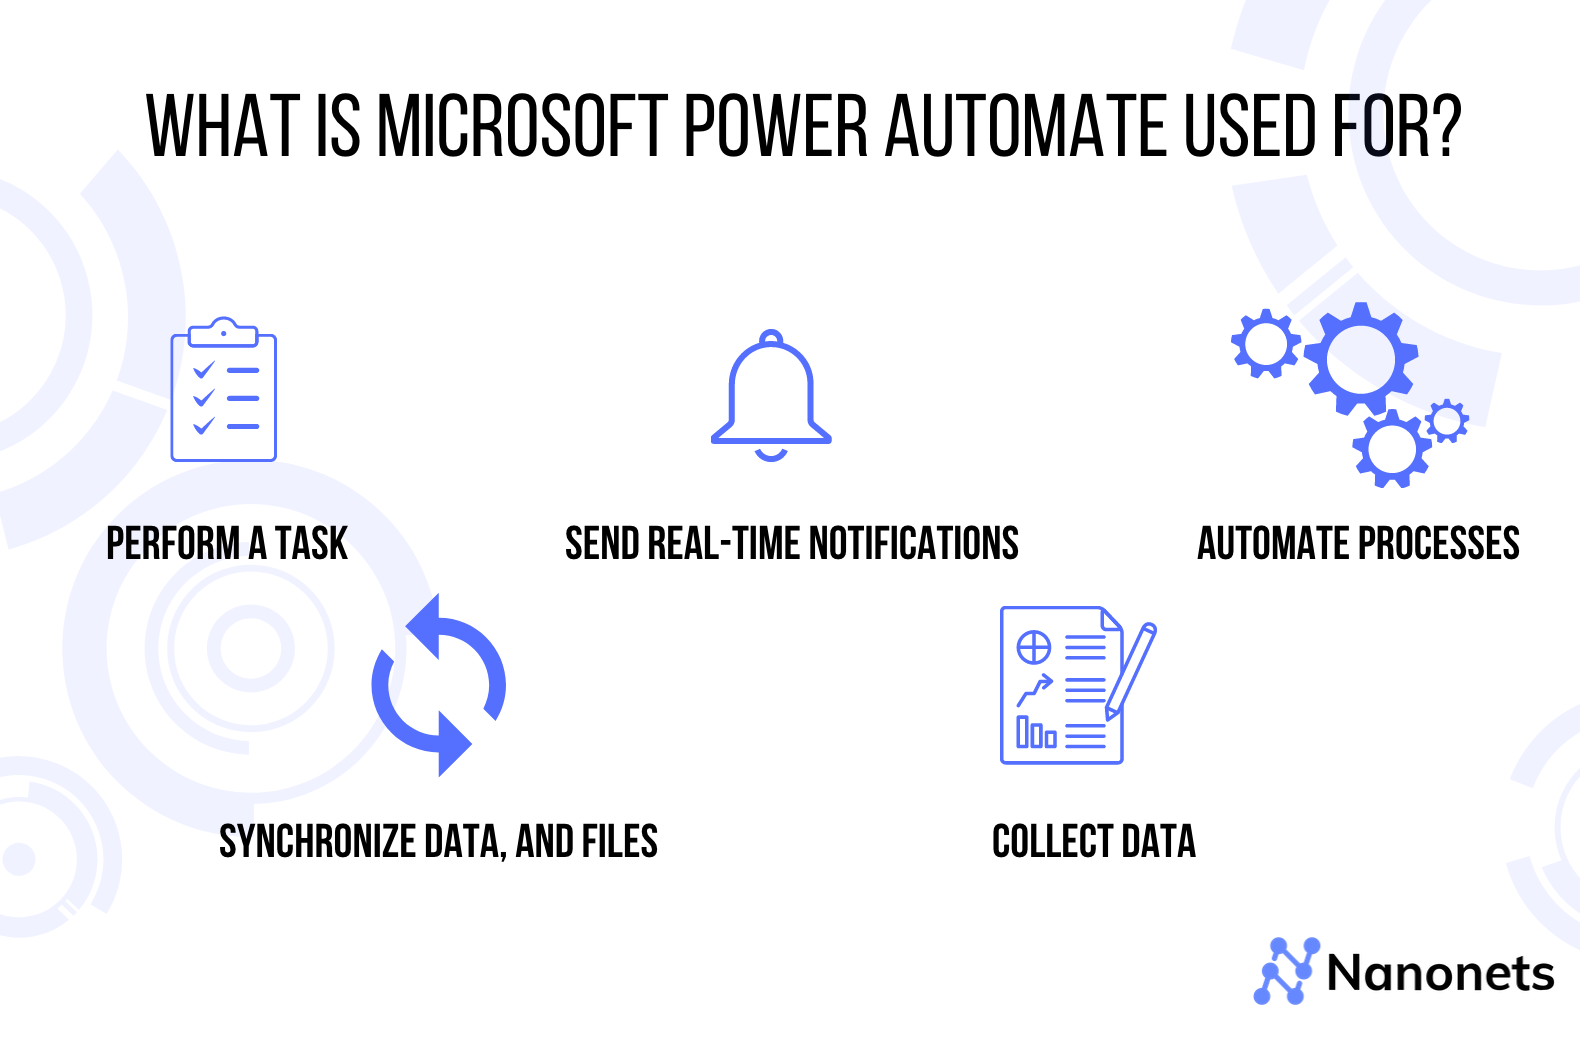
Power Automate can automate repetitive tasks, and here are 6 Microsoft Power Automate example workflows that give a basic understanding of how you can use the intelligent automation platform:
Perform a task
Think of any task that requires you to switch applications. That task can be automated with Power Automate workflows like Zapier. This can be used personally to reduce manual efforts and focus on more valuable tasks.
E.g., Send a Tweet when a Google Sheets row is added, Send an email when an attachment is received
Synchronize Data and Files
Microsoft Power Automate connectors can sync new data across different enterprise applications. This updates business data across different applications.
Eg. When a new customer signs up, update the record in CRM, Marketing Automation & Sales Dashboard.
Send Real-Time Notifications
Send alerts via email to relevant stakeholders so that they stay up to date on recent happenings of the company.
E.g., When a customer complaint is received, send an alert to the Sales and Customer Success teams via email.
Automate Processes
Microsoft Power Automate can automate business processes with rule-based workflows created via Power Apps. e.g., Invoice Approval Process
It can also automate data collection processes like converting pdf to text, extracting text from image, as a website scraper, converting pdf to word and more.
Mailroom Automation
You can automate all mailroom activities like sending an email, saving email attachments, categorizing an email, and processing the contents of the email.
E.g., Save all email attachments in Microsoft SharePoint or Personalize your OOO message.
Collect Data
With Microsoft Power App, you can create a front-end application to digitize data capture and use the data to perform further activities.
E.g., An automobile service station can create an app to capture customer and vehicle information and store information in their CRM.
Above, we’ve mentioned some of the use cases of Microsoft Power Automate. It’s not an exhaustive list, but it gives you a general idea of how businesses can use the software.
How does Microsoft Power Automate Work?
To work with Power Automate, select the process you want to automate. Here is what the process looks like:
- You can create an entirely new flow from scratch or choose any of the available templates.
- Building a flow from scratch requires additional steps which will be discussed later on.
- Once your flow is outlined, connect it with the required datasets via connectors.
- You can test it via the “Run” option to check for errors.
- Set live.
Before deep diving into a tutorial on creating an automated workflow on Microsoft Power Automate, we should look at the different flow types available for users.
Power Automate Flow Types
There are three types of flows based on how the flow is created.
Cloud Flows
Cloud Flows are online flows that start with a trigger or some action. Under Cloud flows, there are three options based on when you want the action to take place after the trigger conditions are met:
Instant Cloud Flows
You can use instant cloud flow when you want to take action at a click of a button.
Eg. Send a reminder to your sales team about an important churned customer now.
Automated Cloud Flows
Automated Cloud flows follow a series of sets when your conditions are met.
E.g. If any tweet mentions your company in a hashtag, you want the system to retweet the tweet and send a team message to your marketing team.
Scheduled Cloud Flows
Scheduled cloud flows can be used periodically to carry out a set of actions. Eg. Save all your email attachments in a folder at 8 AM every day.
Desktop Flows
Desktop flows are used in an offline format. You can record yourself performing a set of actions, and once Microsoft Power Automate codes your actions, you can automate the flow.
Business Process Flows
As a business professional, this will be the most important tab. You can automate all your paper-based processes and digitize your processes with Business Process Flow. Business process flow allows you to create a standardized process for your employees to follow so you get similar outputs no matter who uses the product.
The output of business process flow is a working front-end app that your employees can use to perform tasks.
Tutorial: Using Microsoft Power Automate Templates
Microsoft Power Automate has a massive library of templates.
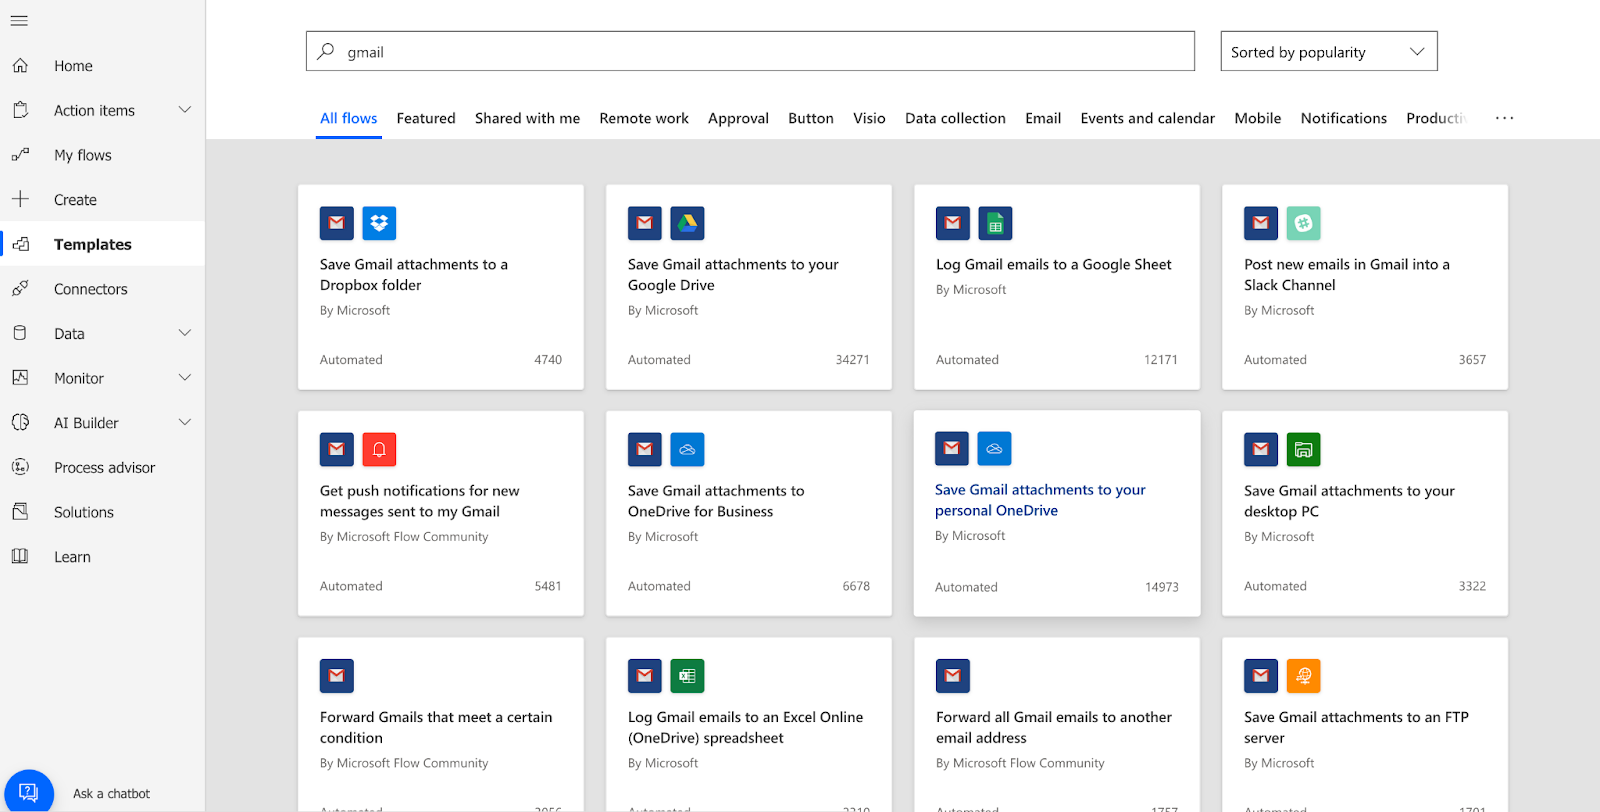
Let’s select a simple one for this tutorial, where we will save our Gmail attachments into our Google Drive Folder.
Step 1: Go to the templates section. If you search for “Gmail” you should find the template we’re talking about in the first row. If not, scroll down to search for it.
Step 2: You’ll be asked to link your accounts after selecting the template. Link your accounts, and when two green ticks appear in front of the connectors, you can click Create Flow.
Step 3: Once you’re on the screen, you’ll see the flow details on the screen. Let’s select edit to see the workflow.
You’ll be redirected to a page like this:
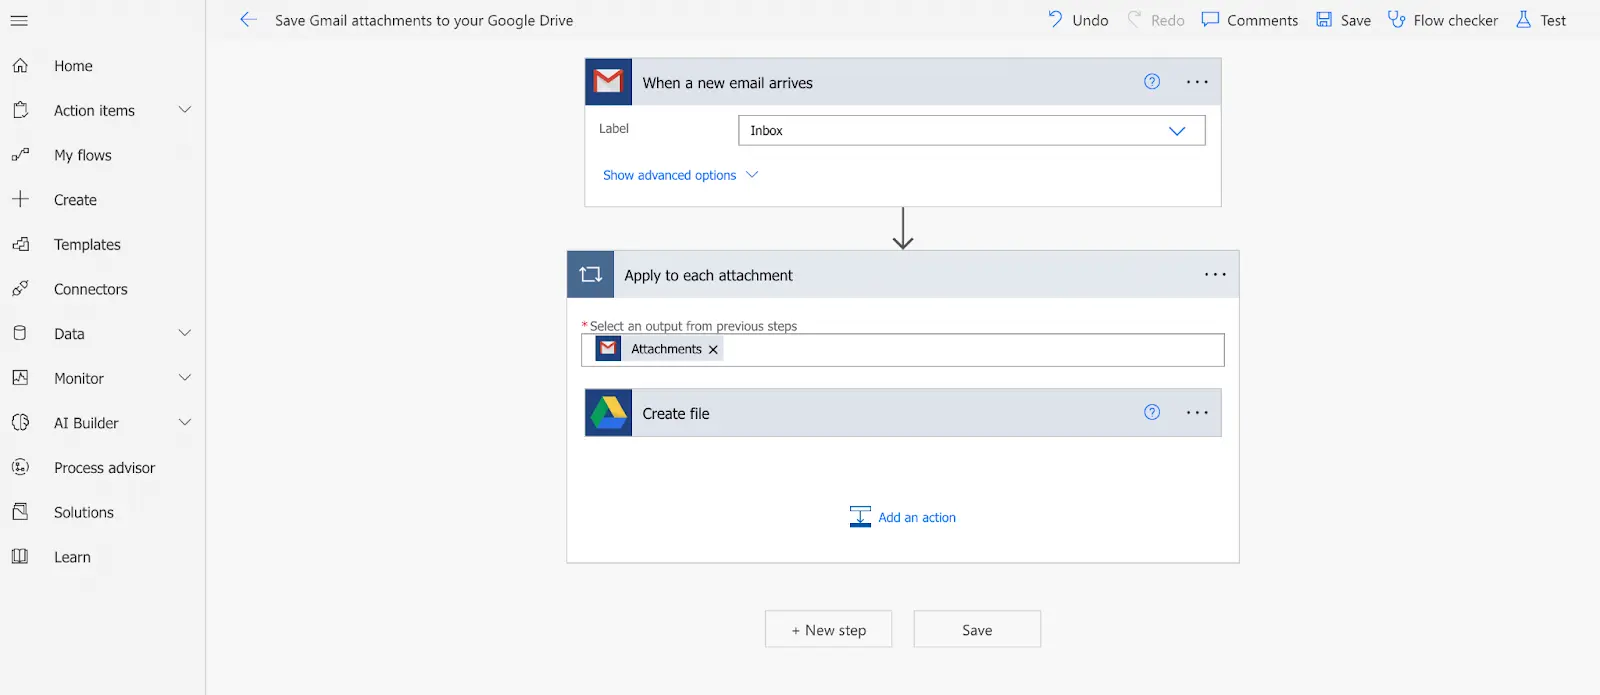
Step 4: Select the proper variables. Do you want to consider emails only to your inbox or promotional messages? Take a look at the options in the drop-down.
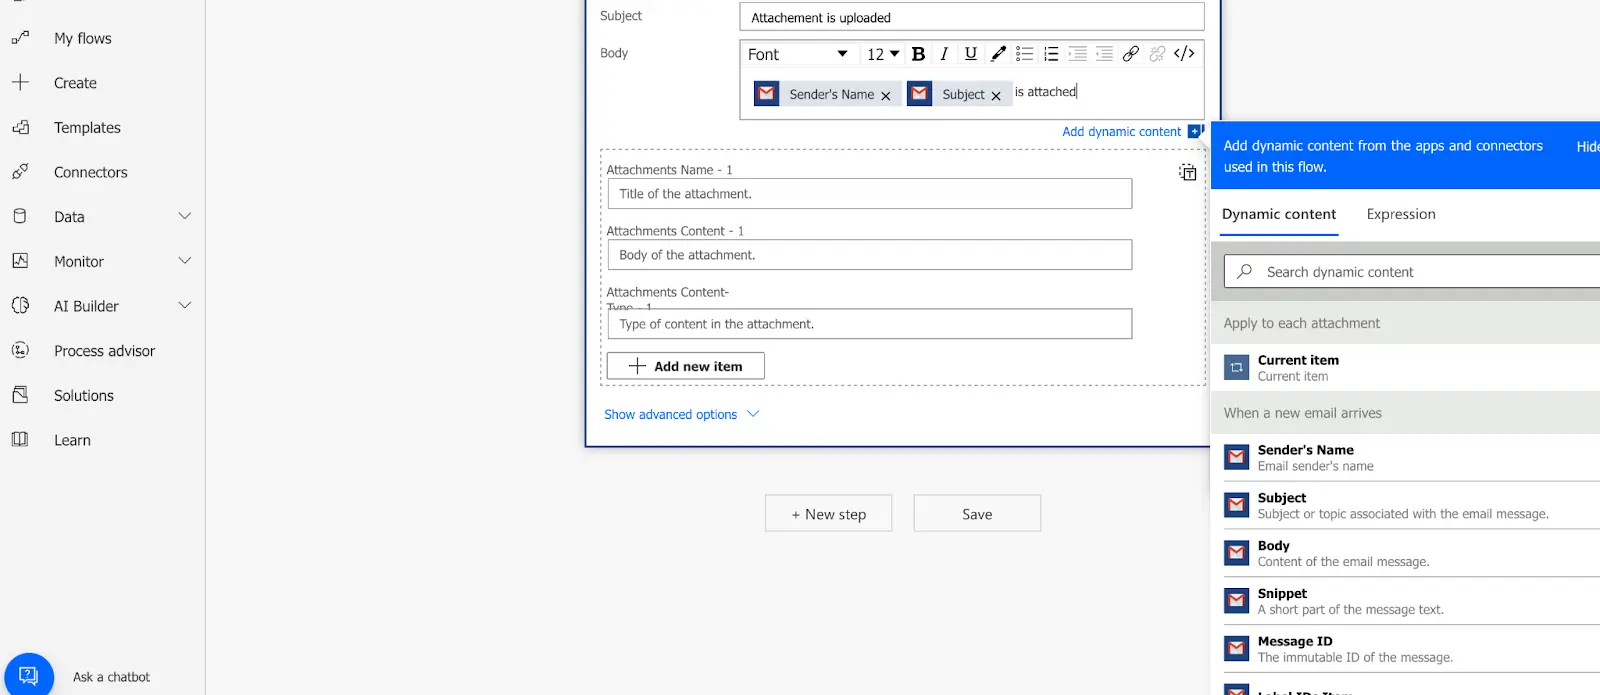
Step 5: Let’s say you want to receive a notification every time this flow occurs. I’ll add another step where I receive an email saying your attachment is uploaded.
Click on the new step to see a screen like this

Step 6: Select Gmail and select send an email (V2). Fill in the details.
Don’t forget to look at the dynamic content for the email body. You can enter the sender's email, email subject line, and other dynamic content to track the notifications.
Step 7: Once done, Save it. On the top bar, click Flow Checker to see if there are any errors or warnings. If not, move on to the next option, which says Test. Try to send a test email to your email id mentioned in the steps.
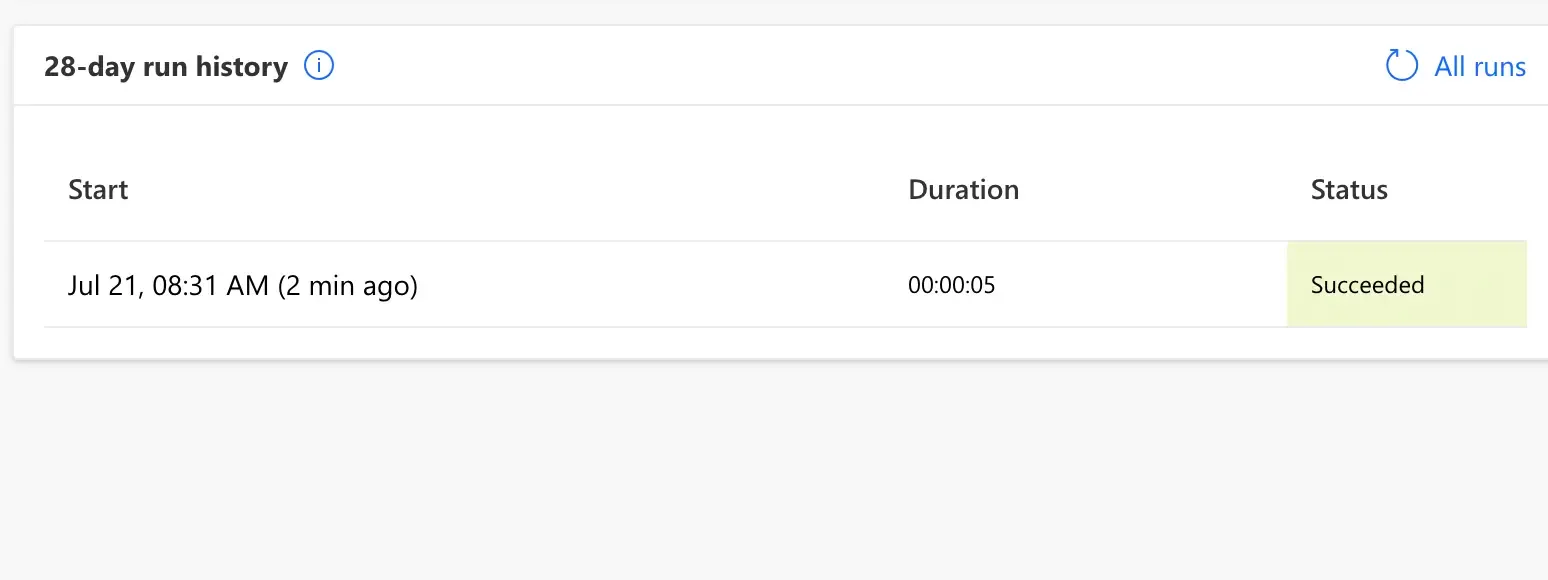
Step 8: To check your flow progress - Select “My Flows” and select the flow you’ve just created. At the bottom, you’ll see a tab that shows the 28-day run history. If the status shows succeeded, your flow works without an error.
You can follow similar steps for other templates. All the Microsoft Flow templates have pre-defined steps created for easy usage.
Power Automate for Business Process Flows
One of the major use cases for Microsoft Power Automate is to create automated Business Process Flows. Now, business process flows could be anything:
- Building a front-end application for your employees to collect data in a streamlined way- eg. Building a customer service app to collect caller details
- Automating Document Processes - eg. Extracting data from invoices and uploading them into a database.
- Streamlining approvals - eg. Setting up a workflow to send content to review to relevant stakeholders
Or any other process that can be converted into a flow diagram.
Microsoft Power Automate Tutorial
How to create an invoice processing flow from scratch?
Before even starting to work on the process in Microsoft Power Automate, we will first take a look at all the steps, datasets, tables, and connectors we will require. We need to set everything else up before we start making business flow in PowerApps.
So our flow would be simple, we want to create a flow
When we receive an Invoice in our Inbox -> Extract Data From Invoice -> Store information in a table in Excel
In our case, we will need the following:
- Connectors: Gmail, One drive, Excel
- AI Model: Invoice Processing Model
- Tables: An Excel with proper headers
So let's start with creating the AI model first.
Building AI model
Step 1: Select AI Builder, select custom to extract data from standardized documents, and click get started.
You need to have an AI Builder license for this step
Step2: You’ll be redirected to a list of action items. Select all the options that are relevant to you. In our case, we assume that the invoices are fairly standardized, hence we will select the first option

Step 3: Adding the variables
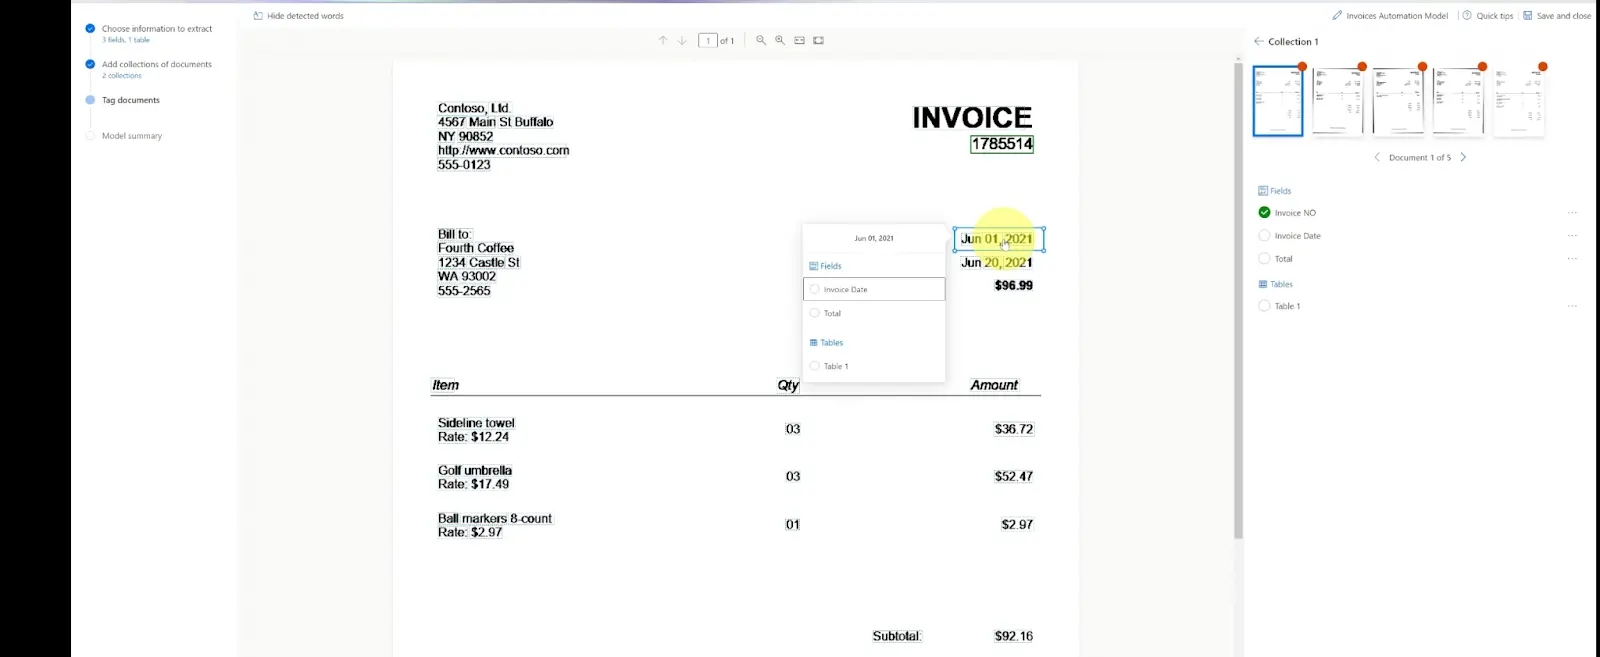
In the next step, select the information you want to extract from your invoices. In this case, pre-planning the variables come in handy.
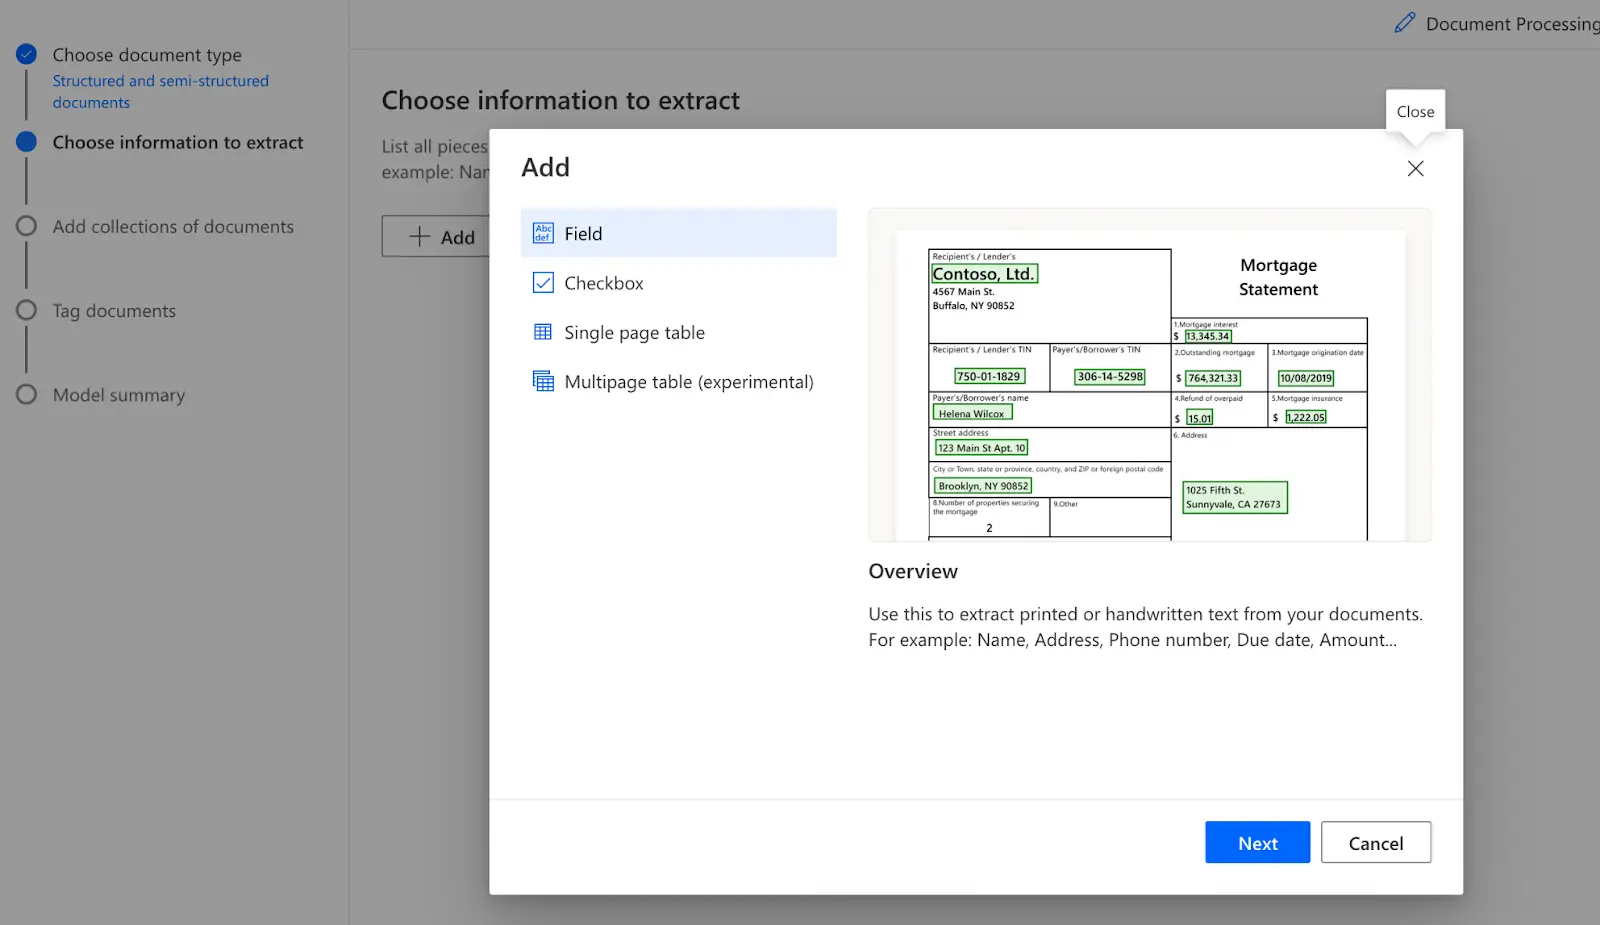
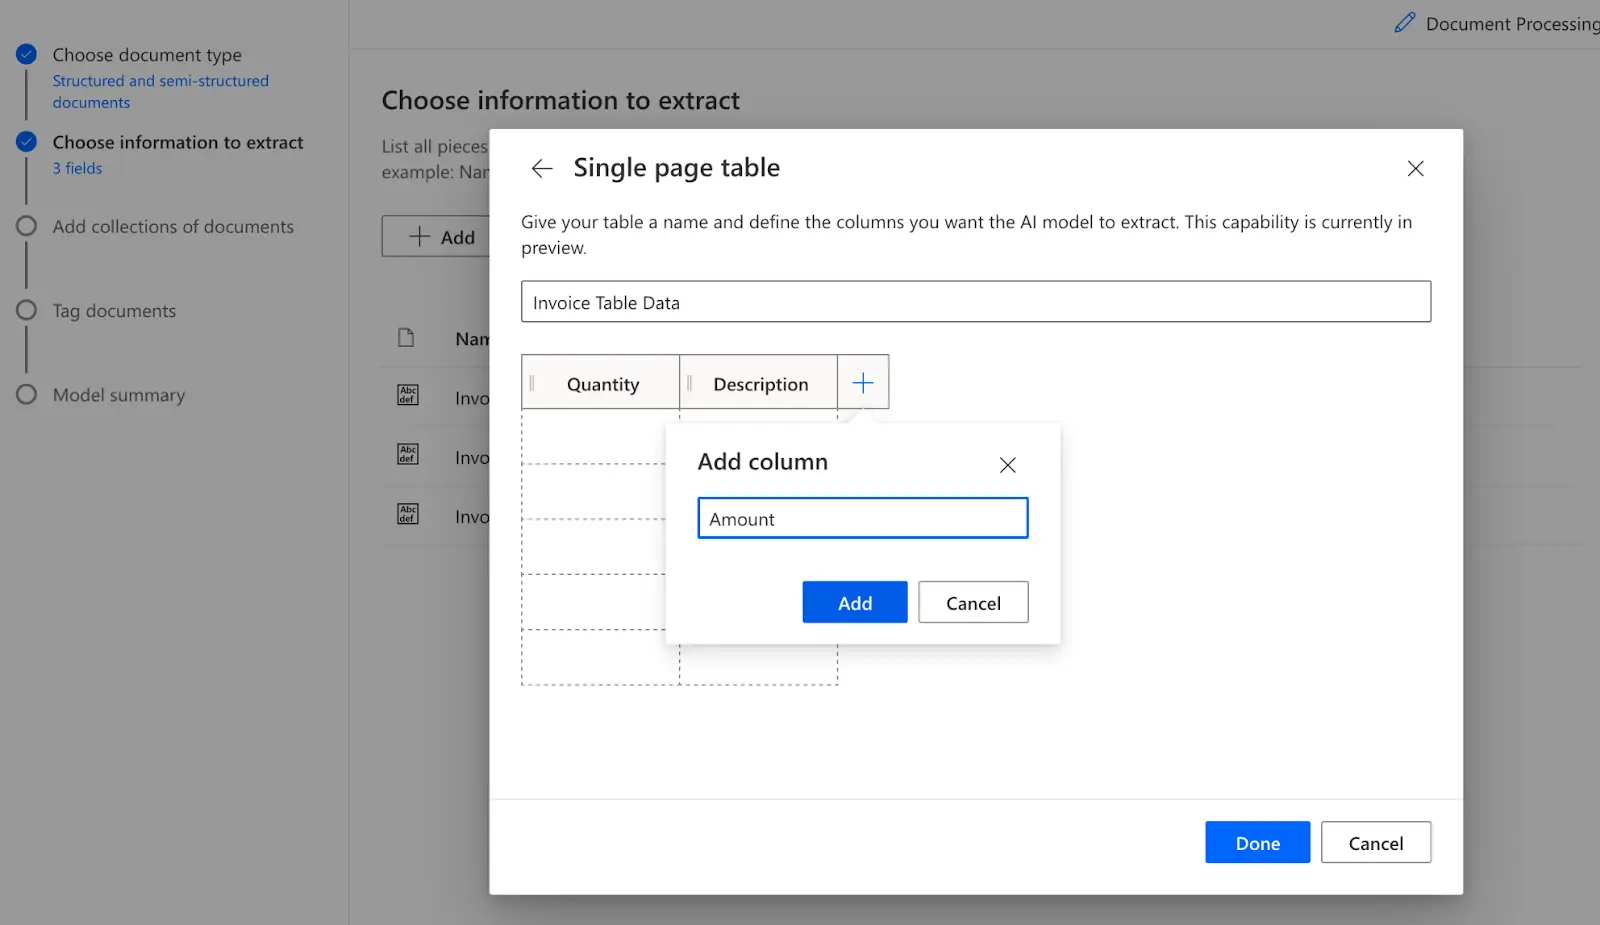
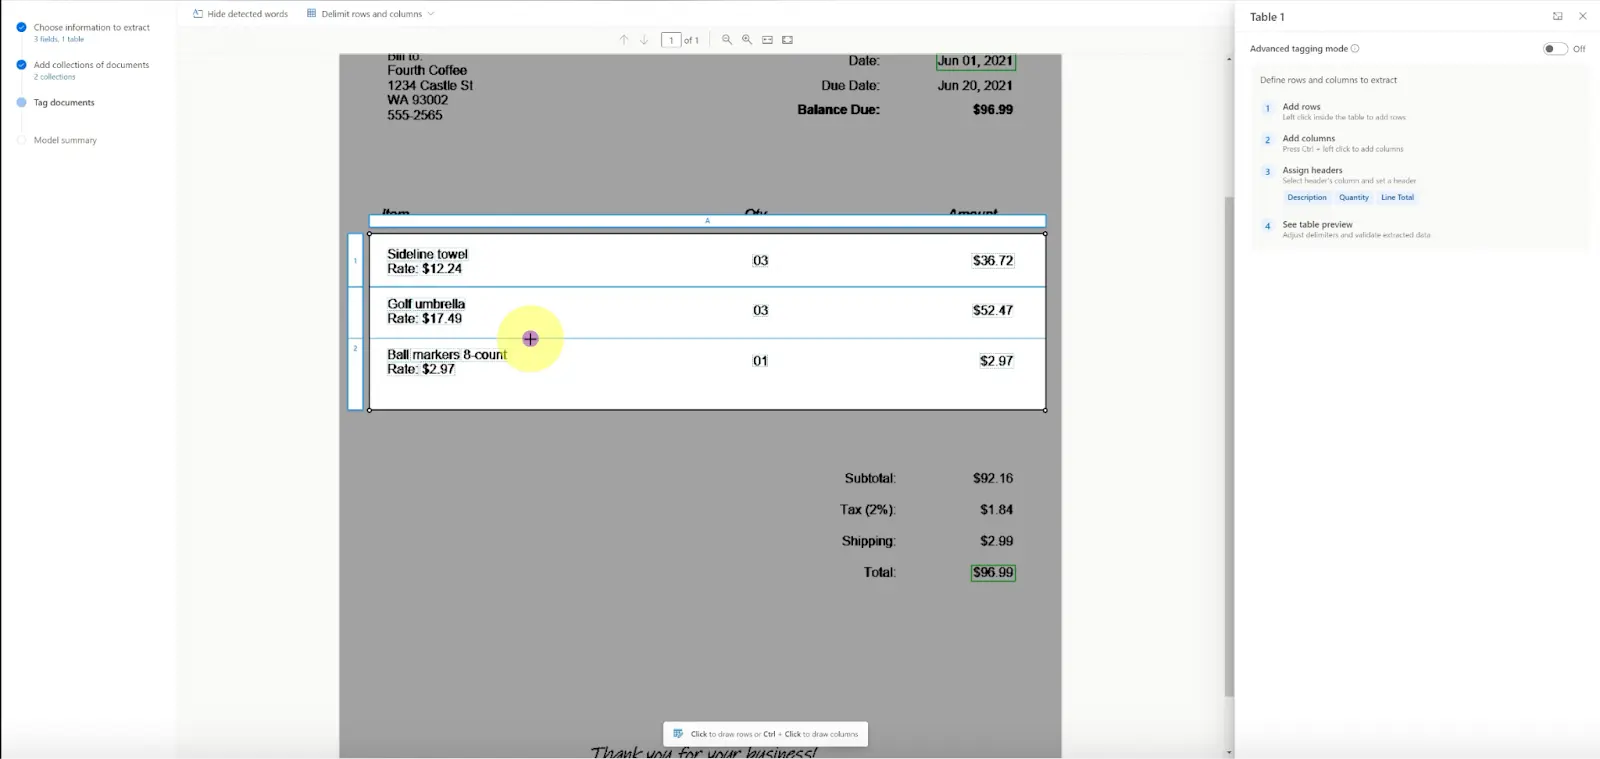
We would like to select fields for invoice numbers, invoice data, and total amount. We can also select the single-page table to select an entire table of all the items mentioned in the invoice.
For the single table, mention the number of columns and rename it appropriately.
Once you’ve listed all the information you want to extract, select Done and choose next.
Step 4: Adding collections
Collections are set of files that have the same format. Upload your invoices from the same vendor in different collections. Once you upload the documents, select the fields and tables to reflect the necessary values.
Open any document that you’ve uploaded. Select detect words to see the fields that are automatically detected. Hover your mouse over the fields that you want to select. Then select the value for each field.
Follow the same steps for all the uploaded invoices in all the collections.
Step 5: Once done, select the Train model. Then choose Go to Your models. The list should show your model with the name you gave at the start.
So now, our AI model is complete. Let’s create a flow where we will use the AI model to extract data from our email attachment and save the information in excel.
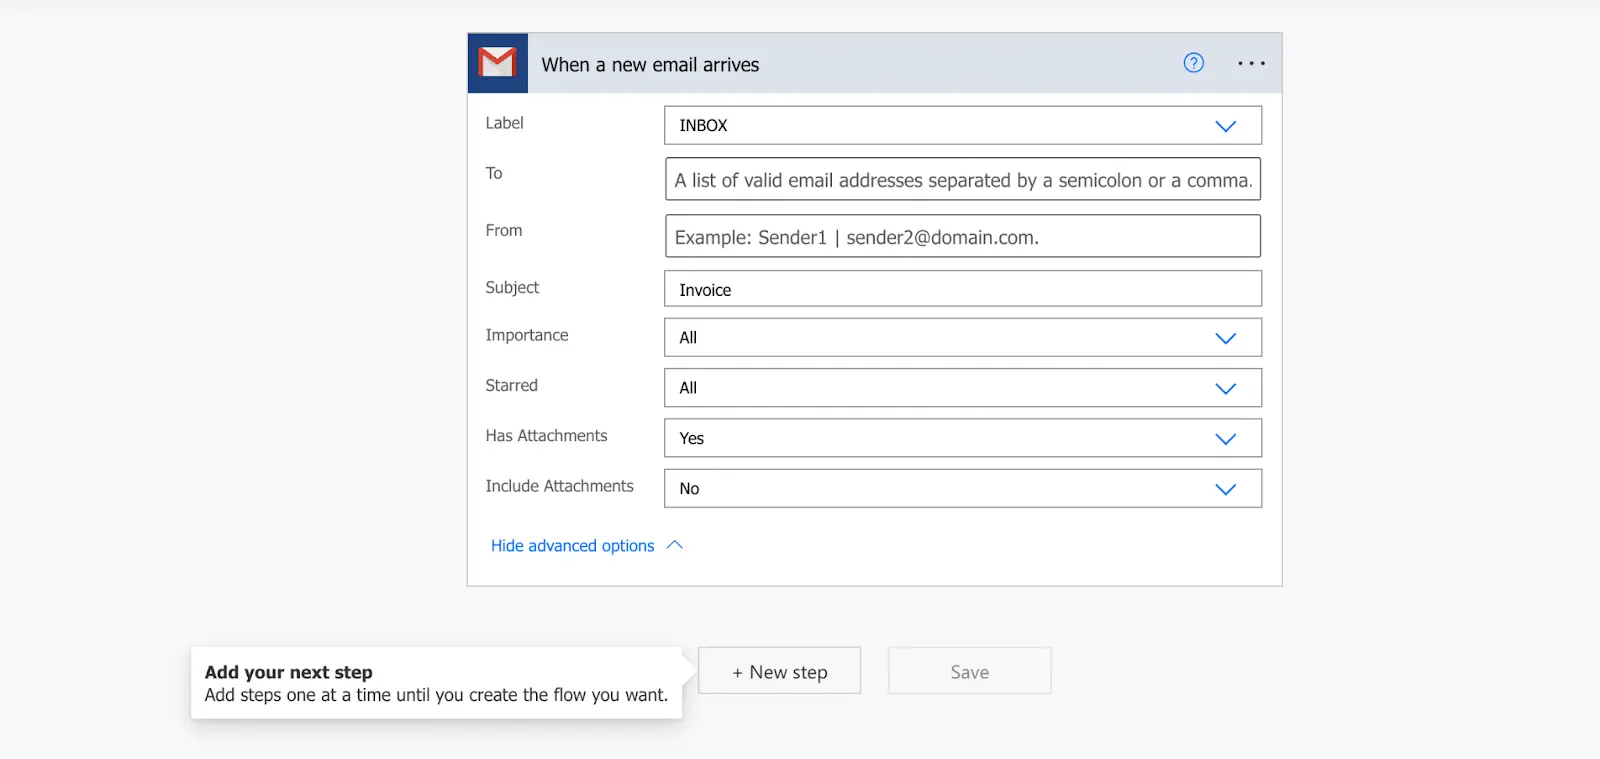
Step 6: Go to flows, and select create an automated flow. And choose the trigger that you want. In this case, we will select Recieve email on Gmail and create.
Step 7: You’ll see a flow where only Gmail trigger is added. Select the required option. I’ll add a filter where in it processes emails with invoices in the subject line and has an attachment.
Step 8: Add the next step for processing the invoice using the AI builder. Select +New Step and select AI builder. Select “Extract custom information from documents” and select your AI model from the drop-down. Add the document type and select attachment content for Form.

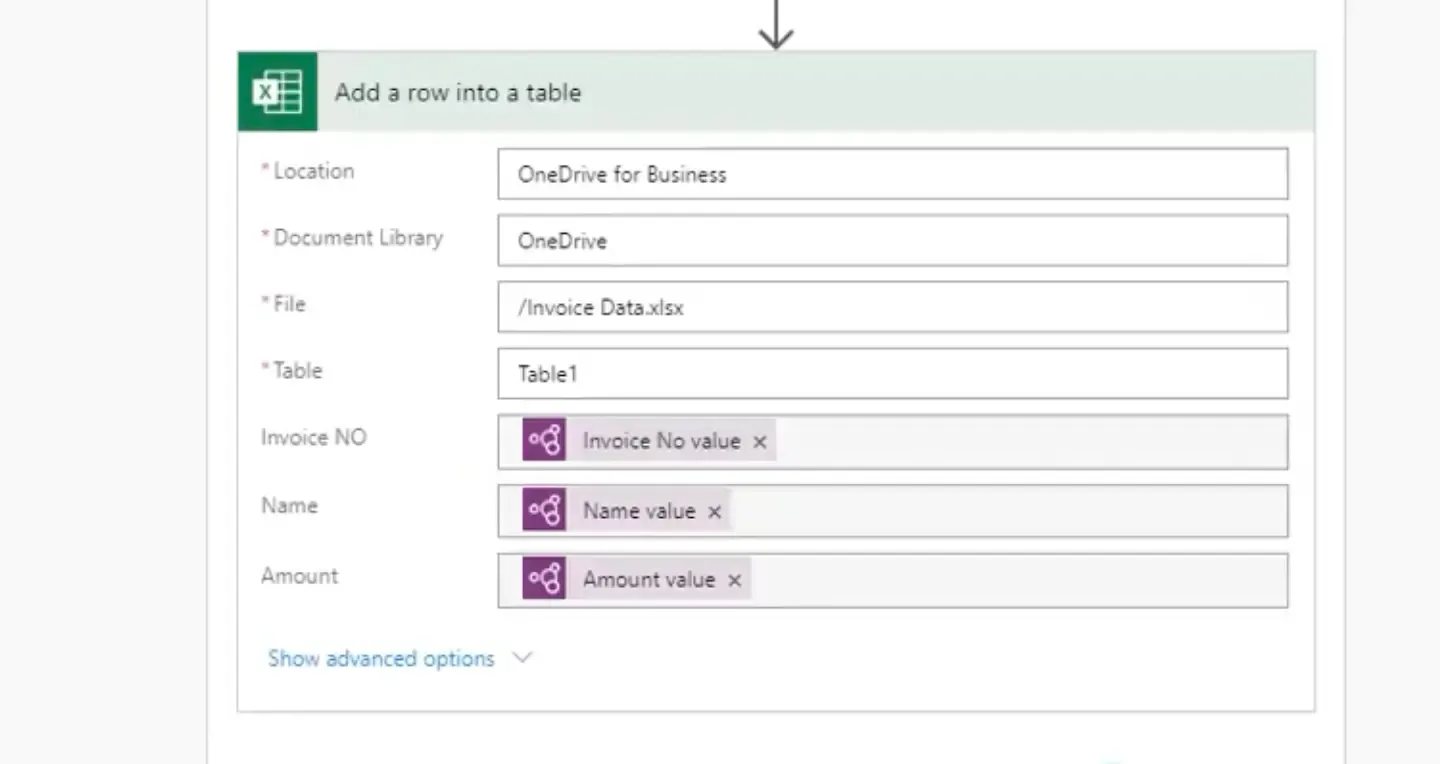
Step 9: Select New Action and select Excel. Select add new row as you want to extract information from the invoice and add the data into a new row in your Excel document.
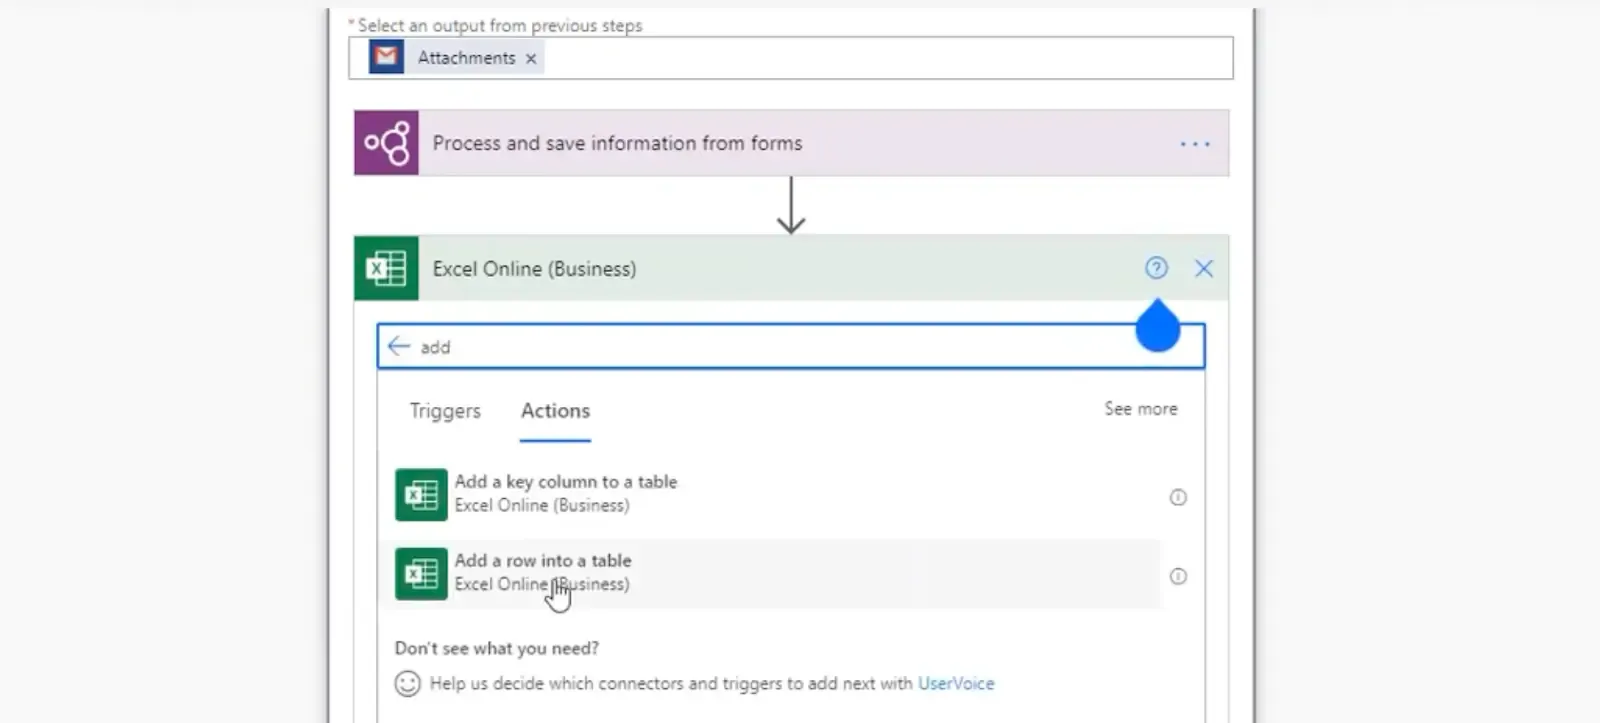
Step 10: Input all the locations of your excel, the table, and the column data from the drop-down. Here, you will assign the data extracted from the invoice to the correct columns in your excel.
Step 11: Once done, select save and Test the Flow by sending an email with an invoice to the email mentioned in the flow.
You can check the flow's activity and progress by checking My Flows or Monitor > Cloud Flow Activity.
We need to add more steps to add more checks, validations, and approvals.
Triggering and Responding to Power Automate Flow steps in Business Process Flows
How to Trigger an Approval from a Business Process Flow
When to use Power Automate?
Microsoft Power Automate can be powerful if used properly. Here are some scenarios when you can use Power Automate:
When all your process elements are mapped out.
Before you even start creating your Power Automate flow, you need to map out all variables and all the stages in the entire flow. Why?
You’ll have to create all the variables in Microsoft Power Apps. Therefore, it is a great exercise to map out all elements: variables, AI models, stages, conditions, connectors, and templates, well before you start creating on the Power Automate platform.
When your process is sequential.
Most of the flows follow the trigger and action approach. Creating loops is difficult. It is advisable to convert your processes into sequential steps. If you need loops, make sure you work with a developer.
When you have access to all the admin accounts.
If you’re connecting two applications, you need to have admin rights to both accounts. Make sure you have the right permissions before you start working.
No Credit Card required. Forever free plans.

Who can use Power Automate?
Anyone can use Power Automate, coder or a non-coder, to automate any kind of task which is manual, repetitive, and follows a set of rules. Anyone with an email id can use Power Automate with a free plan. Here are the best use cases for using Power Automate:
Freelancers - Freelancers are solo entrepreneurs and generally work with a small team or by themselves. Freelancers can use Microsoft Power Automate to automate manual tasks like setting up autoresponders, alerting when they receive a message on email, automatically posting on their social media accounts, and more.
Managers - Managers working for enterprises or brands can use workflow management software to create automated alerts, sync data across applications, set up OOO messages, and more.
Finance Department Users - A lot of finance tasks are manual. Power Automate can be used to set up workflows for approval processes, invoice processing, and more. It can also be used to automate accounts payable on Business Central.
Entrepreneurs - Handling a business is no easy task. Entrepreneurs can automate multiple aspects of their business with automated workflows like sending a thank you message, getting alert notifications when a customer sends an email, syncing customer information across platforms, setting up automated email responses, and more.
Here, we’ve listed some of the users for Power Automate, but frankly, it can be used by anyone to automate any task!
Limitations of using Microsoft Power Automate
Power automate is a great platform for people looking to automate manual processes. It has many upsides, but here are some cons of using Power Automate.
Difficult for first-time users
Microsoft Power Automate is easy to use for 2-step connections like connecting Youtube and Twitter, Email and Team chats, etc.
But the process gets progressively difficult when you’re trying business process flow. The entire process is set across multiple platforms and might require knowledge like WDL or creating JSON files which are a little confusing for a non-coder.
Need Office 365 to use it
If your organization uses Microsoft Office 365, you’ll have most of the tools. But if you don’t have one, you’ll have to either buy one because to use Microsoft PowerApps, you need a license.
Need Admin access for Business Process Flows
When you’re creating a business process flow, you’ll be working with Dataverse (known as Common Dataverse earlier) which requires admin rights. You won’t be able to use all the features of Business Process Flows without admin access.
Not a stand-alone application
Microsoft Power Automate is not a stand-alone application. It is available via Microsoft Power Apps.
Security issues
Attackers can use the automated workflows to download company data, extract passwords, or send malicious applications to your customers. In one instance, Microsoft announced that they found attackers downloading data from MNC organizations for over 200 days.
Microsoft Power Automate flows to bypass security gateways which makes it possible for any third person who has access to a single company email, to get access to the entire company’s data.
Difficult to control access to Power Automate
If your company provides an Office 365 license to all the employees, and several people have the ability to create workflows, it becomes difficult to keep license limitations in check.
Data Backup stays for 30 Days.
Your workflow data stays in the system only for 30 days. This becomes difficult if you use workflows to maintain audit trails and compliance-related activities.
Limitations on workflows
You can only use 250 actions per workflow (around 90 for free trial users). The limit can get exhausted quickly if you use loops to repeatedly check the conditions.
Non-intuitive navigation for simple tasks
Microsoft Power Automate can be non-intuitive in certain scenarios. For example,
- Connections are added via the option under Data, not the Connector option in the navigation menu.
- There is no save option. There is a save as option but saves a copy of your existing workflow.
- Error messages are frequent and a proper explanation of the cause does not accompany the error. You'll lose the entire process if you save without resolving the errors.
- Power automate workflows can run without a warning and there is no option to stop that.
OCR Tool is not advanced
The OCR tools for data extraction under the AI Builder are not as advanced as other tools present in the market. [Source]
Nanonets for Business Automation
Nanonets is a no-code intelligent automation platform that helps businesses automate manual tasks with smart workflows without the IT team. Nanonets provides its users with an intuitive interface, drag and drops modules, and extensive customer support to make business process flow automation a breeze. Furthermore, you can set up Nanonets in 1 day without any external help!
Nanonets is a secure platform with GDPR and SOC2 certification. With role-based access options, you can control who can create workflows and gain access to the company data.
Here are some features that make Nanonets a perfect choice for Business Process Automation:
- Modern UI visual editor with drag-and-drop elements to create workflows of your choice
- Advanced OCR API, which extracts data with >95% accuracy.
- Integrates with 5000+ applications via API and Zapier.
- Strictly no-code environment - No need to write a single code to automate business process
- Available on cloud and on-premise hosting options for your requirements.
- Maintain data logs for every action taken on the platform and be ready for audit every time.
- Deliver automatic updates to relevant stakeholders directly in their inboxes
- Role-based access control to restrict platform access and improve security
- No hidden charges
- 24x7 online chat support and personal client managers
Nanonets can be used for several use cases:
- Financial Automation Platform - Invoice Processing, Accounts Payable, Accounts Receivable, Ledger, Book Keeping, Spend Management
- Banking Automation Platform - Claims Processing, Customer Query Resolution, Bank Statement Processing
- Logistics Automation Platform - Sales Order Matching, Vendor Management, Inventory Management
- Healthcare Automation Platform - Patient Scheduling, Survey Digitization, Patient Experience
- Retail Automation Solution - Customer Service, Customer Onboarding, Inventory Management
- Insurance Automation Platform - Underwriting, Claims Processing
- KYC Automation Platform - ID verification, Passport OCR, License OCR
- Document Conversion - Convert pdf to text, image to text, website to text, image to excel, pdf to csv,
and more.
Nanonets vs Power Automate
We’ve seen how to perform a similar task on Nanonets and Power Automate. Through the steps, we saw some differences in how the platforms operate. In the table below, we will compare the Microsoft Power Automate and Nanonets platforms.
| Feature | Nanonets | Power Automate |
|---|---|---|
| User-Friendly | Very easy to use with a visual editor and intuitive interface. | Can be confusing for first-time users as multiple steps are performed across different platforms (e.g., Power Automate, Power Apps, Dataverse). |
| Coding Expertise | No-code platform. No need to write a single line of code. | Drag-and-drop interface, but working across multiple apps can be confusing. |
| Free Trial | Yes, includes a forever free model. | Free model available, but requires working in a Microsoft environment with limited apps. |
| Security | Secure platform with SOC2 and GDPR certification, role-based access, and a controlled data environment. | Secure, but flows can bypass security requirements, potentially exposing company information. |
| Accessibility | Cloud data is easily accessible by users on the go. | Data stored in the cloud can be accessed by users via applications. |
| Complexity | Drag-and-drop interface makes it easy to use. Even complex workflows can be created without code. | Easy to set up basic workflows but requires a developer for complex processes. |
| Integrations | Can integrate with 5000+ apps via Zapier. | Supports 500+ connectors. |
| OCR Capabilities | High-quality OCR API with 95%+ accuracy. | Great OCR capabilities. |
| Business Process Workflows | Can automate manual parts of business processes such as document handling, approvals, and incident management. | Supports data capture, document processing, and approvals. |
| Pricing | Transparent pricing starts at $499/month. Additional documents cost $0.1 each. Custom options available. | Pricing starts at $500/month for flows. Add-ons like OCR ($500/month) and RPA ($100/flow/month) increase costs. |
| Support | 24x7 chat support, email support, and a dedicated customer manager. | No live chat support. Direct support starts at $180/month. |
Is Power Automate the correct choice for you and your business?
Whether Microsoft Power Automate is a good choice for your business depends on multiple factors mentioned below:
Availability of Developers in your team
A non-coder might not be able to use Microsoft Power Automate at its fullest capability. You’ll need to allocate some developer resources to carry out complex operations, fix errors, integrate tools, and maintain variables as required.
Budget
Microsoft Power Automate plans under per-user and per-flow categories. Per User, plans have low performance. Per-flow plans have the highest performance, but the plan costs around $100/flow/month. This price will increase with add-ons like AI builder and additional RPA capabilities.
If we consider 10 flows with AI builder, the price reaches $1500/month. And it keeps increasing as you can’t control who creates a new workflow.
In contrast, tools like Nanonets cost $499/month. Check out Nanonet's pricing plans.
Requirements
Do you need to connect simple tools or do you want to carry out complex tasks? Do you need it to automate paper document processes, build front-end apps for employees, connect business software, etc?
Based on your requirement, you need to evaluate other tools along with Microsoft Power Automate, rate your experience, and select the alternative.
You can consider easy-to-use automation software like Nanonets. Start your free trial or request a free product tour.
Microsoft Environment
If you’re already using the Microsoft environment, shifting to Power Automate can be easy as it integrates easily with existing Microsoft products.
IT team supervision
In order to prevent license over-charges, IT teams need to supervise account activity, stay alert on who is creating workflows, and try to keep checking for malicious workflows. IT team needs to carry out these tasks to prevent phishing activities actively.
Strong Security
As we discussed above, Microsoft Power Automate has some security breaches. In order to prevent this from happening, you need to have a very strong security check, an active team looking out for anomalies, and monitoring account usage on a regular basis.
If you have dedicated resources, Microsoft Power Automate might be a good choice for you.
Requirement of OCR capabilities
Microsoft Power Automate has OCR API under AI builder. The OCR model is not on par with other vendors in the market like Nanonets. If you rely heavily on the OCR features to automate your manual processes, you can opt for options like Nanonets.
Time to Implement
With admin requirements, the implementation of Microsoft Power Automate can be delayed. If you want to start immediately with no delays, this might not be the right choice for your business.
Even with the above-mentioned pointers, your team must evaluate Microsoft Power Automate based on all your requirements and then come to a solution. According to the pointers, Microsoft Power Automate might be a good choice for organizations using a Microsoft environment, having a lot of IT staff to overlook implementation, fewer flows, and high budgets.
Conclusion
Business process automation will become a necessity for businesses due to improved efficiency, productivity, and security. The market is still nascent and will improve over time with better features and improvements. Businesses need to start adopting the technology now to reap the benefits in the future.
In this blog, we evaluated two BPM software, Microsoft Power Automate, and Nanonets, for process automation.
Microsoft Power Automate has a lot to offer to enterprises, from powerful integrations to enhanced connectivity options (more like Zapier!). As the software continues to evolve, it will be interesting to see what the new additions to the platform will be.
Frequently Asked Questions (FAQs)
Is Microsoft Power Automate for free?
Microsoft Power is not free for all users. You can use the free version to access the Microsoft Power Automate platform with limited capabilities. The platform is free if your organization has access via Microsoft Office 365 subscription.
What is Power Automate vs Microsoft Flow?
Microsoft Flow is the older version of Microsoft Power Automate. On the branding side, there is no difference between Microsft Flow and Microsoft Power Automate but there are some differences between the two platforms if we look at some features.
Microsoft Power Automate has cloud deployment and does not overburden your systems as Microsoft Flow did. Microsoft Power Automate is a low code environment as compared to its earlier counterpart, Microsoft Flow. Microsoft Flow was more driven towards creating rule-based workflows whereas Microsoft Power Automate is geared towards enhanced unattended robotic process automation in organizations.
What can Microsoft Power Automate automate?
Microsoft Power Automate can automate any data sync between 500+ different data sources, create front-end apps for efficient data collection, automate manual processes and send real-time notifications to required stakeholders. Microsoft Power Automate can automate any process as required.
Is Power Automate an RPA tool?
Yes, Power Automate is a Robotic process automation tool. It can be used to automate anything from a data sync to complex multi-step processes like invoice management, approvals, and more.
What is the difference between Power Apps and Power Automate?
Microsoft Power apps are geared towards creating a front-end User interface for efficient data collection by using connectors. Microsoft Power Automate gives users the ability to use the data from the interface to carry out further activities like storing, analyzing, or enhancing.
What are the different elements on Power automate screen?
When you enter Microsft Power Automate, you will be greeted with a screen that resembles the image. Let’s look at what every component in the left-side navigation menu can do for you.
Action Items
Action items give you an overview of all your business processes and any pending approvals requests.
My Flows
Shows all the flows you’ve created in your account at a glance.
Create
Lets you create a new workflow.
Templates
This option leads you to the workflow template library which contains templates segregated by your requirement. You can also use the search bar to find a template that suits your requirement.
Connectors
Connectors just list all the software that can be connected. This is not the place where you can connect your software with Microsoft Power Automate. That option sits under Data. (that’s a little confusing)
Data
This is one of the most important options in the navigation bar after +create. Data allows you to create tables (database to collect, sync, or store data), connections (shows all software that you’ve integrated with Power Automate), custom connectors, and gateways (create a gateway to store data on-premises but still share the data with the cloud when required securely).
Things to note: Basic connectors are available in the free trial version. You can connect your account only. You need admin access to get the API key to connect to most other applications.
Monitor
Shows an overview of cloud and desktop flow activity. It has another option where it shows your system health where desktop flows are actively running.
AI Builder
AI Builder helps users extract information from text, images, structured datasets, and documents. Users can choose from templates or create their own custom models.
Process Advisor
Process Advisor advises how current processes can be improved in two ways. You can either upload data from various sources or record yourself performing any activity.
Solutions
All your databases are added here which contain all variables you want to work with. You can create a new process by selecting the database you’re comfortable with.
Learn
Self-explanatory. It is your help section.